
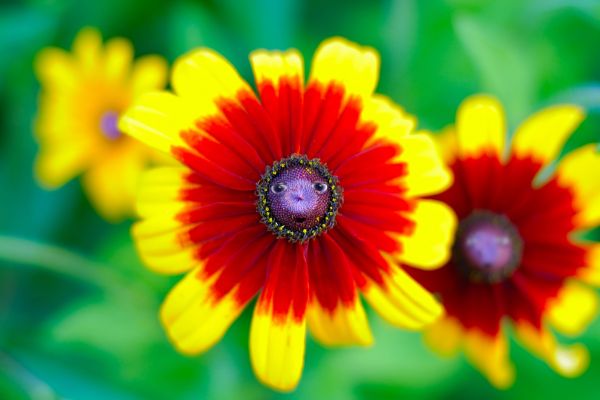
Original image
step 1 of 12
1 I started with the eyes, because I really wanted this to be about big glossy, kinda muppet looking eyes.
Make a circle with the shape tool. It doesn’t matter what color because you can always change it later. I used the eyedrop tool to pull a nice dark color for the eye.
Make a circle with the shape tool. It doesn’t matter what color because you can always change it later. I used the eyedrop tool to pull a nice dark color for the eye.

step 2 of 12
Okay, here’s my secret to the eye: inner shadow and inner glow.. The inner shadow is the depth of the pupil; the glow is the “whiteâ€.

step 3 of 12
Then I add highlights to make the eye glossy. I make the first one also with the shape tool in white and then create a mask with a gradient to fade it from transparent to pure white. I then copy it twice and resize and turn the two to create a better effect. I put all of these in a group to keep things organized.

step 4 of 12
The eye looks good, Let’s make an eyelid. I used the eyeball to create a selection and then made a new layer (apple-J) using the source image and moved that layer above the eyeball. While still selected, I use the spherize filter on the eyelid layer. Then I use the lasso to cut out the area where the eye will show. I go in with the brush tool and darken or lighten bits and pieces to create the illusion the way an eyelid would kind of lip out at the edge, pulling light and dark colors from the actual picture and using a 50% opacity and 0 hardness.

step 5 of 12
I add an inner shadow and a drop shadow to this eyelid layer to make it even more dimensional.

step 6 of 12
It still doesn’t look real enough for me, so I add a layer between the eye and eyelid and go in with the brush tool and make some nice shadows. I also add a layer above the eyelid and use the brush tool to add some highlights on the lid to make that edge pop out even more.

step 7 of 12
One eye done equal two eyes almost done. I take the whole eye group and duplicate it and flip it horizontally. But it doesn’t match that side of the flower, that side is more purple and less pink, so I use the same eyelid layer to make a selection and spherize it like in step 4. I go in on both the eyelid layers again, and using the smudge tool at a low strength and 0 hardness, pull a bit of the edges out so they blend better with the rest of the flower.

step 8 of 12
I’m happy with the way the eyes look but they look like they are just resting on top. See how there is the light purple, feathery bits in the middle? I imagine that if this were real, that part would go over the eyes. So, I use the source layer to make a selection with the lasso, tracing the feathery edges and move it above the eyes. You can see this more on the right side than the left side.

step 9 of 12
I want the center to look more like a nose and the whole centerpiece to look more sculpted really, so I start pushing and pulling the source layer (a copy of course, so the original is never touched) with the smudge tool to make a nose. I also go in with the burn and dodge tool to sculpt the face a little.

step 10 of 12
Now, for the mouth. This is easier than it looks I think. Brush tool with 0 hardness in black. That’s it! With a careful eye and going in with a soft eraser and a steady hand is all it takes.

step 11 of 12
I create some more shadows to the face to create even more dimension and character.

step 12 of 12
Finally, there’s the matter of the flower in the background. Even though it is really blurry, to help the illusion of this flower, we would want to make all the flowers have a face, but maybe not the same expression. So, I take all the face layers, group the, duplicate the group and merge them into one layer, move it and resize it onto the blurry flower and then use a Gaussian blur to match the blur of the source picture. But we don’t want the same exact expression so with a touch of the eraser and the smudge tool, we make a litle smile. Ta da!

Final result
Pxleyes
Photography and photoshop contests
We are a community of people with
a passion for photography, graphics and art in general.
Every day new photoshop
and photography contests are posted to compete in. We also have one weekly drawing contest
and one weekly 3D contest!
Participation is 100% free!
Just
register and get
started!
Good luck!
Follow us:


© 2015 Pxleyes.com. All rights reserved.