
Original image
step 1 of 6
1. Original source image
2. Removed the labeling using cut paste, clone, and masking.
3. Removed the white lines same method as in 2.
4. Added extra "fuzz" on the edges using again copy paste, clone, and masking
2. Removed the labeling using cut paste, clone, and masking.
3. Removed the white lines same method as in 2.
4. Added extra "fuzz" on the edges using again copy paste, clone, and masking

step 2 of 6
1. Changed colour with Hue Sat. and shaped using free transform.
2. Bumped up the contrast by duplicating layer, Filter > Other > High Pass 5> Blend Mode to hard light.
3. Created new layer for dodge burn. also used bevel inboss to create the eyelid.
4. Added the mouth that was simply drawn with the brush and pen tools.
2. Bumped up the contrast by duplicating layer, Filter > Other > High Pass 5> Blend Mode to hard light.
3. Created new layer for dodge burn. also used bevel inboss to create the eyelid.
4. Added the mouth that was simply drawn with the brush and pen tools.

step 3 of 6
1. Created eyeball by: Draw white circle, add gradient overlay, render clouds and blend, the pupil was created by rendering fibres and transforming polar co-ordinates.
2. Added Eyeball to image. Desaturated original image to desire.
3. Added arms by using the texture from the edge of the ball.
4. Repeated most steps to create the Red character.
2. Added Eyeball to image. Desaturated original image to desire.
3. Added arms by using the texture from the edge of the ball.
4. Repeated most steps to create the Red character.

step 4 of 6
Frame was created in PS a long time ago.
Followed tut: http://psd.tutsplus.com/tutorials/photo-effects-tutorials/how-to-illustrate-a-wooden-frame-on-a-wall-scene/
Followed tut: http://psd.tutsplus.com/tutorials/photo-effects-tutorials/how-to-illustrate-a-wooden-frame-on-a-wall-scene/

step 5 of 6
1. Added background to frame.
2. Added characters to image.
3. Added reflection image. Blend mode = screen > Opacity 12.
4. Some extra work on reflection. Added glare from top left.
2. Added characters to image.
3. Added reflection image. Blend mode = screen > Opacity 12.
4. Some extra work on reflection. Added glare from top left.

step 6 of 6
Created simply texture background for the wall.
Added shadow to frame.
Rendered lighting effects.
Added shadow to frame.
Rendered lighting effects.

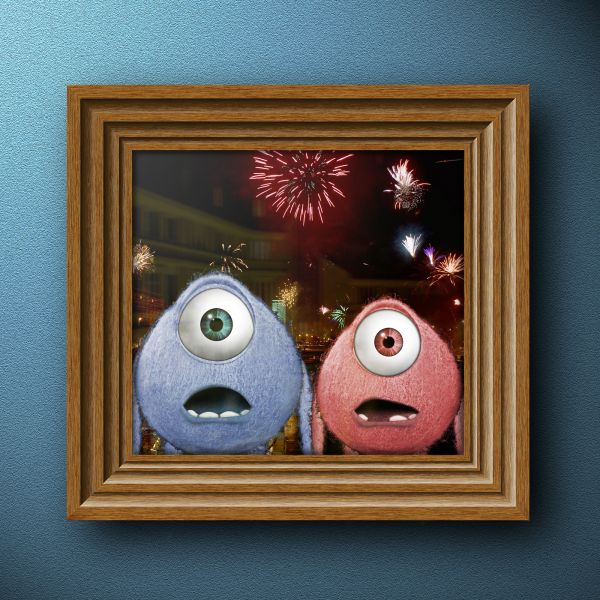
Final result
Pxleyes
Photography and photoshop contests
We are a community of people with
a passion for photography, graphics and art in general.
Every day new photoshop
and photography contests are posted to compete in. We also have one weekly drawing contest
and one weekly 3D contest!
Participation is 100% free!
Just
register and get
started!
Good luck!
Follow us:


© 2015 Pxleyes.com. All rights reserved.