
Original image
step 1 of 15
A portion of source is chopped which I plan to duplicate many times, rotating layers, to form nest.

step 2 of 15
Another piece of chop is modified with the liquify tool to add more layers.

step 3 of 15
Still more layers have been added, some flipped and some rotated into position.

step 4 of 15
Robin babies (my photo)

step 5 of 15
Some branches have been pulled out with smudge tool, and baby birds along with the lining from their nest is chopped and inserted into nest just completed.

step 6 of 15
Robin's head is pulled from branch with smudge tool.

step 7 of 15
Another section of branch is removed with lasso tool to use for robin's breast.

step 8 of 15
Bird is finally pulled into shape. Now the details will be added with the brush and smudge tools. A little extra orange is airbrushed on for breast color which is vibrant on robins in the spring.

step 9 of 15
This dogwood source was duplicated for the background and merged together. I gave it a slight gaussian blur to help set it back to help the perspective.

step 10 of 15
These are the white dogwood blossoms used in the foreground. After chopping, I duplicated several times and flipped a couple so that repeats wouldn't be noticeable.

step 11 of 15
Robin's nest is moved over the dogwood background ready for the closeup dogwood blossoms to be placed.

step 12 of 15
Here I enlarged the canvas both at top and bottom and decided to use a robin at the top, too. It is the same bird, just duplicated, then I moved his tail downward with the liquify warp tool.

step 13 of 15
Here the butterfly is started from the beach grass by using liquify warp tool on a piece of the grass.

step 14 of 15
A wing is completed here by duplicating pieces and rotating and scaling them into position. Then first wing is duplicated and flipped for other side. The two are then merged.

step 15 of 15
Color is added using a new layer with a gradient fill, then color outside of butterfly is erased, leaving color to merge into the wings. Burn tool is used to shade wings, and scale and distort tools to shape and change sizes. So many steps went into this entry, that it is impossible to go into detail on everything, but I have tried to cover most of the steps.

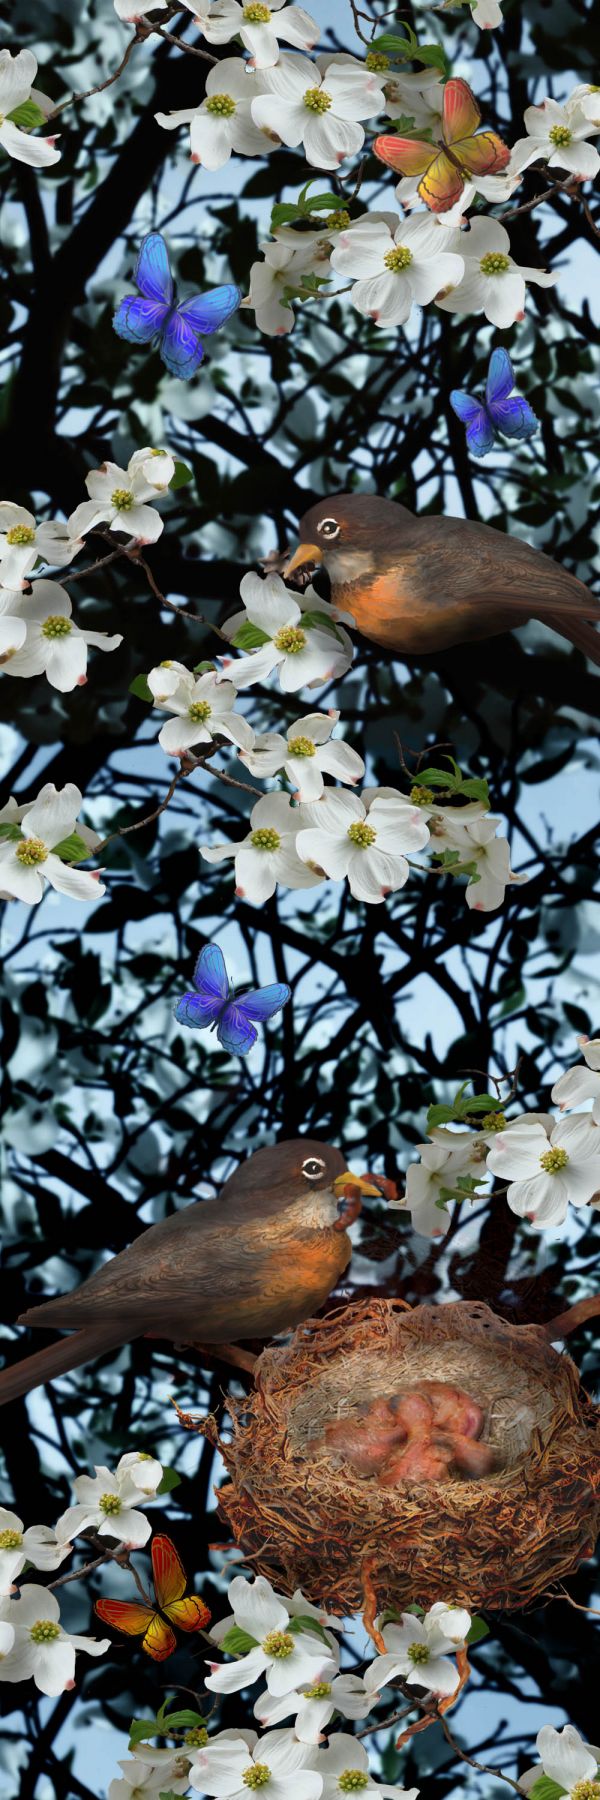
Final result
Pxleyes
Photography and photoshop contests
We are a community of people with
a passion for photography, graphics and art in general.
Every day new photoshop
and photography contests are posted to compete in. We also have one weekly drawing contest
and one weekly 3D contest!
Participation is 100% free!
Just
register and get
started!
Good luck!
Follow us:


© 2015 Pxleyes.com. All rights reserved.