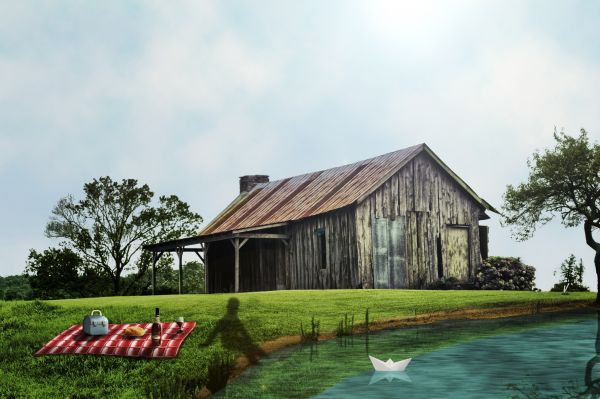
A Work in Progress: Shadow by the Pond


This guide was made for entry:
Shadow by the Pond
In Contest:
source combos


step 1 of 8

Step 1: The pond

A. Used inverted freeze masking to select the part of the field where the river will be.

B. Cut selected area onto a seperate layer, then used clone stamp to delete most of the weeds from it.

C. Motion blur on the cut area.

D. Hue and saturation adjustments to turn the cut area blue.

E. Used clone stamp and healing brush to delete the fencing poles from the grass.

F. Fixed the edge of the water.

G. Used a brown brush set to hue blending to color the edge of the pond. Last picture shows small adjustment with clone stamp.

Creation of Shadow by the Pond: Step 1

step 2 of 8

Step 2: Reflection in the pond

A. Copied the edge of the pond out with the polygonal lasso and flipped it vertically.

B. Used distortion to warp part of it into shape--I split it from the other half to make the distortion more managable.

C. Distorted the second half and merged it with the first.

D. Used overlay blending, then saturation adjustments, then opacity adjustments, to get to the shown reflection result.

E. Copied out tree with polygonal lasso and flipped it.

F. Used color range select to remove the cloud part of the tree.

G. Put the tree in the water and repeated step D, this time with a bit of motion blur.

Creation of Shadow by the Pond: Step 2

step 3 of 8

Step 3: The picnic cloth.

A. Used healing brush and clone stamp to remove the numbers/letters off the 1 and 2 buttons.

B. Cut them out and copied them to a seperate document, then used "Edit > Define Pattern" to turn it into a pattern.

C. Applied pattern to a large square which will be the cloth.

D. Merged the square layer with a blank layer to permanantly apply the pattern (don't yet know of a better way to achieve this).

E. DIstorted the square to look more cloth-like.

F. Hue/saturation then contrast/brightness adjustments to make the cloth a strong red/white.

G. Slight desaturation, then used a transparent soft brush to apply shadow underneath the cloth.

H. Dodged and burned to give it a bit of waviness.

Creation of Shadow by the Pond: Step 3

step 4 of 8

Step 4: The Shadow

A. Cut out the shadow with the pen tool.

B. Flipped him horizontally. Used perspective adjustment to make the shadow appear upright. Also temporarily cut his left arm onto a seperate layer.

C to F. Basically just alot of moving and shaking here. I didn't have a straight idea how I was going to do this so you see alot of random cutting and shifting to try and get the desired result. Tools used: eraser, transform, poly lasso, and clone stamp.

G. Finally got a good pose, so I copied all the loose body part layers as a backup and merged the original ones. Selected the whole thing and filled it with grey.

H. Used guassian blur and opacity adjustments to make it look like an authentic shadow. Also erased parts of the body and arms to make the whole thing a bit cleaner and more slender.

Creation of Shadow by the Pond: Step 4

step 5 of 8

Step 5: The wine, bread, and glass

A. Cut out the wine bottle with the pen tool.

B. Pasted bottle onto the picnic cloth (ignore the horizontal rotation thing, I was just trying a different position out). Also freeze masked the top of the bottle and used a 17% eraser to make the glass look transparent.

C. Copied the bottle, distorted it.

D. Selected the bottle copy and filled it with black, then used guassian blur and opacity adjustments. Also dodge and burned the bottle a bit to make it look shiny.

E. Cut the bread onto the picnic cloth and added a few crumbs with the clone stamp. I also added a shadow like in steps C-D but I unfortunately forgot to show this.

F. Cut out glass with the pen tool.

G. Alot here...pasted the glass beside the wine bottle, used clone stamp to copy a bit of wine from the bottle into the glass, used dodge and burn to make it look shiny, and finally added a shadow using the aforementioned method. Aldo dodge and burned the bread a bit.

H. Final arrangement and result. I also removed a bit of wine from the bottle with the clone stamp, using the nearby glass as the clone source.

Creation of Shadow by the Pond: Step 5

step 6 of 8

Step 6: The lunchbox

A. Selected the metal hull of the gas meter with the (you guessed it) pen tool.

B. As you can see here, I first made a template of the lunchbox with white and grey on which I will build. Pasted the metal into the document.

C. Warped it to fit the template. Here I basically just just alot of copying and warping to get to the result in D. I also copied a bolt from the meter guard picture for use as the lunchbox latches.

D. Final product of C. I also used brightness adjustments to darken the side of the lunchbox. (All these pieces are on seperate layers.)

E. Flipped the whole thing around and used bevel and drop shadow on the latches.

F. A bit more warping to make the whole thing correctly proportionate.

G. Copied a guard bar from the meter guard picture with the...do I even have to say it again? Pen tool...

H. I tried using warp here to bend the bar into a lunchbox handle which, as you can see, failed miserably. This brings me to step I.

I. Copied the left half the warped bar and deleted the shoddy right half. Mirrored it. Also used transform to shrink them down a bit, leading to the result in J.

J. Copied one last chunk of the bar from the meter guard to complete the handle.

K. Just a bit of erasing here to make it blend it.

L. A bit of dodge and burn and an added shadow, using the same method in the wine, bread, and glass step.

Creation of Shadow by the Pond: Step 6

step 7 of 8

Step 7: The boat

A. Cut the boat out with the...(yeah no kidding)...pen tool.

B. Pasted the boat into the pond.

C. Used a bit of clone stamp, easer, and healing brush to even up the bottom of the boat.

D. Made a horizontally flipped copy of the boat and turned it into a reflection with overlay blending and opacity adjustment.

E. Selected a circular area around the boat (now working on the pond layer) and used the zig-zag filter tool to make a pond ripple as shown.

F. Finished result. I don't know who the guy was who scribbled that silly face there.

Creation of Shadow by the Pond: Step 7

step 8 of 8

Step 8: The sky

A. Selected the house with the...oh forget it.

B. Copied the house onto a seperate layer. Also copied the original homstead layer and made it inivisible for now. Then I erased the area behind the house on the visible layer, keeping the field. This effectively splits the house (lets call it layer 1) and the field (layer 2) apart, keeping an image of the entire thing in the background (layer 3). (I also copied layer 3 as another backup.)

C. The product of B.

D. Now, on Layer 3, I used color range select to select the tricky grey bits between the the tree branches and delete them. There was a bit of cloud left over which I just erased. Filled the blank area up with a temporary grey.

E. Re-filled the blank area with a blue/light blue gradient overlay.

F. On a new layer, I used the cloud filter to make some clouds. Set the cloud layer to overlay.

G. Used a transparent eraser with a 48% flow to make the clouds look more scattered.

H. Repeated steps F-G with a slightly more opaque eraser. Forgot whether or not I used overlay again.

I. After backing up and merging the whole image, I used lighting effects filter near the top edge to give the place a bit of sunlight. Finally, I did the completely unnesscary step of using the clone stamp to make the leftmost tree's top look a bit more jagged (it was too even). That's it! Finished!

Creation of Shadow by the Pond: Step 8

Final result

Creation of Shadow by the Pond: Final Result

LOGIN or REGISTER FOR FREE
to rate this guide and create your own guides.