
Original image
step 1 of 8
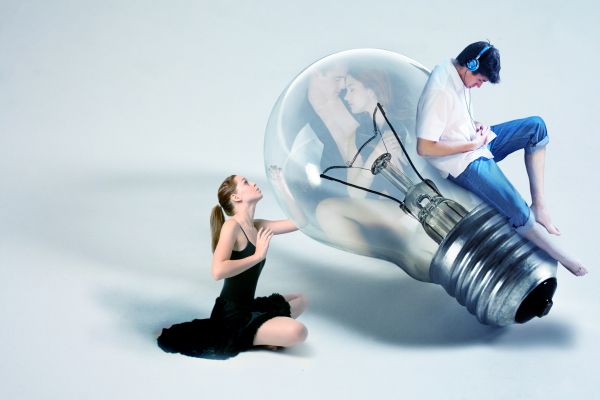
Gather the stock.
I made the lightbulb picture more contrasted and then added the couple inside. I used many blending styles and erased around with a soft brush.
I made the lightbulb picture more contrasted and then added the couple inside. I used many blending styles and erased around with a soft brush.

step 2 of 8
I flipped the stock horizontally and I cropped the women using pen tool.
Then I used Curves to make it fit.
Then I used Curves to make it fit.

step 3 of 8
I put that bit of her arm on a separate layer and used curves, once again. Then I changed the opacity and erased around a bit with a low opacity eraser.

step 4 of 8
Now I crop the guy out with pen tool.

step 5 of 8
I used warp tool (in PS CS3) to alter his position/body angle slightly. Then again, played with curves, brightness, contrast. Used burn tool at some places.

step 6 of 8
Add more shadowing.
By making another layer, using the brush tool and clip mask.. OR use burn tool.
By making another layer, using the brush tool and clip mask.. OR use burn tool.

step 7 of 8
Finally add headphones. Cropped out and used brightness/contrast.

step 8 of 8
Pxleyes asked me to prnt screen permission so here it is.

Final result
Pxleyes
Photography and photoshop contests
We are a community of people with
a passion for photography, graphics and art in general.
Every day new photoshop
and photography contests are posted to compete in. We also have one weekly drawing contest
and one weekly 3D contest!
Participation is 100% free!
Just
register and get
started!
Good luck!
Follow us:


© 2015 Pxleyes.com. All rights reserved.