
Original image
step 1 of 17
Old boat source photo

step 2 of 17
Swan by wraggy at mf

step 3 of 17
Waterlily source photo

step 4 of 17
Source photo of ducks and swan by gracey at mf

step 5 of 17
Lily pads source photo

step 6 of 17
Waterfall source photo by howaral at mf

step 7 of 17
Wedding day couple source photo by mikrash at mf

step 8 of 17
Lily pads are lassoed from source and moved over background.

step 9 of 17
The lily pads source is duplicated, moved end to end, then edges merged into background using eraser tool set at low opacity.

step 10 of 17
Waterlily is moved into work area to be duplicated (with alt key), then scaled (edit/transform/scale tool) to different sizes. I will moved these around from time to time until I get them where I want them in the end. Of course, larger flowers will be in foreground, then they will get smaller as they recede into the scene. Color changes are made using the hue/saturation tool and also the color balance tool.

step 11 of 17
Boat is lassoed and moved into scene, then scaled to size and burn tool used to shadow dark side and give it a reflection in the water. I had a fairy in the boat, just one of several I tried to use in the scene, but eventually I decided to leave out the fairies.

step 12 of 17
Here I have added the waterfall, much of which will be erased or at least blended into the rocks already there. Water at the base will be cloned into the lily pads to try to chanel the rush of the water into the pads, and off to left of scene.

step 13 of 17
I've decided to move the boat to the right side where the couple will be standing in the light rays.

step 14 of 17
Here the fairy is out and the couple is in. Photo of couple is reversed (edit/transform/flip horixontally) and soft airbrush is used to create continuation of light across the girl's skirt. Hair around their heads is chopped using the background eraser tool set about 17% discontiguous setting. I don't completely erase around it in order to have a slight halo of light around their heads. Otherwise, their heads would be against a dark background and would not show up at all. Back of man is darkened with burn tool.

step 15 of 17
With the paintbrush tool, oars are added to the boat, matching grays from side of boat.

step 16 of 17
Swans are both chopped and moved into scene, then must be sized according to their placement in the scene. Burn tool adds shadows to them, and I move them until I like their placement.

step 17 of 17
Last step was the brush application of the little stars which I found in the 'assorted brushes palette), then a little soft airbrush of light gray-blue set at dissolve mode was sprayed over star pattern and behind boat.

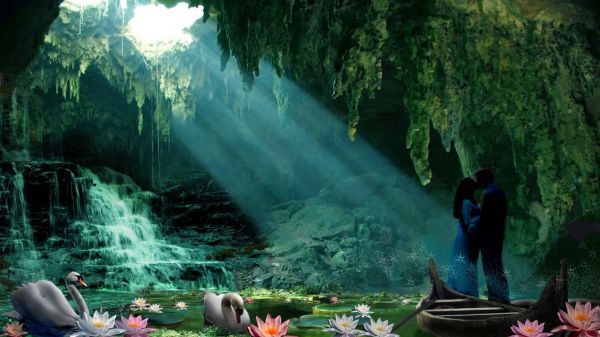
Final result
Pxleyes
Photography and photoshop contests
We are a community of people with
a passion for photography, graphics and art in general.
Every day new photoshop
and photography contests are posted to compete in. We also have one weekly drawing contest
and one weekly 3D contest!
Participation is 100% free!
Just
register and get
started!
Good luck!
Follow us:


© 2015 Pxleyes.com. All rights reserved.