
Original image
step 1 of 18
Take the pen tool and mask out all the non metal parts. I only selected the outlines of some parts (like the top metal part with the eagle) for more effect.

step 2 of 18
Then take a brush with a size you like, and start painting in the drips. Doesn't matter if it's sloppy, you can smooth it out with the eraser. My drips started out as straight lines. Then erased them into shape.
When you are done apply a blur to make the edges smoother. Zoom in on your drips and apply it so that you dont lose drip detail, but they will be nice and soft.
After that go to image--> adjustments levels. Take the whit and gray way over to black and move black slightly to the right. When the setting is right you will see the edges of the drips return, but much smoother. The rough painting is smoothed out this way.
The end result will look something like this:

step 3 of 18
Now copy the levelled channel and select the new copy. Aplly a gaussian blur. Mind the detail in the drips and make is smoother. I used 9.7
After that choose select all --> copy and then paste it in a new document. Save this as texture.psd
After that choose select all --> copy and then paste it in a new document. Save this as texture.psd

step 4 of 18
Now close the texture document and open the soon to be black and white one.
I applied a black and white adjustment and a levels adjustment to make it nice and dark. Then i merged it to one layer.
Then i chose select all---> copy
Now paste it into your watch file.
Be ware the you go to layer mode before you paste, or you will paste it in your channel. And that's no fun, trust me.

- : source
step 5 of 18
Now rotate and strecht the image so that the building fills your watch. I set the opacity to 50% so i could check this. After set it back to 100%

step 6 of 18
he next thing to do is crop the image. The castle now sticks out from you canvas, and that needs to be cropped. So just select the crop tool and drag around your canvas. Don't cut in your canvas, only the unseen parts.
Then apply a gaussian blur to the castle layer, i used a setting of 11.
Then apply a gaussian blur to the castle layer, i used a setting of 11.

step 7 of 18
Then apply the glass filter to the castle layer.
Set distort to maximum, right next to the tecture menu is a little button, click it and choose add texture. Now load the texture we just made.
Zoom in and set the smoothness really low, but make sure the noise is gone. When your happy, click ok.
Set distort to maximum, right next to the tecture menu is a little button, click it and choose add texture. Now load the texture we just made.
Zoom in and set the smoothness really low, but make sure the noise is gone. When your happy, click ok.

step 8 of 18
Since windows decided my updates needed and unwarned and sudden restart, i noticed i didn't save the psd file after making the drip mask. So that could be fun.
I loaded up the unsmeared selection (dont do this, we continue in a sec) and with the lasso roughly selected the drops so i can finish this tutorial. But mind that the pictures will be a little sloppier because of it.
Next part of the guide: After the glass filter, go to channels and load the selection of the first copy of the drip channel. So: Not the one you created them on, not the one we saved as a texture (3) but number two, with only a little blur and a levels enhancement.
Now select--> inverse and delete.

step 9 of 18
Now reload the last selection before we inversed. So that's channel copy two.
Make sure you have a black background and have the cut out glassfilter layer on top. Make a new layer in between and load the selection mentioned above.
Disable all layers but the new one, and fill the watch with black.
Again, excuse my neatness on these next pics, but have a heart, i lost all my files =)

step 10 of 18
Ok, now we got a lot of layer styles. Since it's black on black i suggest to just copy my settings for now, later on there is time to tweak.
Until after emboss you wont see much difference, but then you will see the effect and will be better able to tweak it by playing with the various settings.
But anyway, start off with drop shadow, i've set distance to 17, and size to 29 for now. My photoshop is in dutch but the settings are at the same place. Basicly you learn two things here.

step 11 of 18
No go to inner shadow and apply these settings. dont mind the blending style for now, when that changes i will tell.
I set the angle to 45 degrees, distance at 5 and the size to 43
I set the angle to 45 degrees, distance at 5 and the size to 43

step 12 of 18
Now on to inner glow, set the blending mode to multiply.
Set the glow color to black, and increase the size. I used 38 for now. The lower you put this the more shiny it will get. But i want that chocolate smooth look.
Set the glow color to black, and increase the size. I used 38 for now. The lower you put this the more shiny it will get. But i want that chocolate smooth look.

step 13 of 18
Now after all that blackness we are finally going to see some shiny parts =)
Go to bevel and emboss, set it to inner bevel, the depth to 103 and the size to 46.
Change the angle and height of the light to 120 and 65 degrees.
Also change the contour, look at my picture cause i have no idea what it's called.
Up the hightlights to 90% and set the shadow blending mode to overlay.
Now we start to see something

step 14 of 18
Go to contour and increase it while looking at your watch. Look at the highlights below, and set it to your liking

step 15 of 18
Now check satin. Put the blending mode to screen, with the color white.Opacity is at 76%
I set the angle to 141
Distance to 15 and size to 21
I set the angle to 141
Distance to 15 and size to 21

step 16 of 18
Now, still in satin doubleclick the contours icon and you should get a curve. Copy my settings by placing and dragging point. Put a check in corner after every drag.

step 17 of 18
Now i turned on the layer with the glass structure, chose soft light for blending mode and set my opacity to about 40%.
I noticed that on my entry for the contest i forgot to activate this layer, it gives the melt a little extra depth.
Then i applied a warm photofilter adjustment and a hue/saturation adjustment to create the chocolaty color.
I noticed that on my entry for the contest i forgot to activate this layer, it gives the melt a little extra depth.
Then i applied a warm photofilter adjustment and a hue/saturation adjustment to create the chocolaty color.

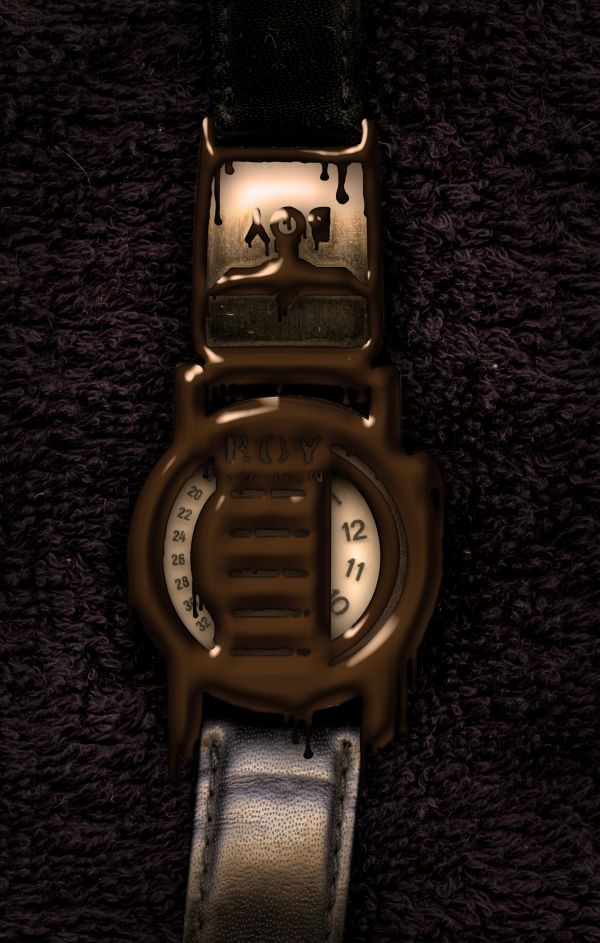
step 18 of 18
Then i applied Levels adjustment to make the watch drip and background blend better, after that i put on a warm photofilter adjustment, with a density of 70%
And last i did was create an extra layer and with a 50% opacity brush i circled around the edges of the canvas to darken it. Then i played with the opacity to get a mood i liked.
Now that you have the end result, you can see if it needs tweaking. This is done on feeling.
Hope you had fun
And last i did was create an extra layer and with a 50% opacity brush i circled around the edges of the canvas to darken it. Then i played with the opacity to get a mood i liked.
Now that you have the end result, you can see if it needs tweaking. This is done on feeling.
Hope you had fun

Final result
Pxleyes
Photography and photoshop contests
We are a community of people with
a passion for photography, graphics and art in general.
Every day new photoshop
and photography contests are posted to compete in. We also have one weekly drawing contest
and one weekly 3D contest!
Participation is 100% free!
Just
register and get
started!
Good luck!
Follow us:


© 2015 Pxleyes.com. All rights reserved.