
Original image
step 1 of 17
Get the pen tool and get busy, i get very fussy about selections so i spend quite some time. Notice that the little holes in the framework are also cut out.
When you have the selection, make sure to make it in to a channel or save the selection for future reference, it can come in handy with masking.
When you have the selection, make sure to make it in to a channel or save the selection for future reference, it can come in handy with masking.

step 2 of 17
When you have the cut out, press ctrl-t and rote it and try to find a point of interest. When i had it upside down it remided me of a head, so that is where it started.
Scaled it, rotated it and masked out the unwanted parts (arrow)
Scaled it, rotated it and masked out the unwanted parts (arrow)

step 3 of 17
Then i pasted in the shoulders, and the idea was born. I continued in that order:
Shoulders, body, legs, and arms.
It's all a matter of scaling and rotating to find the best parts. Never used the clone stamp on this one. Arms and legs are made out of 3 chandeliers each, And they are all the same. So i basicly made one leg, and copied it four times. The group in my layer pallete are identical, only the scaling differs. (and i distorted the right side a bit)

step 4 of 17
Then you got the complete robot. Start to fine tune the masking, look if there are no seems or blurry spots.
Nice detail is to play with the curls, mask one over another so they intwine.
Now on to the shading and highlights
Nice detail is to play with the curls, mask one over another so they intwine.
Now on to the shading and highlights

step 5 of 17
Group your robot, select the group (disable all other layers) and press ctrl-shift-alt-e to make a merged copy on top of the stack of layers.
Ctrl click the layer icon to make a selection and on a new layer paint black with a opacity of 50% on your brush. The selection makes sure that you don't have to worry about the edges, and this part you do on feeling. Darken op the unlit side and look at the shapes on the robot. Dont worry if it turn out to black, tweak the opacity of the layer and preferably set the blending mode to multiply. And presto, shading.
Ctrl click the layer icon to make a selection and on a new layer paint black with a opacity of 50% on your brush. The selection makes sure that you don't have to worry about the edges, and this part you do on feeling. Darken op the unlit side and look at the shapes on the robot. Dont worry if it turn out to black, tweak the opacity of the layer and preferably set the blending mode to multiply. And presto, shading.

step 6 of 17
Same as before, but then with highlights. Select the robot outline, make a new layer and paint with white.
Highlight can be very bright, so set the opacity of your brush back a little and make it smaller. Start with the glowing edges and finish of with a nice bright dot on those points that need it. After that set the blending mode to screen and tweak your opacity.
Again, this is done on feeling, zoom out every now and then and look at it. It's always fixable and dont be afraid that it's to dark or to white.

step 7 of 17
When you use your model in another background, it's better to do this step later, but it's easier to show it here so creating the drop shadow.
I selected the robot and made a new layer. Fill the selection with black and distort. (in a background look at the lights and try to imagine where it would end up.
When satisfied, accept and blur it, make it nice and smooth with gaussian blur.
Copy the layer and put it on top of the first one.
Make a layer mask (on the first drop shadow layer) and fill the top end of the shadow with a white to black gradient to make it fade out.
Set both layers to blending mode overlay or soft light and tweak the opacity so that you get a nice fade and a soft shadow.
In the image my shadow is still quite dark, but that will be fixed with opacity

step 8 of 17
Using the elliptical marquee tool i made an ellips underneath him, filled it with black and used gausiian blur to make it soft.
Layer blending mode will be overlay, and then tweak to opacity so that you can barely see it, a little lighter then the drop shadow. It's just to indicate a 'presence' there, to achieve more realism.
Layer blending mode will be overlay, and then tweak to opacity so that you can barely see it, a little lighter then the drop shadow. It's just to indicate a 'presence' there, to achieve more realism.

step 9 of 17
Last one on the robot, a contact shadow. To indicate that the robot is there, and touching the ground, i made a contact shadow right where he touches the ground. Very subtle and light. I used 100% black, and then use the opacity to set it to my liking. These may be dark, it looks more real that way.

step 10 of 17
First i made a selection of the foreground, and make it into a channel for easy selection later on, especially with that pine, what a pain to cut out =)

step 11 of 17
Then i cut out the parts i dont need to bee misty, and make a new layer that i called water blur.
In quickmaskmode i started painting with black on the water. Make sure softness is all the way up. Paint with white on the top of some rocks, so they will stick out of the "mist".
When done, exit quickmask mode, invert selection and apply gaussian blur. I believe i used about 9-10%
It should look something like this (this is not my original, because i didn't want to go through the masking process again) The more detailed you mask, the more realistic the result. Try to get some rocks pointing out of the mist (like in my original) by painting with whit in quickmask BEFORE applying blur offcourse.

step 12 of 17
Apply radial blur to the result after gaussian, use zoom method. I set it a 100%. The result should be like this.
Apply a layer mask and with black paint away the zoom from the rocks. Dont forget the rocks in the water!
Apply a layer mask and with black paint away the zoom from the rocks. Dont forget the rocks in the water!

step 13 of 17
Apply filter --> Twirl. Set a very slight twirl to make a notion of movement on the water and apply. Play with the opacity of the layer to make the lines less visible.

step 14 of 17
Create a new layer, i called it mist streams. Paint with white and draw lines in the water. Draw them curly and try to look at sort of a water flow.
Apply filter zoom, 100%, after that twirl again.
Then select filter---> misc, Maximal and play with the setting to make the lines really thin and mistlike.
I have a dutch photoshop, so im not sure how that last filter is called in the english one. Maximum or maximal. In a sub menu at the bottom.
Apply filter zoom, 100%, after that twirl again.
Then select filter---> misc, Maximal and play with the setting to make the lines really thin and mistlike.
I have a dutch photoshop, so im not sure how that last filter is called in the english one. Maximum or maximal. In a sub menu at the bottom.

step 15 of 17
If you made an alpha channel at the start you are going to be happy. Make a new layer. Ctrl click to select the entire foreground, including the tree.
Then make a layer mask to hide the forground. Paste in the new sky and stretch and morph to fit.
And that's about it. I applied a levels setting and did two color overlays.
Then make a layer mask to hide the forground. Paste in the new sky and stretch and morph to fit.
And that's about it. I applied a levels setting and did two color overlays.

step 16 of 17
I applied a hue saturation to blend the sky in better, and to get a more dark feeling.
I also imported the robot, scaled it, and made shadows as said in a previous step.
I also made him a bit darker and tweaked the highlights/shadows with white and black paint.
Then it's just a copy and rescale for the second one
I also imported the robot, scaled it, and made shadows as said in a previous step.
I also made him a bit darker and tweaked the highlights/shadows with white and black paint.
Then it's just a copy and rescale for the second one

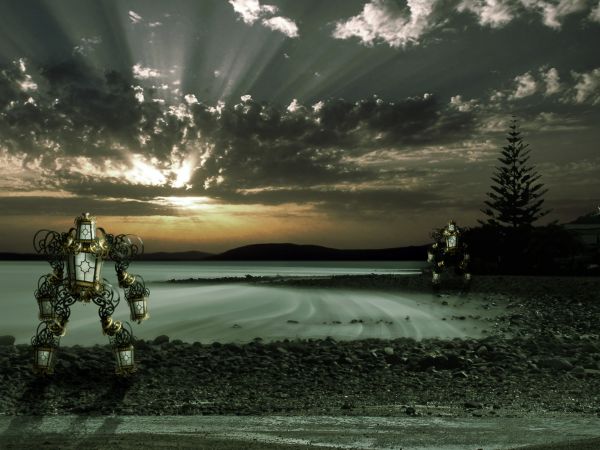
step 17 of 17
On the second robot also do the highlights and shadows, level him so the blend with the enviroment looks better amd finally do the color overlay.
This was my first guide, so i hope it's any good =)
This was my first guide, so i hope it's any good =)

Final result
Comments
Pxleyes
Photography and photoshop contests
We are a community of people with
a passion for photography, graphics and art in general.
Every day new photoshop
and photography contests are posted to compete in. We also have one weekly drawing contest
and one weekly 3D contest!
Participation is 100% free!
Just
register and get
started!
Good luck!
Follow us:


© 2015 Pxleyes.com. All rights reserved.
Love this one , Very well explained.
(5 years and 3806 days ago)