A Work in Progress: Demon


This guide was made for entry:
Demon
In Contest:
movie makeup


step 1 of 18

Step One-

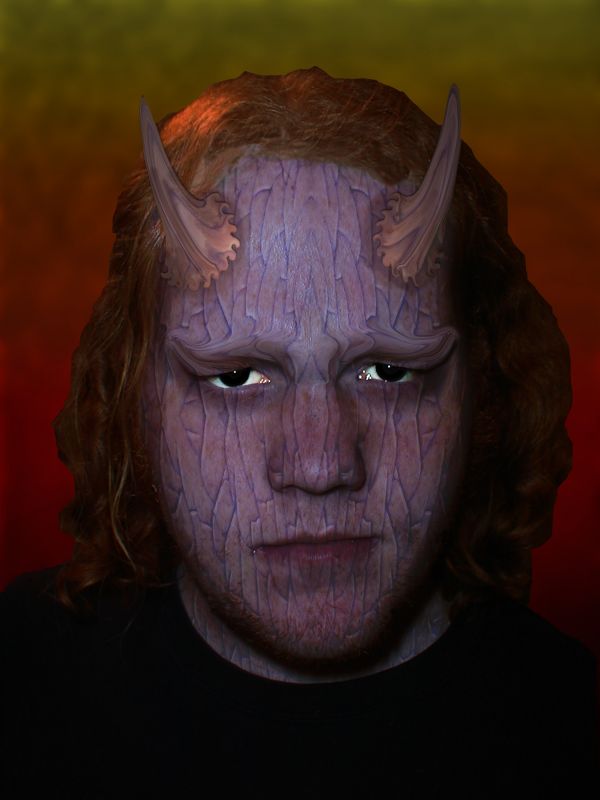
The first thing you need is an unsuspecting victim for Demonic Possession. In this case I used my brother! Though I am sure that I have other family members better suited for the part, he was "happy" to oblige. I used a straight forward face shot, if demons had to send in head shots for hellish auditions this would fit the bill.

Creation of Demon: Step 1

step 2 of 18

If you are going to edit something you ought to clarify. I intend to edit the skin, and eyes seperately, so I selected those objects and did save selections on both. If you are a true Photoshop user, I am betting that you will probably want to use a mask, I don't have that option, so selection will do.

Creation of Demon: Step 2

step 3 of 18

I felt that an intersesting texture would serve his face well. So I went to Morgue files and searched for cracks. http://morguefile.com/archive/display/192921 This was the image the I decided to use.

Creation of Demon: Step 3

step 4 of 18

In this step I duplicated the original cracks four times and arranged them so that they would be mirror images of one another, this way they would better fit the face, and the cracks would be smaller. Then I warped in the corners.

Creation of Demon: Step 4

step 5 of 18

The next step was to cut the cracked image to fit the face.

Creation of Demon: Step 5

step 6 of 18

I then made another layer to fit the exact same area and colored it a solid dark blue.


Creation of Demon: Step 6

step 7 of 18

I then set the texture layer at Vivid Light with an opacity of 50% & the colored layer at Multiply with an opacity of 38%.

Creation of Demon: Step 7

step 8 of 18

Next I duplicated the background layer. I then selected all of the blue, and going back to the background copy, I selected the inverse and deleted it. Leaving me with a copy of the face.

Creation of Demon: Step 8

step 9 of 18

I have now merged the face, and the two layers that were modifying it. This way we can edit the background to match the new colors and textures.

Creation of Demon: Step 9

step 10 of 18

I deleted everything but figure, later we will add an appropriate background. Then I changed the brightness and contrast of the rest of the image to match the face. I went with a Brightness of -90 and contrast of +70.

Creation of Demon: Step 10

step 11 of 18

Every Demon needs a pair of creepy eyes. In this tutorial I went for the black out look. Feel free to mess around with red, or perhaps put in some snake eyes. I also bumped the contrast in the eyes a little. This way they would stand out.

Creation of Demon: Step 11

step 12 of 18

Liquefy! I used liquefy to add some height to the brow, and add in some nice horns.

Creation of Demon: Step 12

step 13 of 18

I then cut out the horns and made them a little yellow by changing the hue and saturation.

Creation of Demon: Step 13

step 14 of 18

Then I used liquefy to create a twisted edge where the horns meet the head.

Creation of Demon: Step 14

step 15 of 18

To this horn layer I applied a small drop shadow with a size of 6 distance of 2 and opacity of 100%. This gave them a nice but not overbearing raised look.

Creation of Demon: Step 15

step 16 of 18

I added an Omni light and raised the contrast slightly, as well as the brightness to make the horns stand out a little more. Then I merged all the layers.

Creation of Demon: Step 16

step 17 of 18

The last thing I did to sell this demon, was I cleaned up the area by the hair line by using the blur, clone, and smear tools to fill in the area where the hair and face meet. Then I made another layer I set this layer at 30% Opacity, on Overlay. I took a brush, at 50% and began to add browns and reds around the horns, eyes, nose, and mouth, to add depth.

Creation of Demon: Step 17

step 18 of 18

Then I just added the background and adjusted the lighting. Thanks!

Creation of Demon: Step 18

Final result

Creation of Demon: Final Result

LOGIN or REGISTER FOR FREE
to rate this guide and create your own guides.