
Original image
step 1 of 6
Cut Tin Man from original image using your favorite masking tool. I used Quick Mask (Q).
Open New image. Copy and paste Tin Man into new image. Cut out rectangle where heart should be. Again, I used Quick Mask (Q).
Open New image. Copy and paste Tin Man into new image. Cut out rectangle where heart should be. Again, I used Quick Mask (Q).

step 2 of 6
Open image of Cogs and Sprockets. Cut and paste it into new Tin Man image. Scale, Rotate and Skew to make it fit just larger than rectangle hole. Place this layer beneath Tin Man layer.
Use Bevel and Emboss and Drop Shadow on Tin Man to give the hole a realistic look.
Use inner shadow on Cogs layer.
Use Bevel and Emboss and Drop Shadow on Tin Man to give the hole a realistic look.
Use inner shadow on Cogs layer.

step 3 of 6
I used Quick Mask once again to cut out a heart shape from this clock. I cut and paste into the Tin Man image.
I used Scale to make it fit into hole while allowing the Cog layer to show. I applied Drop Shadow and Bevel and Emboss to the heart.
I used Scale to make it fit into hole while allowing the Cog layer to show. I applied Drop Shadow and Bevel and Emboss to the heart.

step 4 of 6

step 5 of 6
Copy and Paste, Scale this Clock to fit the Tin Man image. Move layer to th bottom.
Select the Goggles (I used Quick Mask). Copy and Paste them into Tin Man image. Scale and Rotate them to sit on Tin Man's nose.
Select the Goggles (I used Quick Mask). Copy and Paste them into Tin Man image. Scale and Rotate them to sit on Tin Man's nose.

step 6 of 6
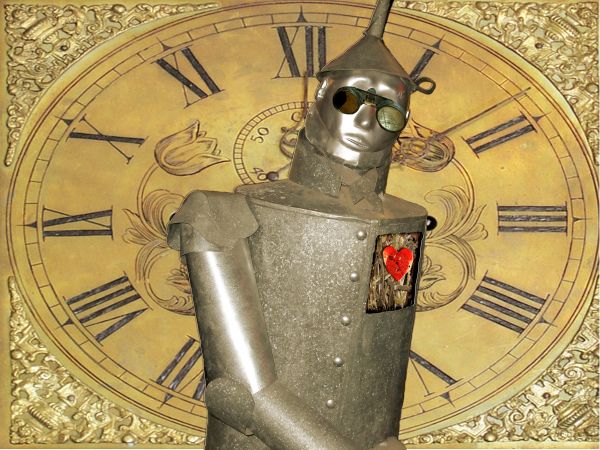
Use the Eyedroppe Tool to choose a brownish color from the image. Create a new layer and place it at the top. Use the Paint Bucket Tool to fill the entire new layer. Use Overlay to blend.
Hide the Heart layer. Merge Visible.
Reveal Heart Layer. Merge Visible.
Hide the Heart layer. Merge Visible.
Reveal Heart Layer. Merge Visible.

Final result
Pxleyes
Photography and photoshop contests
We are a community of people with
a passion for photography, graphics and art in general.
Every day new photoshop
and photography contests are posted to compete in. We also have one weekly drawing contest
and one weekly 3D contest!
Participation is 100% free!
Just
register and get
started!
Good luck!
Follow us:


© 2015 Pxleyes.com. All rights reserved.