
Original image
step 1 of 9
Removed the handle, cleaned the shapes and used standard PS scaling tools to alter the size and shape.

step 2 of 9
Simple rotation for the scaled shape to make a horizontal 'tube'.

step 3 of 9
The basic idea for the 'buildings' composition, used light blending mode to figure out proper place for horizontal tube.

step 4 of 9
I chose a nice looking bacground image and used a simple copy/paste/flip horizontal tool to duplicate the trees for the left side as well.
Used standar pattern copy tool to cover some of the excess blue sky behind the trees on the right side of the image.
Used standar pattern copy tool to cover some of the excess blue sky behind the trees on the right side of the image.

- : source
step 5 of 9
Composition of the shapes and background image. Masked the shapes to hide the lower parts and to make tree branches cover some of the shapes.
Also masked the horizontal tube, to make it look like a proper glass corridor.
Also masked the horizontal tube, to make it look like a proper glass corridor.

step 6 of 9
Altered the glass colours for all shapes with hue/saturation and color balance tool.
Added shadows for the glass and shapes with drop shadow effect and layer duplicating (when drop shadow effect gave bad results).
Gave the shapes and glass some depth with inner shadow effect, to make them look more round and 3D.
Added shadows for the glass and shapes with drop shadow effect and layer duplicating (when drop shadow effect gave bad results).
Gave the shapes and glass some depth with inner shadow effect, to make them look more round and 3D.

step 7 of 9
Coloured the background image with different blend and opacity modes, using the sunset picture.
I masked some of the areas to hide excess colours and highlight certain areas.
Used pattern tool for the colouring image too, when I wanted to repeat certain colours (like more red on some areas)
The direction of the 'main light source' changed, so I decided to cover the actual sun, to make it appear the sun is shining behind the observer view point. Otherwise I should have added the shadows in front of the picture and didn't feel comfortable with the idea.

- 1: source 1
step 8 of 9
Took 2 sources for the humans, masked the background, scaled them down heavily and added some shadow. Notice shadow perspectives, as one shadow appears on ground and 2 others on the glass wall, behind the people.
I made a copy of the boy, made him a new straight leg (like not walking) with pattern tool and colored his shirt with gradient map and hue/saturation tools. Also removed that strange red candy bag or w'ever he was carrying in his pocket.
For the girl I altered the colours to fit better the picture.
I made a copy of the boy, made him a new straight leg (like not walking) with pattern tool and colored his shirt with gradient map and hue/saturation tools. Also removed that strange red candy bag or w'ever he was carrying in his pocket.
For the girl I altered the colours to fit better the picture.

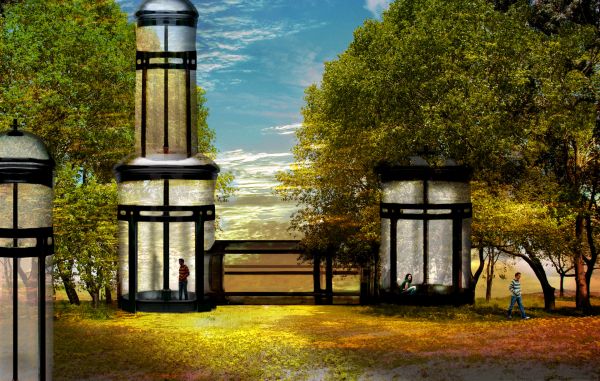
step 9 of 9
Finally flattened the image. Fixed some minor flaws on the horizontal tube (missing frames), smoothed the joint lines and other edges. A lot of work there, used the infamous healing brush tool a few times.
Took a duplicate of the whole layer, used render/lightning to colorize the new layer and with masking and blending options adjusted the final colours to appeal for my eye.
Took a duplicate of the whole layer, used render/lightning to colorize the new layer and with masking and blending options adjusted the final colours to appeal for my eye.

Final result
Pxleyes
Photography and photoshop contests
We are a community of people with
a passion for photography, graphics and art in general.
Every day new photoshop
and photography contests are posted to compete in. We also have one weekly drawing contest
and one weekly 3D contest!
Participation is 100% free!
Just
register and get
started!
Good luck!
Follow us:


© 2015 Pxleyes.com. All rights reserved.