
Original image
step 1 of 9
Increased canvas size to the left. Control click on thumbnail in layers pallet to select. Edit>Copy and then Edit>Paste. Flip Horizontal.

step 2 of 9
Painted in black for the nostrils. Filter>Liquify>bloat to add shape to the nose.

step 3 of 9
Add brightness to the nose by adding adjustment layer and increasing brightness. Add layer mask and CTL+I to inverse the mask. Paint black in mask to isolate brightness. Filter>blur>Guassian blur. Reduce Opacity to 55%. Erase and clone as needed

step 4 of 9
My photo.

step 5 of 9
Add photo and erase everything but lips and parts of chin.

step 6 of 9
Clone wood to chin, begin cloning mustache.

step 7 of 9
Finish cloning mustache and beard. Finish the wood around the rest of the face.

step 8 of 9
Add more shadow and depth to mustache and beard by painting with black, blurring, and reducing opacity. Paint in eye detail

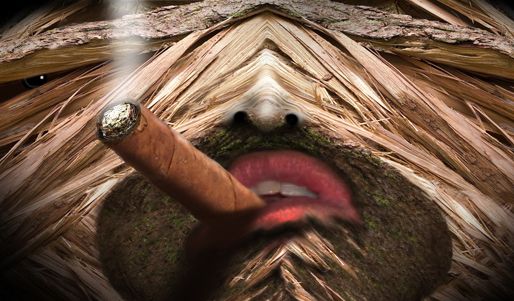
step 9 of 9
Using the clone tool, I reduced the amount of symmetry on each side of the face to increase realism. With a soft large brush, I added a vignette around the edges and reduced opacity to taste. I painted in the fire on the cigar tip and added smoke with a large,soft white brush.

Final result
Pxleyes
Photography and photoshop contests
We are a community of people with
a passion for photography, graphics and art in general.
Every day new photoshop
and photography contests are posted to compete in. We also have one weekly drawing contest
and one weekly 3D contest!
Participation is 100% free!
Just
register and get
started!
Good luck!
Follow us:


© 2015 Pxleyes.com. All rights reserved.