
Original image
step 1 of 26
MY CONCEPT SKETCH

step 2 of 26
FRAME ADDED

step 3 of 26
The candy cane is manipulated using liquify - the head would
need to be a seperate layer as it overlapse the body.
also, the belly underside area will be masked out.
need to be a seperate layer as it overlapse the body.
also, the belly underside area will be masked out.

step 4 of 26
Once the candycane has been masked I placed in the grass using the pen tool, and the default grass brush.

step 5 of 26
Taking a circular selection from a green area of the candycane source image, it's then scaled up to fill over the apple in the sketch and once again the liquify tool is used to manipulate into shape. I also started to place shadow on the dragons body.

step 6 of 26
Duplicated the Green Apple and changed the Hue and Saturation to make it the bright red colour.

step 7 of 26
Another Duplicate. set to 80% opacity and a layer mask to tone the green down and let the red show through.

step 8 of 26
One last Duplicate of the apple, changed Hue and Saturation to a yellow goldy colour (as the intention is to have this apple filled with a syrup like substance) I used a layer mask to bring out the red, and slight hue of the green from the layer below.

step 9 of 26
For the tail I place another candycane into position and mask the apple so it looks as though it's being pierced.

step 10 of 26
The Liquify tool is used to shape the tail to the sketch on the far side of the apple and forked at the front.
At this point I also made a selection of the forked section and gave it it's own layer.
At this point I also made a selection of the forked section and gave it it's own layer.

step 11 of 26
Refering to the initial sketch I use white to paint in a base, and a low opacity black for some darker areas so I can use the Plastic Wrap filter.

step 12 of 26
Once the Plastic Wrap filter is applied I lower the opacity to around 70% so you can see the tail.
Holding ctrl I click on the 'white' layer, and painted it a light yellow colour, placed it above the plastic wrap and set it to colour burn. which gave it a nice honey like colour.
Holding ctrl I click on the 'white' layer, and painted it a light yellow colour, placed it above the plastic wrap and set it to colour burn. which gave it a nice honey like colour.

step 13 of 26
Syrup and apple detail: the Apple is 'opened' up a little more. Here I painted in more syrup, some drips and applied the plastic wrap filter, changed the Hue slightly on the drips.
Painted in some hard lines with the layer style set on inner shadow with the fill set to 0%, so that it was just the shadow that was seen.
I also added some highlights. and shading under the drips.
I also applied some shading to the tail under the syrup.
Painted in some hard lines with the layer style set on inner shadow with the fill set to 0%, so that it was just the shadow that was seen.
I also added some highlights. and shading under the drips.
I also applied some shading to the tail under the syrup.

step 14 of 26
A rectangular selection of the candycane was used to make the worm, the warp too was used to make the basic shape and the Liquify tool was then used to refine it. I gave it some basic shading and an eye. (small round brush with a stroke applied) > (a small pupil with a smaller round brush)
Decided to differentiate the dragon from the worm so selected the worm layer (ctrl) made a new layer and painted in the selection with a dark blue and set it to Screen @ 40% which gave it its pink and purple colour.
A small round brush made the hole
and a reflection was made by duplicating the layer, flipped it and distorted it accordingly to achieve the reflection you see.

step 15 of 26
The Dragon Head:
1: selection from source
2: duplicate; flip horizontal; line up
3: warp into basic shape
4: using the liquify tool a shape it even further to what the sketch looks like ( I also hade to take another selection white canycane which is shown to carry on the colour pattern)
5: Shading and the eyes added
6: finished reslut of the head

step 16 of 26
making the background
1: flat purple (complimentary colour to green) Bottom base layer
1: flat purple (complimentary colour to green) Bottom base layer

step 17 of 26
making the background
2: scaled up part of white area from candycane this layer set to around 50% so texture can show through.
2: scaled up part of white area from candycane this layer set to around 50% so texture can show through.

step 18 of 26
making the background
3: Some pink sky colour at 50% opacity
3: Some pink sky colour at 50% opacity

step 19 of 26
making the background
4: Painted a blue colour around the dragon to give it a kind of dark halo this layer was set to a 90% overlay
4: Painted a blue colour around the dragon to give it a kind of dark halo this layer was set to a 90% overlay

step 20 of 26
making the background
5: some Clouds made with a soft round brush with the brush settings changed to include some scatter and fade. this layer was set to 36%
5: some Clouds made with a soft round brush with the brush settings changed to include some scatter and fade. this layer was set to 36%

step 21 of 26
The belly underside was made with a selection from the white area of the candycane source image. and shaded on top.

step 22 of 26
making the MUSHROOMS
1: taking some selections from the source image
2: using the warp tool to transform them into the required shape
3: a highlight section for the top of the mushroom, made from an elliptical selection, with a gradient white to transparent gradient. then using the warp tool, transformed as required.
4: elliptical selection from the source image, then scaled and warped and placed over the head. then the head was selected, inverted and deleted.
5: a colour overlay for the lower part of the mushroom to shrink it back as the shadow falls.
6:an overall shading done with the soft brush.

step 23 of 26
mushrooms in the scene
After making a mushroom from the source image, I placed them and changed the Hue and Saturation to different colours to help the image of being a 'candy' world, and full of colour.
I also added some extra grass on top and between them to help blend them in... same thing... using the default grass brush

step 24 of 26
adding some details
> I shaded the tail behind the apple and added some highlights too with a normal soft round brush.
> added another section of tail (taken from the source image) in the distance to give the impression of scale and length... I added some shading and a fairly large gaussian blur so it didn't become distracting.
> I also added some highlights on the dragons neck, and a ribbing around the belly to body section using the pen tool and stroke, one white, one black and nudging them apart slightly.

step 25 of 26
More details:
REFLECTIONS and apple details
1: a selection for the stork made with the pen tool. made from the source image.
2: some shading for the dip area in the apple normal brush
3: A highlight section for the top of the apple, made using the pen tool and lowering the opacity.
4: using the pen tool I made a selection of what could be passed as a reflection of the grass and filled it with the same coloured green as the grass. ctrl and clicked on the apple layer thumb, inverte the selection and deleted the excess of the colour.
*next I added the blue mushroom by duplicating it, scaling it down and using the bloat tool in Liquify to give some distortion.
the same process for the red mushroom... deleting where appropriate. To finish this set of reflections off, I merged the layers, and set it to screen at 18%
5: some simple shading

step 26 of 26
finishing details
I added another hill in the background with another mushroom, just to show some scenery.
And I added the shadow across the grass using an elliptical selection with a dark green fill, and the pen tool to draw a path for the tail section, both then had a gaussian blur applied.
additionally I went back and I made some final adjustments, some extra highlights and shading, and also a colour correction to the syrup to try make it more 'real'

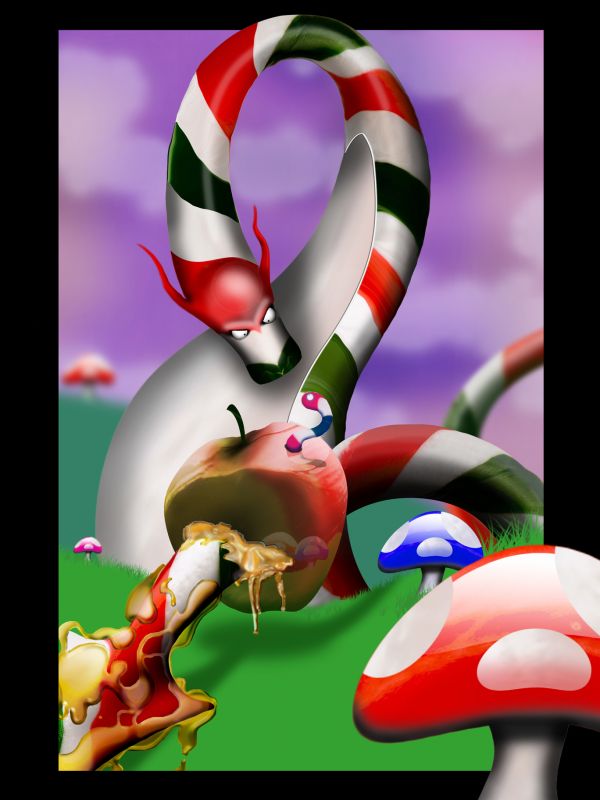
Final result
Pxleyes
Photography and photoshop contests
We are a community of people with
a passion for photography, graphics and art in general.
Every day new photoshop
and photography contests are posted to compete in. We also have one weekly drawing contest
and one weekly 3D contest!
Participation is 100% free!
Just
register and get
started!
Good luck!
Follow us:


© 2015 Pxleyes.com. All rights reserved.