
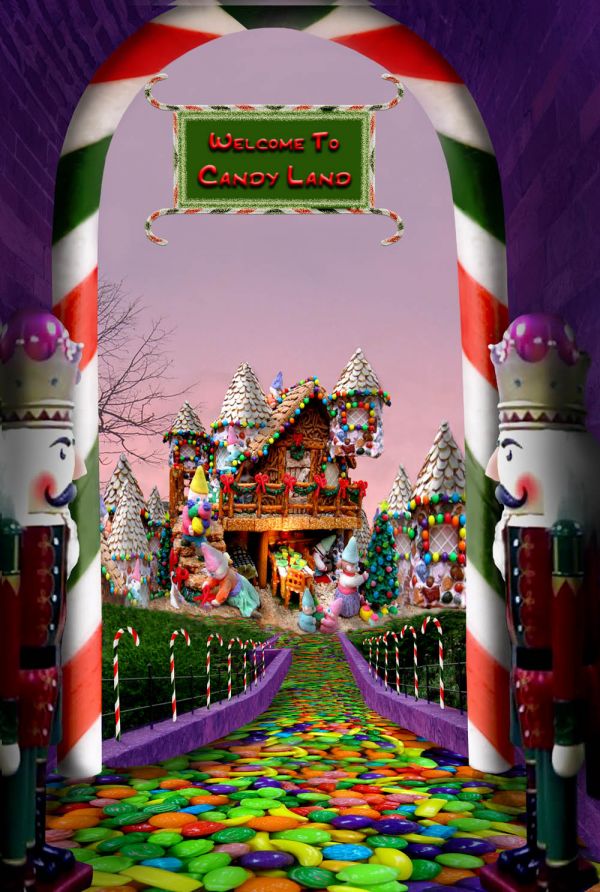
Original image
step 1 of 23
Candy source photo for street

step 2 of 23
Nutcracker source photo

step 3 of 23
Doorway photo from Barcelona Album by zamgyoo7 at pxleyes

step 4 of 23
Gingerbread/candy house source photo

step 5 of 23
Sunset sky source photo

step 6 of 23
Candy cane shape is cut out of source with lasso tool, then moved into canvas with wall with archway and street.

step 7 of 23
Candy cane has been chopped using eraser tools, ready to frame doorway.

step 8 of 23
Candy cane is scaled down to a smaller size using edit/transform/scale tool.

step 9 of 23
Cane is duplicated , and duplicate has to be flipped using the edit/transform/flip horizontal tool.

step 10 of 23
When two canes are at proper scale to cover doorway, they are trimmed and merged into a single layer. It was necessary to use the edit/transform/perspective tool to get canes to fit properly.

step 11 of 23
Candy to cover floor of doorway is moved into canvas. Before being fit into the space, a duplicate is made (using alt. key)

step 12 of 23
Here the candy pieces have been 'flattened' and fit into floor space. The fitting is done using the perspective and distort tool (edit/transform) then edges are trimmed with eraser tool.

step 13 of 23
Here a duplicate copy of the candy source has been shaped to fit part of walkway using once again the distort and perspective tools. I attempted to make the candy look smaller in size as it proceeded down walk. A copy of this section will be used to proceed on down the walkway once again.

step 14 of 23
Another duplicate copy of candy is flattened, shaped to fit another portion of walkway, then balance is cloned in with the clone tool.

step 15 of 23
New background is added (my own photo), but will be changed later with simpler sky photo. Arch opening has been cut away using the eraser tool where sky will be needed. First buildings have been lassoed from source photo , portions to be duplicated to add more houses to the little town we are creating.

step 16 of 23
Work has been done with clone tool on foliage; and walls along walkway and inside entry way have been changed to purple using the saturation/hue color change tool.

step 17 of 23
Candy canes are now added to the railing along the walkway. One already chopped cane was used from an early step, reduced in size with scale tool, the duplicated (alt key) for opposite side of walk and flipped horizontally to be set into place. Then another cane was duplicated for next position in railing, sized down slightly with scale tool, duplicated for opposite side of walk, etc. until complete railing was done. I decided to just do every other one, in order not to overdo them. When all canes were inserted, 'merge down' was used to merge them into one layer, and this layer was merged with archway and walkway.

step 18 of 23
A sign is made for top of arch. It was added since there seemed to be too much empty space there. A chopped cane is duplicated and placed end to end and merged. Then the merged piece is duplicated again and flipped vertically. Top is placed to touch arch, then grid is brought up to help place bottom of sign, and especially to get sides of sign (duplicated canes, shortened) evenly placed.

step 19 of 23
After forming outside frame of sign, the brush tool is used with a pleasing green shade. First an outline of green is made inside of the frame, corner to corner, then filled in with paint bucket tool. A very small white line is left, which could be filled in, but I rather liked it and thought it added to the design of the sign.

step 20 of 23
Lettering tool is used to add words to the sign. Different fonts were tried before settling on final fonts. Next I filled the letters of 'Candy Land' with colors using the paint bucket tool again.

step 21 of 23
It seemed that something was needed at the entry to the walkway, so I looked for a nutcracker. After chopping it, it was duplicated and flipped for the opposite side. Then shadows were added where needed on nutcrackers, as well as elsewhere in the entire composition.

step 22 of 23
Not being satisfied with background sky, I settled on a sky which was less 'busy' and caught the edge of just one of the trees on one side, finishing the composition.

step 23 of 23
This revision to the sign was made using layers/bevel/emboss tools. The top line was changed to 'inkpen2chords' font like the bottom line. Also, the sign itself was highlighted with 'inner glow' in layer style tools.

Final result
Pxleyes
Photography and photoshop contests
We are a community of people with
a passion for photography, graphics and art in general.
Every day new photoshop
and photography contests are posted to compete in. We also have one weekly drawing contest
and one weekly 3D contest!
Participation is 100% free!
Just
register and get
started!
Good luck!
Follow us:


© 2015 Pxleyes.com. All rights reserved.