
Original image
step 1 of 14
Source buggy photo

step 2 of 14
Source country road photo

step 3 of 14
Source photo of Amish children

step 4 of 14
Source covered bridge photo

step 5 of 14
Covered bridge is moved over source background after making resolution 200 dpi on each of them.

step 6 of 14
Bridge is scaled to fit background using the edit/transform/scale tool.

step 7 of 14
Bridge is chopped using the eraser tools to let background source show through.

step 8 of 14
Light source has been changed by flipping horiz. and the road is inserted.

step 9 of 14
Floor of bridge is worked on using cloning tool and brush tool.

step 10 of 14
Here a country road photo is inserted, since I didn't care for the road I had been working on.

step 11 of 14
Buggy chopped and set into place

step 12 of 14
Here I decided to add some children since the dog didn't seem like quite enough added interest.

step 13 of 14
Here is the dog source photo which was flipped a couple times to decide how he would look best. His light source also had to be adjusted.

step 14 of 14
A brown Pantone filter is added over entire work after all layers are merged and adjusted to 66% opacity.

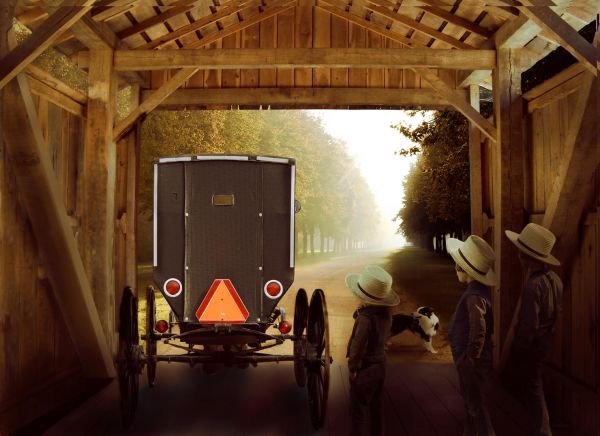
Final result
Pxleyes
Photography and photoshop contests
We are a community of people with
a passion for photography, graphics and art in general.
Every day new photoshop
and photography contests are posted to compete in. We also have one weekly drawing contest
and one weekly 3D contest!
Participation is 100% free!
Just
register and get
started!
Good luck!
Follow us:


© 2015 Pxleyes.com. All rights reserved.