
Original image
step 1 of 14
remove girl's background

step 2 of 14
add new color layer, named background, put the color you like (yeah thats the spirit of pop art ! any color you like as long its contrast & asthetic)

step 3 of 14
go to image --> adjustment --> shadow & highlight. Adjust so that the black & the highlight has visible contrast. This step is important to prepare for next step, treshold.

step 4 of 14
ohya , before threshold, we desaturate the girl layer, to remove all color info.

step 5 of 14
Right click on girl layer ---> choose Duplicate layer--> in te destination box choose "new" --> ok
This will create 2 file windows. 1st the original, and 2nd the new file (in my case is untitled-5) with 1 layer only (desaturated girl).
This will create 2 file windows. 1st the original, and 2nd the new file (in my case is untitled-5) with 1 layer only (desaturated girl).

step 6 of 14
the magic begin...
apply image-->adjustment ---> treshold --->adjust white slider to say...150? ok
apply image-->adjustment ---> treshold --->adjust white slider to say...150? ok

step 7 of 14
well the edge is rough..so lets blur it...filter --> blue -->gausian blur-- aplly 1.5 pxl

step 8 of 14
convert the image to grayscale. image --> mode --> grayscale. This will discart all color info again, then we can apply the magical half tone effect..

step 9 of 14
now, 1) klik image--> mode--> bitmap. 2) flatten layer? yes. 3) In the Method box, choose " Halftone Screen " 4) in the half tone screen, choose: frequency 2 line/inch. (the more the frequency, the smaller our half tone effect). Choose angle 45 degree. Choose Shape Round. Hola.....

step 10 of 14
ok we want to move this halftone image back to our main file, we must change the mode back from Bitmap to grayscale and then RGB. otherwise, the right click duplicate layer wont work. So mode ---> grayscale, size ratio 1. then mode ---> RGB. After that, right click image layer -->duplicate layer --> in the destination box, choose our main file. The main file should look like this....

step 11 of 14
make the halftone layer to become the clipping mask lower layer (i,e desaturate layer). For windows. Hold alt and point to the border of the layer, icon will change, then klik. This will create clipping mask shown here.....

step 12 of 14
now let start coloring. make new color layer above half tone layer, named it skin. Change the blending mode to "Multiply". Fill with skin color. Then create mask --> invert mask (ctrl I) ---> use brush with foreground white background black (we are painting the mask here). Then paint the face and neck....

step 13 of 14
repeat coloring process for each additional color, for lips, eyes, hair, flower. each layer has its own mask, and we paint on the mask. If we want to change the color later, we just fill the layer with other color...

step 14 of 14
for cool color efect, add a new color layer on top of all layers without mask. Blending mode multiply. Fill with any color you want. Then---> image---> adjustment--->hue saturation. Adjust the hue slider so you can have different color as you wish. hola....
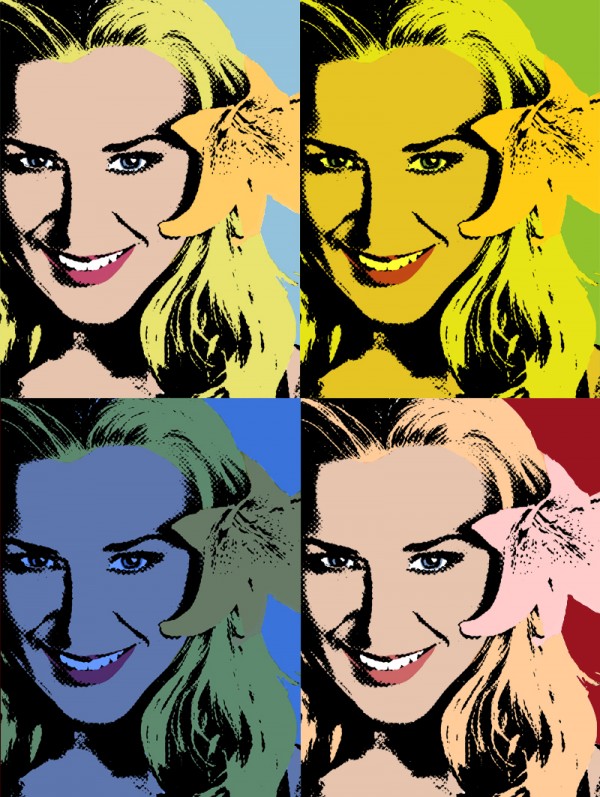
Then you can make 4 or 6 different color variation....here comes Andy Warhol Pop Art style. So, who want to buy my USD 100million pop art replica ? :P
Then you can make 4 or 6 different color variation....here comes Andy Warhol Pop Art style. So, who want to buy my USD 100million pop art replica ? :P

Final result
Pxleyes
Photography and photoshop contests
We are a community of people with
a passion for photography, graphics and art in general.
Every day new photoshop
and photography contests are posted to compete in. We also have one weekly drawing contest
and one weekly 3D contest!
Participation is 100% free!
Just
register and get
started!
Good luck!
Follow us:


© 2015 Pxleyes.com. All rights reserved.