
Original image
step 1 of 18
Ceiling and balloons with ears by hilleke

step 2 of 18
Checkered floor at Versailles by zambyoo7 at pxleyes

step 3 of 18
Clock by jack683 at pxleyes used, but numbers reversed in entry

step 4 of 18
Balloons by alvimann at morguefile, used for falling balloons and balloons on floor.

step 5 of 18
New Year's babies by dee at morguefile.

step 6 of 18
First, after making sure the size and resolution of the source is what I want, the clock is set for same resolution, then chopped and set into the canvas, where i will be sizing it to fit the arch with edit/transform/scale tool, and trimming with the eraser tools.

step 7 of 18
The canvas was enlarged at the bottom (click the top square on the diagram for changing canvas size to enlarge the bottom???) then the source with checkered floor is cropped out and set into floor area. By using the edit/transform/perspective and distort tools, the floor is manipulated to get perspective needed.

step 8 of 18
Now the hands are edited out of the clock in order to reset it later to midnight. Also, the many light reflections are edited out. Editing is done using the cloning tool and a airbrush tool set 35 to 40 in opacity. Smudge tool helped with edges that were uneven.

step 9 of 18
The clock is now ready for the new hands which are painted in with the brush tool. Small hand is in yellow tones and edges outlined with dark gray. Large hand is in same gray and set slightly past midnight since some celebrating has obvioiusly been done already.

step 10 of 18
Chopped table is moved onto canvas here. It must be scaled larger and made wider to hold the babies. Edit/transform/perspective tool and scale tools are used for this.

step 11 of 18
Here the table is scaled to the larger size just explained and extends close to the foreground.

step 12 of 18
Here babies source has been moved onto canvas, edited to scale them larger, and table size adjusted once again to accommodate the babies comfortably.

step 13 of 18
Here the babies have been isolated using the magic wand and the eraser tool with a small hard edge. The numbers are now reversed on the clock as well. That was done with the cloning tool by moving a number with the cloning tool to the area where it is to go. 11 becomes a 1 by cloning out the first 1. The 2 is cloned from second half of 12. Some additional linework was done using the brush tool and dark color taken from nearby color.

step 14 of 18
A top hat is added to the boy baby here. A hat brush tool was used on a small, new canvas, the moved into the entry and sized to fit the boy's head. Dodge and burn tools were used to add shape, shadows, and light.

step 15 of 18
Having decided to extend the top with a high ceiling and balloons, the canvas had to be enlarged again, this time at the top by clicking on the bottom square on the canvas-sizing boxes. Then new source for ceiling is moved onto canvas and after checking resolution, sized with edit/transform/scale tool to fill top of picture. Outside edges not used can be removed.

step 16 of 18
Many of the shadows are started now using the burn tool. More will be done later. Balloons with mouse ears are cloned in order to repeat them across ceiling area.

step 17 of 18
Balloons with ears are all added now. Regular balloons are added falling through the air, and also on the floor. 3 balloons are selected from source photo and used individually by chopping each out and duplication them with the 'alt' key. Colors are changed with the color/balance tool. Sizes are also needing to be changed with the edit/transform/scale tool so that larger ones will be in foreground, and smaller ones will be further behind the table and up in the air. Confetti is needed, so that is all added with the brush tool, changing colors several times. I ended up using the smudge tool on each piece of confetti to help it look more like it was falling. However, I should have done this sooner before merging my layers, then the layer of confetti could be moving by using motion blur and gaussian blur.

step 18 of 18
Here a filter has been added in brown tones to cut down on the bright colors and bring the whole piece together. Some color/balance, and hue/saturation changes can be made to get desired overall tones. Layers (all visible) have been merged so that overall changes are made. Shadows under table have been deepened,

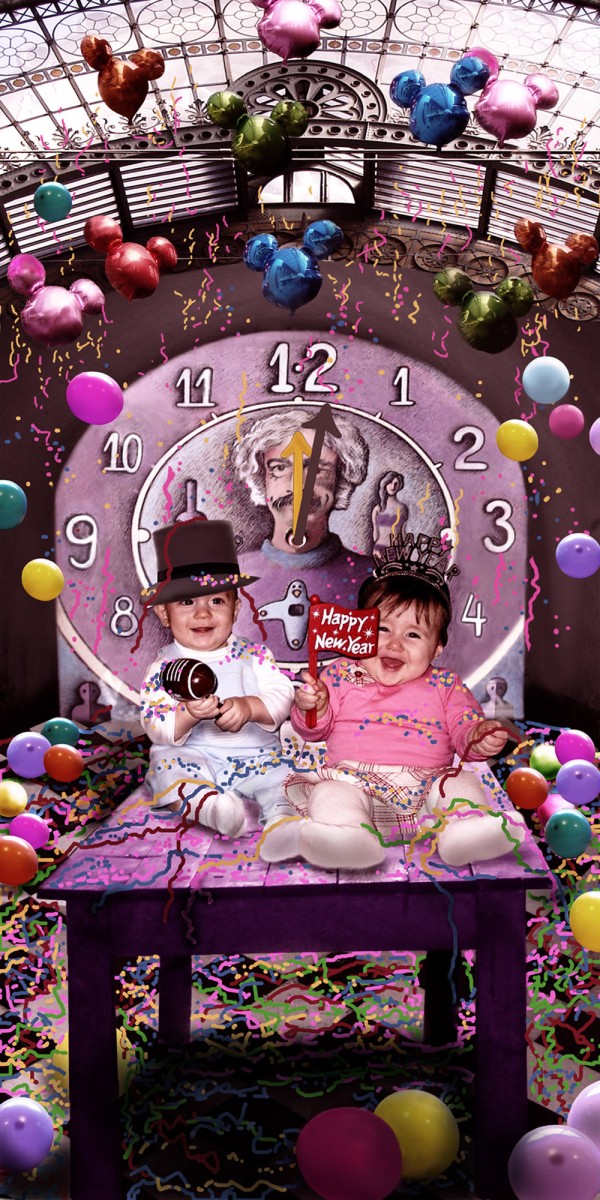
Final result
Pxleyes
Photography and photoshop contests
We are a community of people with
a passion for photography, graphics and art in general.
Every day new photoshop
and photography contests are posted to compete in. We also have one weekly drawing contest
and one weekly 3D contest!
Participation is 100% free!
Just
register and get
started!
Good luck!
Follow us:


© 2015 Pxleyes.com. All rights reserved.