
Original image
step 1 of 18
I got rid of the source image perspective using transform tool.

step 2 of 18
Duplicated it and flipped it vertically.

step 3 of 18
Made copies of the two last layers and flipped them horizontally.

step 4 of 18
More two copies were made without flipping them now. And using eraser tool with very low flow, I worked on the edges to get an even blending.

step 5 of 18
I merged all the pieces on a new layer and applied sandstone texture.

step 6 of 18
I then selected a row of cobblestone and made copy of it. Using warp tool, I turned it into an arch.

step 7 of 18
Using mask, I worked on the arch edges.

step 8 of 18
I worked on the arch shadows then.

step 9 of 18
I place the window stock on a new layer between the arch and the wall and stretched it.

step 10 of 18
Using mask, I got rid of the wall.

step 11 of 18
Using both clipped layers and adjustment layer, I worked on the window shadows and saturation.

step 12 of 18
I created a folder and put all pieces away. Then I placed the ivy stock on a new layer.

step 13 of 18
Using mask, I worked on the ivy shape.

step 14 of 18
Worked on the ivy shadows then.

step 15 of 18
I placed the same ivy stock on a new layer, moving it to the right side.

step 16 of 18
Worked on its shape and shadows too.

step 17 of 18
I put all the ivy pieces away into a folder and on a new layer I applied some light.

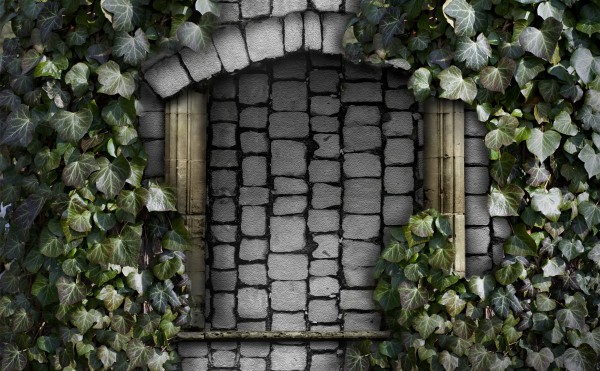
step 18 of 18
On a new layer at the top I merged all the visible layers, made a copy and dessaturated it, applying gaussian bluer to it and overlay blending with 30% opacity.

Final result
Pxleyes
Photography and photoshop contests
We are a community of people with
a passion for photography, graphics and art in general.
Every day new photoshop
and photography contests are posted to compete in. We also have one weekly drawing contest
and one weekly 3D contest!
Participation is 100% free!
Just
register and get
started!
Good luck!
Follow us:


© 2015 Pxleyes.com. All rights reserved.