
Original image
step 1 of 40
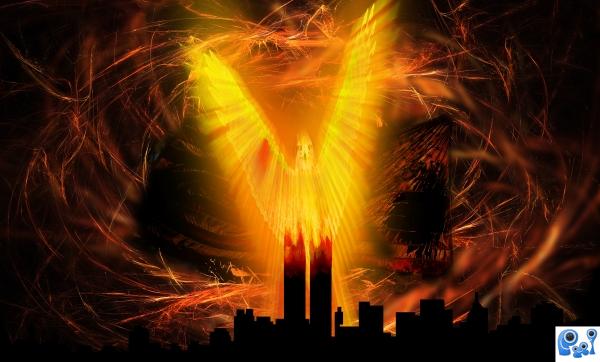
This tutorial was written for a Photoshop contest involving somehow using the contest’s stock image of a bird face. I decided to make a Phoenix rising from the World Trade Center in New York. This tutorial is the first one that I have written, and it is quite involved, however, there are some great tips and instructions that can be used for any photoshoping you might do. Have patience and you should be able to produce a great image.
Source of Stock Images/Patterns that you will need:
Hawk Stock by Colourize Stock: http://colourize-stock.deviantart.com/art/Hawk-Stock1-88186331
Fire Fractal by Crowned Meadow: http://crowned-meadow.deviantart.com/art/C-M-Fractals-002-88626699
The flag image needed is my own photo, however, I have uploaded it to Pxleyes Stock gallery, and it can be used by anyone. Just please credit me if you use it.
Flag Image: http://www.pxleyes.com/picture/13370/4b10547e54285.html
New York Skyline Shape by Hebedesign: http://hebedesign.deviantart.com/art/Skyline-Collection-7485757
SS Fire Patterns: http://www.obsidiandawn.com/fire-photoshop-patterns (see Photoshop Help to load these patterns if you don’t know how)
The first thing we need to do is to take the stock Hawk image and mask out the background. There are a few ways to do this. You can use the pen tool and draw a path around the hawk which doesn’t give you an accurate and clean edge on such a “complex†mask, or you could create a layer mask and “paint†out the background which when done right gives you very clean and accurate edges. This method can take a bit of practice and can be a bit time consuming, but when done right, it will produce great results.
So open the stock image of the Hawk in Photoshop. Double-click on the background layer to unlock it. It will rename this layer “Layer 0â€. Next create a new layer (Layer 1) and drag this new layer under Layer 0. Set the foreground color to black if it isn’t already, and with the paint bucket tool, fill Layer 1 with black. This will give us a dark background so that we can see the results of our mask.
Now select Layer 0 and rename it Layer 2. Then at the bottom of the layers palette, click on the square box with a circle (looks like a camera) to add a layer mask to this layer. Your layers palette should look like this.

- : source
step 2 of 40
To begin the masking, select the layer mask box in Layer 2 by clicking on the white box next to the small icon picture of the hawk. Magnify the image to 300%. Select a small brush (17px) with a hardness of 100% and Opacity and Flow of 100%. Make sure the foreground color is black and begin painting around the edges of the hawk. This can take quite a while, so take your time. What you are aiming for is to paint completely around the hawk so that there are no light colored edges. Don’t worry about masking out the part of the cane at the bottom. For the contest that this tutorial was written for, I had to use the bird face of the contest source image, so after the masking was complete, I dragged the bird face layer into this image and masked it in replacing this image’s bird face.

step 3 of 40
Once you have finished masking out the background, create a new document, but leave the hawk image open. We will be coming back to it. Create the new document with the below settings and fill the background layer with black.

step 4 of 40
Open the Fire Fractal image and either drag it or cut and paste it into the new document and change the name to Fire. Press CTRL+T to open the Free Transform tool and drag the four corners to the outside corners of the document so that the fractal image is now the same size as the new document and in the layers palette, change the Blending Mode of this layer to Screen.

- 1: source 1
step 5 of 40
Duplicate this layer, and using the Free Transform tool (CTRL+T) rotate and move this duplicated layer to start creating a “circle of fireâ€. Duplicate it one more time and rotate and move this new layer as well. You should end up with something like the below image.

step 6 of 40
Duplicate the original fire layer (Fire) one more time. Merge the copied fire layers (but not the original). Do this by holding down the CTRL key while clicking on each of the layers and then press CTRL+E. In the layers palette, change the blending mode of this new merged layer to Screen. Apply a 20px Gaussian blur to this new layer by choosing Filter/Blur/Gaussian Blur.
Now we’re going to sharpen the original fire layer a bit. So select the layer named Fire, and apply a Smart Sharpen (Filter/Sharpen/Smart Sharpen) with the settings in the image below which will give our ring of fire some nice depth of field (DOF). Play around with adding some more layers until you get the background that you like. Once you have applied the sharpen and have all the front layers where you want them, merge all of the layers together. Our background is now done.
Now we’re going to sharpen the original fire layer a bit. So select the layer named Fire, and apply a Smart Sharpen (Filter/Sharpen/Smart Sharpen) with the settings in the image below which will give our ring of fire some nice depth of field (DOF). Play around with adding some more layers until you get the background that you like. Once you have applied the sharpen and have all the front layers where you want them, merge all of the layers together. Our background is now done.

step 7 of 40
Finished background.

step 8 of 40
Close out the original Fire Fractal image, and open the Flag image in Photoshop. We’re going to quickly sharpen the image a little using a Lab color technique. Change the image to Lab Color by going to Image/Mode/Lab Color. Press CTRL+ALT+3, then SHIFT+CTRL+i to invert what we just selected. Next Press CTRL+H to hide the selection. Apply an unsharp mask to the image by selecting Filter/Sharpen/Unsharp Mask and use the settings in the below image and press OK. Press CTRL+D, and then change the image mode back to RGB color.

- 2: source 2
step 9 of 40
We’re going to darken up the flag a little by adjusting the Curves setting. So select Image/Adjustments/Curves (or press CTRL+M) to bring up the Curves window. Adjust the curve and settings like the below image.

step 10 of 40
Once you have the flag the way you want it, drag or cut and paste it into the Phoenix Rising image. It should automatically become the top layer. Rename it Flag. If needed, resize and center the flag. Do this by pressing CTRL+T to bring up the Free Transform tool, then while pressing SHIFT+ALT, resize and center the image. You should have something like the below image. Once it’s sized and centered, press OK.

step 11 of 40
Add a layer mask to the flag layer, and just like the hawk image, mask out the background of clouds. You can leave a little bit of the clouds around the edges but not to much. After I finished the mask, I recentered the flag a little. After you get it where you want it, right-click on the layer mask, and select Apply Layer Mask. Add a layer mask to the fire layer below, and mask out the flag area in this layer. The reason will become evident in the next step.

step 12 of 40
Now it’s time to drastically alter the flag’s appearance and make it look more burned and charred. First, select the flag layer, and click the FX on the bottom of the layers palette, and choose Pattern Overlay. From the fire patterns that you loaded, choose a pattern that you like and use the below settings. Feel free to adjust the settings to something you like.

- 3: source 3
step 13 of 40
Next check Gradient Overlay and use the below settings.

step 14 of 40
Next go up and click on the Blending Options, and use the following settings. Pay close attention to the color settings under Blend If:

step 15 of 40

step 16 of 40

step 17 of 40

step 18 of 40
Next select Image/Adjustments/Levels (CTRL+L) and use the below settings.

step 19 of 40
Now select Image/Adjustments/Color Balance (CTRL+B) and use the following color balance settings for Midtones/Highlights/Shadows. Feel free to adjust them more to get something that you like better.

step 20 of 40

step 21 of 40

step 22 of 40
You should now have an image similar to the below image.

step 23 of 40
Next, you’ll need to zoom out a little so that you have quite a bit of space on each side of the image. Create a new layer which should be on the top and name it New York. On the left in the tools palette, select the Custom Shape Tool (U). It’s the one that looks like a starfish. Up top, select the 3rd box (Fill Pixels) and in the Shape box, choose the New York Skyline shape (you should have loaded this shape from the stock shapes source).

- 4: source 4
step 24 of 40
Now click and hold way to the left of the image, and drag the cursor across the image. You should see the outline of the city getting bigger as you drag. You want to make sure that you get the twin towers right in the middle (or where you want them) because you will only be able to resize the shape and move it up or down…but not left or right. Use CTRL+ALT+z (Step Back) if you mess up. It might take you a few tries before you get it the way you want. Once you get the towers centered, release the mouse button. Press CTRL+T to bring up the Free Transform tool and while holding ALT+SHIFT drag the top left corner to resize the city to the size that you want it and move it down to the edge of the image. Create a layer mask, and mask out some of the top of the towers. Use different hardness and opacity settings to make it fade into the flag. Once you get it the way you want it, right-click on the layer mask and select Apply Layer Mask. Next press the FX button on the bottom left of the layers palette and select Outer Glow. Once you are finished, you should end up with something like below.

step 25 of 40

step 26 of 40
We’re now going to go back to the hawk image that we masked at the beginning and start to change it into a Flaming Phoenix. First we are going to change the colors of the feathers. Select Layer 2, then Select/Color Range. Click on the top edge of the right wing and press OK. This will select all of that color in the image.

step 27 of 40
In this next step it will help if you zoom in on the image to 100%. Make your foreground color a nice yellowish/orange. I used #F9AE31 as my color.

step 28 of 40
Select the Paint Bucket tool and fill all of the selected areas with the color. This can be a tedious process. Have patience. You don’t have to fill every little pixel, but get enough to color most of the selection. If you color too much, use ALT+CTRL+z (Step Back). When you’re finished press CTRL+D to deselect the pixels. After my first color change, it looks like the below image.

step 29 of 40
Repeat the Color Range selection above, but this time choose a dark brown part of the image. For the foreground color for this step I chose #E82B19 (a nice red). After I filled this new selection, I got the below image.

step 30 of 40
Duplicate the layer. Select the original hawk layer (Layer 2) and press CTRL+i to invert this layer. Then press CTRL+U to bring up the Hue/Saturation window and apply the settings below.

step 31 of 40
Select Layer copy 2, press CTRL+B to bring up the Color Balance window, and apply the following settings to the Shadows/Midtones/Highlights.

step 32 of 40

step 33 of 40

step 34 of 40
Change the Blending Mode of this layer (Layer 2) to Hard Light. Select the layer above (Layer 2 copy) and change the Blending Mode to Color Dodge. You should have an image that looks like the one below.

step 35 of 40
Duplicate the hawk layer (Layer 2). Apply a 250px Gaussian blur to this layer. Filter/Blur/Gaussian Blur. Press CTRL+F to reapply the Gaussian blur. You should now have a nice outer glow. Select the top layer, and rotate it 90 degrees CCW using the Free Transform tool. Apply a wind effect by selecting Filter/Stylize/Wind. Select To The Left and press OK. Press CTRL+F to reapply the effect. Rotate the layer 90 degrees CW back to its original position, and set the layer Opacity to 65%.

step 36 of 40
Merge all three hawk layers together and change the Blending Mode of the new layer to Hard Light.

step 37 of 40
Drag or cut and paste the merged hawk layer into the Phoenix Rising image and rename it Phoenix. If you need to resize or move the layer, press CTRL+T to bring up the Free Transform tool and while holding down ALT+SHIFT, drag the top left corner to resize the phoenix and then move it into position. Select Edit/Transform/Warp and elongate it. This is where you will have to make your own decision as to how elongated you want the phoenix to look. Afterwards, you can use the smudge tool if you like and smudge some of the phoenix (wings/tail) to give it the appearance of rising from the towers. The image below is how I decided to make it.

step 38 of 40
We’re almost done. Duplicate the phoenix layer. Apply a Radial Zoom Blur to this layer. Filter/Blur/Radial and use the below settings.

step 39 of 40
Duplicate this layer 3 times. Move all these new blurred layers below the New York layer, but keep the original phoenix layer on top.
Change the layer Blending Modes of the Phoenix layers as follows:
Phoenix: Screen
Phoenix copy: Normal
Phoenix copy 2: Luminosity
Phoenix copy 3: Multiply
Phoenix copy 4: Difference
You should have an image similar to the below image.
Change the layer Blending Modes of the Phoenix layers as follows:
Phoenix: Screen
Phoenix copy: Normal
Phoenix copy 2: Luminosity
Phoenix copy 3: Multiply
Phoenix copy 4: Difference
You should have an image similar to the below image.

step 40 of 40
The final step is to select the layer mask in the Phoenix layer, and mask out the phoenix glow in front of the skyline so that the skyline is completely black. Once you’re satisfied with your image, flatten the entire image and save.

Final result
Pxleyes
Photography and photoshop contests
We are a community of people with
a passion for photography, graphics and art in general.
Every day new photoshop
and photography contests are posted to compete in. We also have one weekly drawing contest
and one weekly 3D contest!
Participation is 100% free!
Just
register and get
started!
Good luck!
Follow us:


© 2015 Pxleyes.com. All rights reserved.