
Original image
step 1 of 6
In this step, i cut out both figures with the pen tool and placed them onto the image. I then added a layer mask on the statue and sued the default grass brush to paint over it to create the illusion of her immeresed in grass. Wing were extracted from the bird in the statue image and colour corrected, then added onto the figure which had an inner glow applied to it.

step 2 of 6
Here i stretched the canves so that the tree was not in the image, and i also used the elipse tool and with a light orange i created a sphere which i then blurred heavily. The blending mode was set to screen, the circle was duplicated and enlarged and the opacity was lowered.

step 3 of 6
I added light rays and i created highlights on the statue, these were both set to screen and a light orange colour.

step 4 of 6
I added some heavier light rays. This was a problem for me because to achieve this effect i would normally work with the line tool, but the effect just wasn't good enough, so after a while of experimenting i found a method that worked very well for me:
I added a new gradient adjustment layer, and when the pop up menu appeared, i clicked on the thumbnail showing the gradient. This took me to the Gradient Editor. Once in here I selected the option "Noise" from the drop down menu where it normally says "Solid" and i simply moved all the white sliders to the left, except the green one. I then click okay and i then adjust the angle of the gradient to about -45 degrees. I then desaturated it (ctrl+shift+u) and set the blending mode to "Screen" Then using a layer mask i erased any unwanted parts.
I added a new gradient adjustment layer, and when the pop up menu appeared, i clicked on the thumbnail showing the gradient. This took me to the Gradient Editor. Once in here I selected the option "Noise" from the drop down menu where it normally says "Solid" and i simply moved all the white sliders to the left, except the green one. I then click okay and i then adjust the angle of the gradient to about -45 degrees. I then desaturated it (ctrl+shift+u) and set the blending mode to "Screen" Then using a layer mask i erased any unwanted parts.

step 5 of 6
All the colours were matched by adding a few green, blue and brown overlays with different blending modes and opacities.

step 6 of 6
I wasn't happy with the feel of the image at this point because it felt a bit too dark and gloomy for such a happy image and so a gradient map was added to give the final, warm effect.

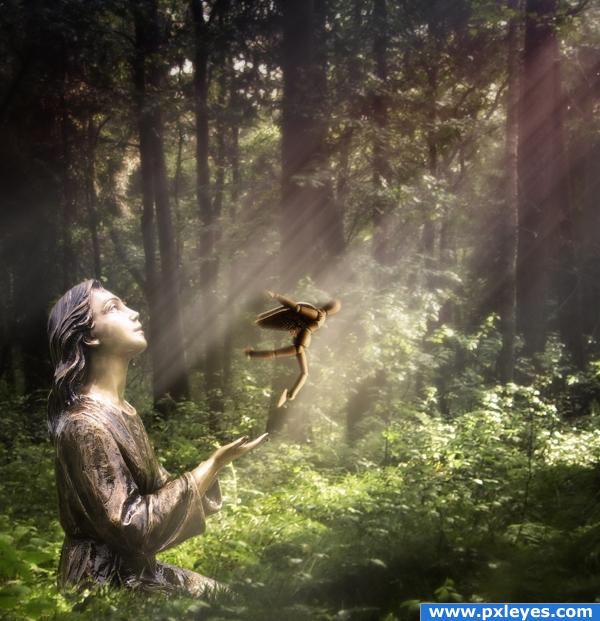
Final result
Pxleyes
Photography and photoshop contests
We are a community of people with
a passion for photography, graphics and art in general.
Every day new photoshop
and photography contests are posted to compete in. We also have one weekly drawing contest
and one weekly 3D contest!
Participation is 100% free!
Just
register and get
started!
Good luck!
Follow us:


© 2015 Pxleyes.com. All rights reserved.