
Original image
step 1 of 12
First thing, I expanded the canvas size to give myself room to work. Then I cut the image where I wanted my waterfall to break.

step 2 of 12
I used a portion of the river to create a color base for my waterfall.

step 3 of 12
Added some blending and smudged the contours.

step 4 of 12
Added several layers to give the depth of falling water.

step 5 of 12

step 6 of 12
Added rocks and trees to the far side of the river. cut the rock edges with a soft brush to better blend into the dune grass and shrubs. Used the warp tool to better align the rocks to fit the space.

- 1: source 1
step 7 of 12
Layer order adjustments. A few more transform changes to get the right grade to the rocks.

- 2: source 2
step 8 of 12
Added water texture to the top of my color base layer. Used the luminosity setting to increase the depth.

- 3: source 3
step 9 of 12
Cleaned up the edges and made a few fixes with the edge flow.

step 10 of 12
Added a couple of rocks to the top of the falls to show some separation in the falling water.

step 11 of 12
Created a rainbow with the gradient tool. Ran filter "Polar Coordinates" to give it an arch.

step 12 of 12
Lowered the opacity of the rainbow and lightened the ends to help it blend in.

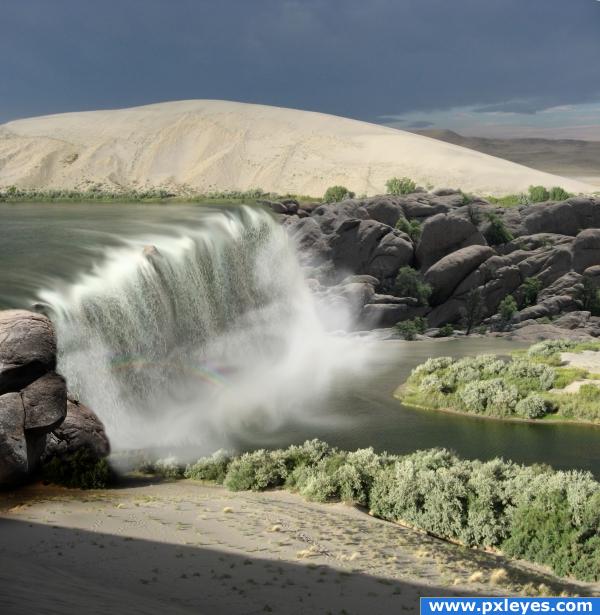
Final result
Pxleyes
Photography and photoshop contests
We are a community of people with
a passion for photography, graphics and art in general.
Every day new photoshop
and photography contests are posted to compete in. We also have one weekly drawing contest
and one weekly 3D contest!
Participation is 100% free!
Just
register and get
started!
Good luck!
Follow us:


© 2015 Pxleyes.com. All rights reserved.