
Original image
step 1 of 18
I opened source 1 and cropped it. Then I created a brightness/contrast adjustment layer.

step 2 of 18

step 3 of 18
On a new layer I placed my own photo, adjusted its size and rasterized it.

step 4 of 18
With the polygonal lasso tool I selected the window panels, masked the photo and applied 35% opacity.

step 5 of 18

step 6 of 18
On a new layer over the photo, I applied some shadow.

step 7 of 18
I created a new layer above and placed the source 2, rasterized it, got rid of its white background and adjusted its size.

step 8 of 18
Using mask, I hid small areas of the background that hadn't been erased, and the right part of the image.

step 9 of 18
To the leaves I applied drop shadow and inner shadow and created a hue/saturation adjustment layer.

step 10 of 18
I created a new layer under the leaves and applied shadow with 70% opacity.

step 11 of 18
On a new layer at the top I place the image source and erased its background. I duplicated it five times and created a branch a bit longer with two copies. Brightness/contrast adjustment layer was applied then.

step 12 of 18

step 13 of 18
I enlarged the third image source copy, applied brightness/contrast adjustment layer and blurred the image to have some depth.

step 14 of 18

step 15 of 18
Then I used the fourth copy of the image source. Same process, but I made it bigger and applied more blur.

step 16 of 18
Same process for the last copy of the image source, but increasing its size and blur a little bit.

step 17 of 18
On a new layer at the top I created a rain texture [I suggest following this tutorial to add rain to your picture: http://photoshoptutorials.ws/photoshop-tutorials/photo-effects/rain.html . It's a very good one).

step 18 of 18
On a new layer above my photo and its shadow I added rain drops to the window panels, using brush and with white foreground.

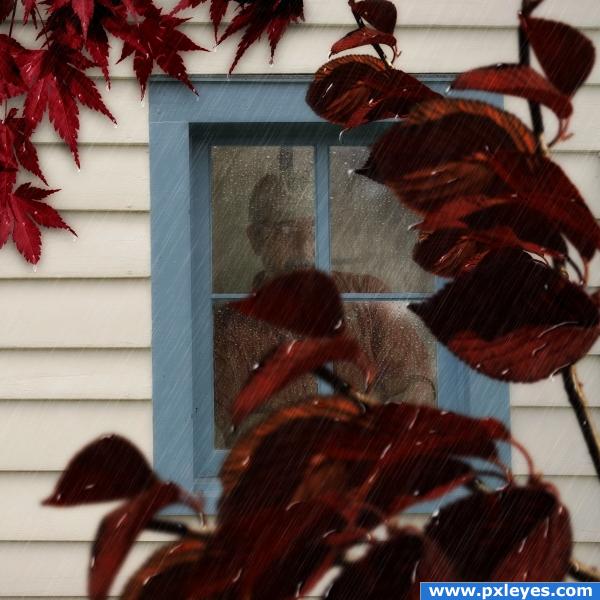
Final result
Pxleyes
Photography and photoshop contests
We are a community of people with
a passion for photography, graphics and art in general.
Every day new photoshop
and photography contests are posted to compete in. We also have one weekly drawing contest
and one weekly 3D contest!
Participation is 100% free!
Just
register and get
started!
Good luck!
Follow us:


© 2015 Pxleyes.com. All rights reserved.