
Original image
step 1 of 22
First of all I cut out the lips using polygonal lasso tool.

step 2 of 22

step 3 of 22
Upper and lower lips were cut out and a layer for each one was created via copy. I created another copy just in case something went wrong.

step 4 of 22

step 5 of 22
I placed the skull in a new layer at the bottom, just above the background, rasterized it and worked on it as to adjust the teeth to the mouth.

step 6 of 22
Using the warp modes I worked on the lips to open and distort the mouth and show the teeth [dont't bother with the colour burn you see in the image below. It comes later. I forgot to make a copy of the distorted lips :-)]

step 7 of 22

step 8 of 22

step 9 of 22

step 10 of 22
I applied shadow, some colour and hue/saturation adjustment to the skull.

step 11 of 22
Now the zipper. First I created the pieces of the zipper [you can go to http://www.webdesign.org/web/photoshop/drawing-techniques/zipper-tutorial.16469.html to learn how to draw a zipper. Mine is far from being so nice.]

step 12 of 22

step 13 of 22

step 14 of 22
I created a folder named 'Zipper' and two other folders within, one for the zipper on he upper lip, and oher for the zipper on the lower lip. I duplicated the first piece of the zipper and placed it on the folder 'ZIP 1' and made as many copies as needed to place on the upper lip one by one following the curve. The same process was used for the lower lip. In each zip folder I created a layer for the shadow.

step 15 of 22
I placed the other pieces of the zipper inside the zipper folder.

step 16 of 22
Below the zipper folder I created two adjusment layers, one for photo filtre and the other for hue/saturation. Worked on shadows and colour burn.

step 17 of 22

step 18 of 22
I created a new layer and merged all visible layers [shift+ctrl+alt-e] and duplicated this layer.

step 19 of 22
Equalized the stamped copy

step 20 of 22
Applied gaussian blur.

step 21 of 22
Applied high pass filtre.

step 22 of 22
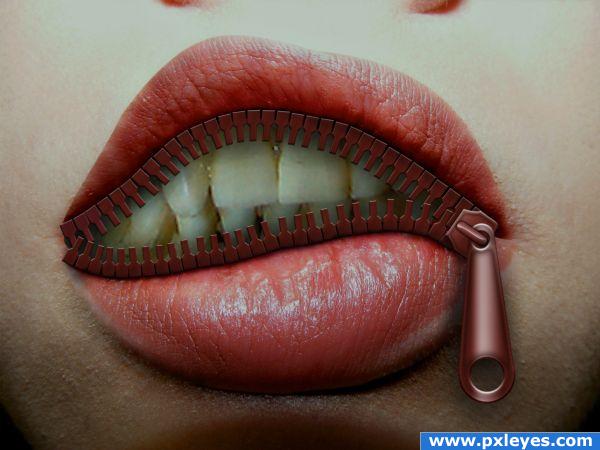
And finally I applied overlay blending.

Final result
Pxleyes
Photography and photoshop contests
We are a community of people with
a passion for photography, graphics and art in general.
Every day new photoshop
and photography contests are posted to compete in. We also have one weekly drawing contest
and one weekly 3D contest!
Participation is 100% free!
Just
register and get
started!
Good luck!
Follow us:


© 2015 Pxleyes.com. All rights reserved.