
Original image
step 1 of 13

step 2 of 13
Clone stamped out the bldg. and did a levels adjustment to brighten it up a little.

step 3 of 13
Used a variety of selection tools to isolate the bldg without windows. I think magic wand for the BG, color selector for the bldg, and a combination of marquee and poly lasso to finish off.

step 4 of 13
cropped an open area of the windmill, alt-dragged it a few times to copy, then flattened them to one layer (ctrl+e)

step 5 of 13
I then clipped the bricks with the bldg cut-out (alt-click on line between layers) and blended with multiply and set the opacity to 80.

step 6 of 13
I took a texture and colorized pink to look like some stained glass or something, I then clipped them with a copy of the bldg that still had windows intact and placed below the bldg with cut out windows.

step 7 of 13
It looked a little bland to me still so I added a wood texture clipped with a windowless bldg, then added a layer mask to some areas to look like some wood on the bldg.
I placed this layer between my brick bldg and the "stain glass" layer
I placed this layer between my brick bldg and the "stain glass" layer

step 8 of 13
Next I isolated one of the windmills propellers with some selection tools, mostly again the wand, marquee, and poly lasso.

step 9 of 13
Copied the single propeller blade and transformed them to fit their places
also added the middle connector to complete and some beveling and other styling to add depth
also added the middle connector to complete and some beveling and other styling to add depth

step 10 of 13
I flattened the propeller blades to one layer (ctrl+e) and jumped it to a new layer (ctrl+j)
I added a radial blur to this layer ( is it just me or is radial blurs UI a little outdated? No preview, I had to keep tweaking )
Then I moved that layer below the flattened propeller layer to create a motion effect.
I added a radial blur to this layer ( is it just me or is radial blurs UI a little outdated? No preview, I had to keep tweaking )
Then I moved that layer below the flattened propeller layer to create a motion effect.

step 11 of 13
I didn't want to spend too much time melding the castle to the base so I just clone stamped some of the grass from below to the bottom of the castle to hide my ugly edge :)

step 12 of 13
I added some noise to make it feel more... illustrated. I guess thats the word also threw in a little lightning and a lightning rod to power the windmill

step 13 of 13
Finally I did some curves adjustment to darken the colors for a more gothic feel and threw a dark blue photo filter layer above it all to tie it all together! Hope you all like it!

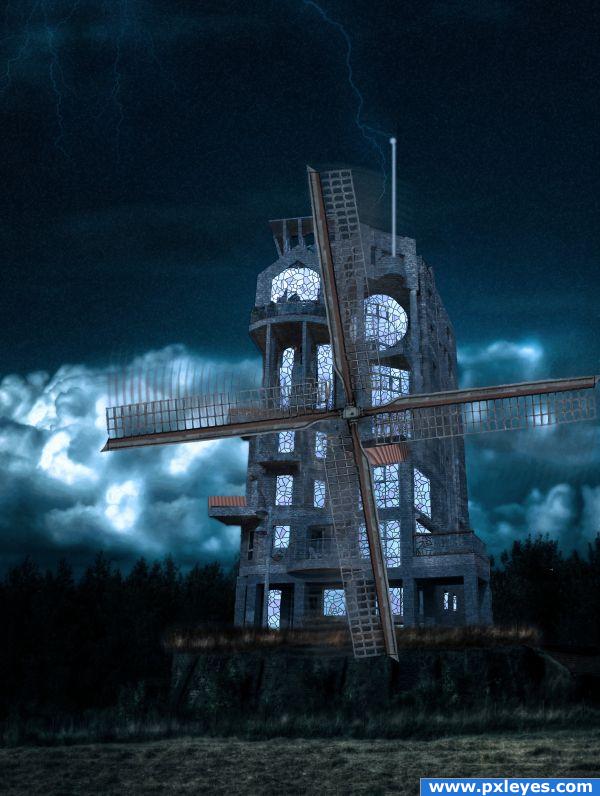
Final result
Pxleyes
Photography and photoshop contests
We are a community of people with
a passion for photography, graphics and art in general.
Every day new photoshop
and photography contests are posted to compete in. We also have one weekly drawing contest
and one weekly 3D contest!
Participation is 100% free!
Just
register and get
started!
Good luck!
Follow us:


© 2015 Pxleyes.com. All rights reserved.