
Original image
step 1 of 10
Roughly draw a sketch using your reference picture...

step 2 of 10
Begin to build the rose by taking parts of the source pic and adding them to the sketch that you have drawn...

step 3 of 10
continue to build...

step 4 of 10
...add more sections, using the warp tool to shape into place...

step 5 of 10
add more sections...and begin to form the inside of the rose...

step 6 of 10
complete the inside of the rose, both by using warp tool and by using the liquify tool to add more detail...

step 7 of 10
now add the leafs by taking the "bricks" from the source pic, and warping them into place :)

step 8 of 10
Now to add the background, using marquee tool, create a perfect circle and crop the middle section of the source pic...scale transform it into place...

step 9 of 10
Add a black background to the image... to the circle created by the source pic, add an outer and inner glow, including a inner shadow, to make it look like a globe... Then add a "glass crack" brush... I used the brush from
www.brusheezy.com and here is the link to my brush
http://www.brusheezy.com/brush/829-Shattered-Glass
thanks to Obsidian Dawn
www.brusheezy.com and here is the link to my brush
http://www.brusheezy.com/brush/829-Shattered-Glass
thanks to Obsidian Dawn

step 10 of 10
Add a slight texture/pattern to the background for depth...
I used a carbon fibre pattern and added a colour tint (orange) onto it..
http://www.brusheezy.com/brush/647-Carbon-Fiber
thanks to rubina119 for the pattern.
I used a carbon fibre pattern and added a colour tint (orange) onto it..
http://www.brusheezy.com/brush/647-Carbon-Fiber
thanks to rubina119 for the pattern.

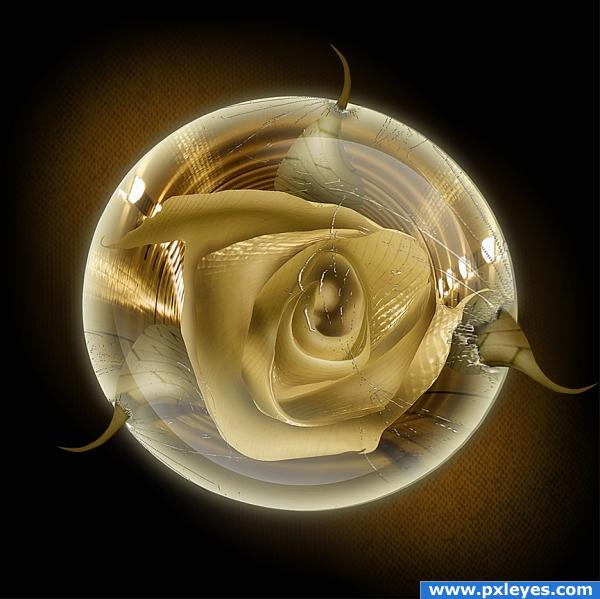
Final result
Pxleyes
Photography and photoshop contests
We are a community of people with
a passion for photography, graphics and art in general.
Every day new photoshop
and photography contests are posted to compete in. We also have one weekly drawing contest
and one weekly 3D contest!
Participation is 100% free!
Just
register and get
started!
Good luck!
Follow us:


© 2015 Pxleyes.com. All rights reserved.