
Original image
step 1 of 2
Open Picture of Girl. Select girl out of photo. Copy and paste her into photo of field/flower.
Use healing brush to hide seed on right side of flower.
Edit>Transform>Scale to make girl smaller. Hold shift to keep her proportions right. Move her further back into picture.
Use healing brush to hide seed on right side of flower.
Edit>Transform>Scale to make girl smaller. Hold shift to keep her proportions right. Move her further back into picture.

step 2 of 2
Select Round Gradient Tool.
Select Yellow to Purple. Draw line from center of flower to top corner. It should be yellow in the middle, graduating to purple at the edges.
Select Overlay.
Duplicate girl layer.
Layer>Layer Styles>Color Overlay. Select Black.
On black layer, select Filter>Blur>Gaussian Blur, 60 Pixels.
Edit>Transform>Rotate, Warp to put the shadow under the girl.
Flatten image.
Select Girl Layer. Filter>Render>Lighting Effects>Omni. Expand to cover girl.
Select Healing Brush set to Multiply. Use a small brush to ring around the girl so that her edges blend.
Use the Healing brush to make grass around her feet.
Use Blur Tool and a large soft brush to blur the girl slightly for propper depth of field.

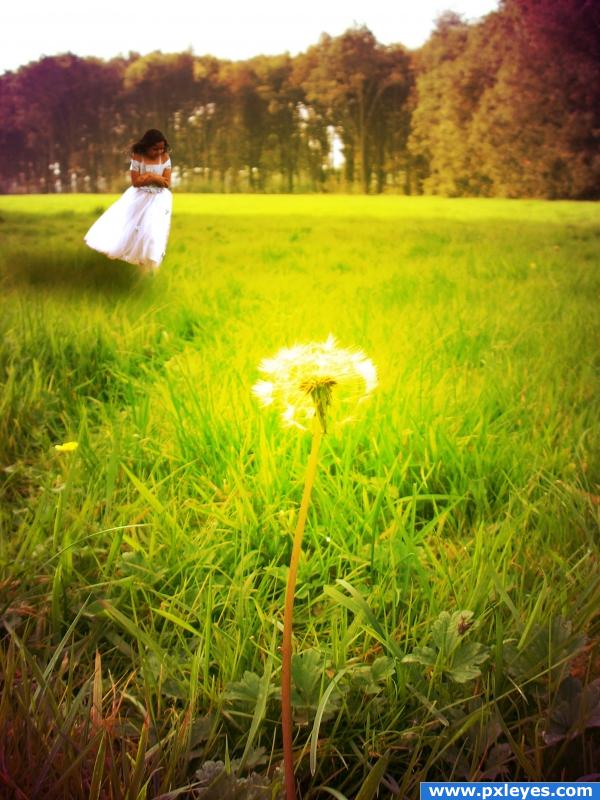
Final result
Pxleyes
Photography and photoshop contests
We are a community of people with
a passion for photography, graphics and art in general.
Every day new photoshop
and photography contests are posted to compete in. We also have one weekly drawing contest
and one weekly 3D contest!
Participation is 100% free!
Just
register and get
started!
Good luck!
Follow us:


© 2015 Pxleyes.com. All rights reserved.