
Original image
step 1 of 16
First I chopped out the metal piece from the gun

step 2 of 16
then free transformed it making a hat like image

step 3 of 16
used the same piece for the suit of armor just duplicating it and free transforming it around a bit

step 4 of 16
Then used the Elliptical Marquee tool to select a part of the rounded area on the stock portion of the gun to make the head - then I desaturated it a bit and played around with hue and saturation

step 5 of 16

step 6 of 16
Free transformed the head and hue and saturation.

step 7 of 16
Chopped out another part of the wood for the neck area

step 8 of 16
Start of neck area

step 9 of 16
Free transformed the neck in with the head and applied the desaturated and hue with the same color as the head

step 10 of 16
Also duplicated the armor and applied a bottom layer free trans forming it so it would blend to the neck area

step 11 of 16
used the same piece for the bottom leg portions duplicating and adjusting them together

step 12 of 16
Chopped out this portion for the feet and free transformed

step 13 of 16
Added little cuff looking things from here

step 14 of 16
Then I just chopped out this portion for the hand areas and added under the armor

step 15 of 16
next I used a star like thing I started playing with from the image and used it under the armor to look like metal fingers

step 16 of 16
And last I liquifye the image to tweak the had and bring it down and some of the shoulder areas then just burned, desaturated and adjusted the colors

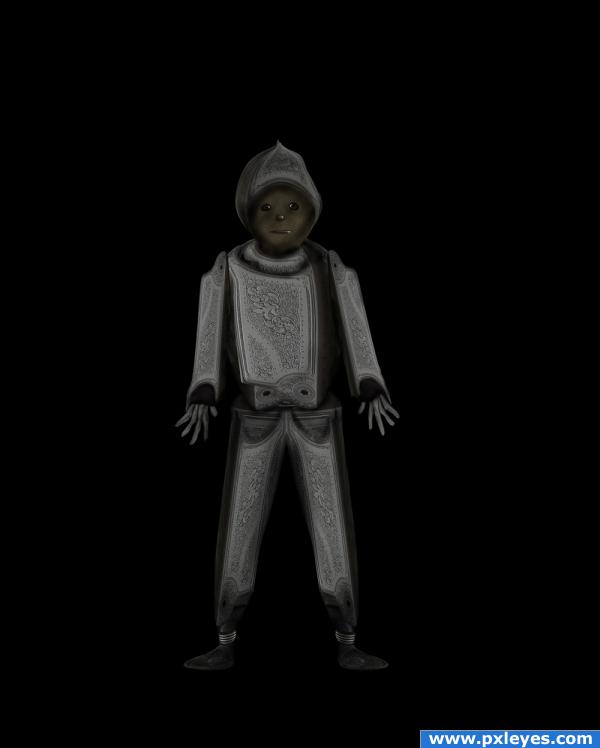
Final result
Pxleyes
Photography and photoshop contests
We are a community of people with
a passion for photography, graphics and art in general.
Every day new photoshop
and photography contests are posted to compete in. We also have one weekly drawing contest
and one weekly 3D contest!
Participation is 100% free!
Just
register and get
started!
Good luck!
Follow us:


© 2015 Pxleyes.com. All rights reserved.