
Original image
step 1 of 15
First of make some minor colour adjustments to the original source image.
remove the sky because it looks very blahh
remove the sky because it looks very blahh

step 2 of 15
now i slipped the new sky image under the landscape that we just cut out. i also made some minor colour asjustments just to increase the saturation and such.

- : source
step 3 of 15
Now is when the program hopping starts. Open illustrator and make some random shapes with the pen tool try to make them somewhat oblong and angular looking. Now make sure you save them as illustrator 8 this is critical as not doing this will not allow you to go on to the next step

step 4 of 15
to get these shapes i first opened up thos shapes we made in illustrator up in maxon c4d they will show up as comon lines in the browser.
then you have to use the extrude nurbs feature to give them some depth.
after doing this rotate them to get some interesting angles. make sure that from where you are viewing them they don't touch. Add low luminosity light all around the objects.
use one strong spotlight high above the object to kinda simulate the light that would come from a real sky.
also include a sky.
now on to materials, give the material a flat refraction index and include a weak reflection aply the material to the shapes we just made.
Create another material for the sky, in this one the only thing you change would be the texture use the sky image from the begining.
apply this material to the sky. lastly make sure you save these materials because you want to use the exact same ones for all your 3d work.
Now go to the render seting dialogue box change the dpi to 300, check the save alpha channel box, and change the render size to 2000X3000 make sure you save this because you will use it allot.

step 5 of 15
To make these small particles you create a piramid object in a new window in c4d aply a explosion effect to it an play around with the setings until you are satisfied make sure you aply the same brown material to the pyramid. use the render setings you used earlier, the only change aplied to them should be 1000 pixels added to both dimensions

step 6 of 15
in a new window select the text tool and type in STONE all caps. then use extrude again to give it depth now change the caps in the seting to filet caps with 1 hight and 6 subdivisions. use roughly the same lighting as the first render we made rotate it to make it match the destination image.

step 7 of 15
Now make a sphere and apply the same material lighting and render seting as the stone render.

step 8 of 15
Open the images of the renders you saved in photoshop. Once open go to the alpha channels window and you will see the generic r, g and b chanels and a new black and white one make a selection of this chanel and apply it as a layer mask on the render repeat this proces with all the shapes.
drag them onto the landscape and place them whatever way you want.
drag them onto the landscape and place them whatever way you want.

step 9 of 15
apply these layer styles to the render layers.
Tip just do this once and copy and paste the layer style from one item to another doing minor tweaks allong the way
Tip just do this once and copy and paste the layer style from one item to another doing minor tweaks allong the way

step 10 of 15
Open rust image, desaturate it, and then apply this layer adjustment to it st this layer to multiply this will allow us to only get the texture from the image
for those who cant read it the numbers are 0- 1.44- 83 in the leves dialogue.
for those who cant read it the numbers are 0- 1.44- 83 in the leves dialogue.

- 1: source 1
step 11 of 15
place your texture over the letters and shapes and use layer masks to make sure the edges of it are not visible. You can tille as many as you want on top of each other it will just make the effect more pronounced.
now carefully start dodging the edge of you shapes that is roughly facing the light and burning the side that is in shadow. also use your burn tool to give the shapes shadow.
now carefully start dodging the edge of you shapes that is roughly facing the light and burning the side that is in shadow. also use your burn tool to give the shapes shadow.

step 12 of 15
you cant really see this on the image but i very slightly aplied gausian blurs progresivly geting stronger on the object that are farther away from you also blur the sphere on the side that is closer to you this will create a very subtle DOF efect

step 13 of 15
use the cloud brush on a low oppacity on your image brush a litle in the distance and brush on your leters it will slightly soften the whole without giving it the gausian blur look. another thing this brush was good for was covering up my mistakes for example the horizon line looked od to rectify this i just made it look misty with the brush

- 2: source 2
step 14 of 15
to make the sky look bluer i aplied this adjustment layer to it

step 15 of 15
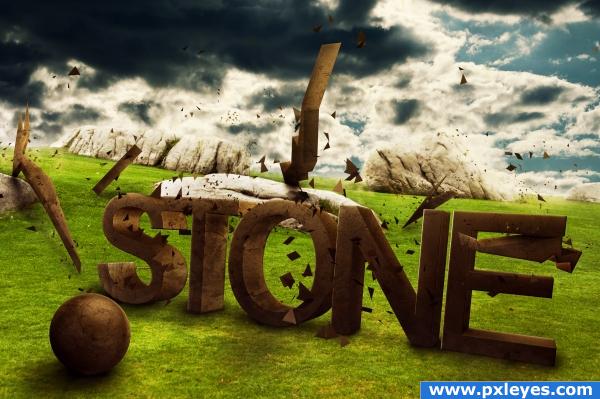
now flaten your image ontop of the flat version i put these adjustment layers and lastly i sharpened the whole

Final result
Pxleyes
Photography and photoshop contests
We are a community of people with
a passion for photography, graphics and art in general.
Every day new photoshop
and photography contests are posted to compete in. We also have one weekly drawing contest
and one weekly 3D contest!
Participation is 100% free!
Just
register and get
started!
Good luck!
Follow us:


© 2015 Pxleyes.com. All rights reserved.