
Original image
step 1 of 14
Cut and paste the statue on top of the jelly mold. Adjust the perspective of the jelly to match the angle of the statue.

- : source
step 2 of 14
Make a selection of the statue and on a new layer fill the selection in with a gradient. Use the jelly mold to get color samples. And use a middle value orange for the top of the fill blending into a slightly darker orange at the bottom

step 3 of 14
Next we are going to give the volume some depth and a translucent effect. So make a selection from the statue layer again. Then shrink the selection by about 20 pixels (for 300dpi)

step 4 of 14
Now trim away most of that selection leaving a 20pixel wide strip along the side of your light source. (for this image it is on the left.)

step 5 of 14
Now smooth the selection using Select>Modify>Smooth.
I used a value of 12 pixels.
It is the smoothing that makes the image look soft and glossy.
I used a value of 12 pixels.
It is the smoothing that makes the image look soft and glossy.

step 6 of 14
Now on a new layer, airbrush in the selection using a yellow sampled with the eyedropper from the original jelly mold. Dont fill in the selection entirely solid. Just use a soft brush like "Soft Mechanical 250px"
Then brush along the edges of the selection light in some areas heavier in others.
Now you have your light source travelling through your object to create the translucency.
Then brush along the edges of the selection light in some areas heavier in others.
Now you have your light source travelling through your object to create the translucency.

step 7 of 14
Hide your previous layer. And on a new layer repeat steps 3 through 6 using a smaller shrink selection value. And leave two selection strips along both sides of the statue. Then smooth and airbrush them using a darker orange. This is what is giving our jelly volume and depth.

step 8 of 14
Add a bit more darker orange/red in the same selection just on the right side to make the volume a little deeper and darker.

step 9 of 14
The next steps in the process is going to give our image gloss and definition. Begin by hiding all your layers and turn on the original statue layer. Using the selection tool (I like using the poly lasso for fine control) Make a selection of an area on the statue that has a hard highlight. Just make small to medium sized selections at a time. You arent going to be able to paint all the highlights on the whole model in one selection.

step 10 of 14
Now smooth the selection. Use a smaller value like 8px beacuse we don't want to lose all of our definition, but still want to make sure our highlights make the object look soft, not hard edged.

step 11 of 14
Now airbrush in the selection using the lightest yellow you can sample out of the jelly mold (using the technique described earlier). Deselect and repeat the process on each of the statues highlights, until the statue is covered.

step 12 of 14
Next repeat the process used for the glossy highlights. But this time select shadowed areas of the statue and fill on a new layer with a dark orange/red sampled from the jelly mold.

step 13 of 14
Hide the original statue layer and unhide all of the layers you painted and your details should look something like this.

step 14 of 14
Finally drop a background layer in the back that blends well with the original jelly image. And you are done!

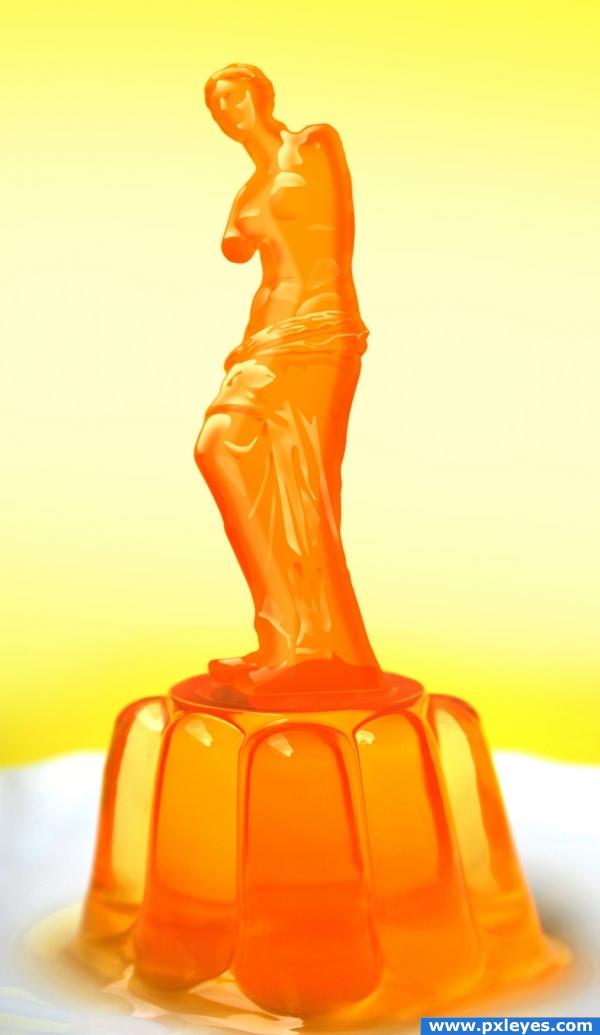
Final result
Comments
Pxleyes
Photography and photoshop contests
We are a community of people with
a passion for photography, graphics and art in general.
Every day new photoshop
and photography contests are posted to compete in. We also have one weekly drawing contest
and one weekly 3D contest!
Participation is 100% free!
Just
register and get
started!
Good luck!
Follow us:


© 2015 Pxleyes.com. All rights reserved.
you say you like to use poly lasso tool for selections. wouldn't it be easier to use magic wand tool or even pen tool to make the selections? generally i prefer pen tool over lasso tool and rarely use magic wand tool, but in this case magic wand seems to be the best choice..

(5 years and 3993 days ago)other than that it's a nice sbs and i really like the entry. good job.
ps: i'll probably try something similar some time soon, thanks for the idea
This guide is genious and the image is fantastic! I wish that I can think like that when I look at an image. I'm so glad that I found this website. It's making me think in ways about my images that haven't thought of before. Thanks a lot!
(5 years and 3993 days ago)First thank you both for the complements.
(5 years and 3993 days ago)Pen vs Lasso: I agree the pen tool would be a good choice over the lasso. For me its just personal preference to use the lasso. Some people like the pen, some like the quick mask, some use lasso.
Wand vs. Lasso: I dont like the magic wand or the magnetic lasso at all. I find myself contantly adjusting the tolerance just to have it not do what I am expecting. Except in high contrast or line drawings the wand is pretty useful.
Cool Pic, Congrats for the Second Place, And Nice SBS too.,
(5 years and 3988 days ago)