
Original image
step 1 of 16
Cut out the chandelier and a piece of the bg.

step 2 of 16
Rotate the piece of the bg so that the lines are perfectly vertical. Use the rectangular marquee tool to select the part you want to use, select inverse and delete the outer parts. Select inverse again, copy and paste the piece. Align the second piece. Merge the two layers. And repeat the last steps a couple of times.

step 3 of 16
Cut out pieces from the chandelier using the elliptical marquee tool. Paste in seperate layers. So you can use the new pieces later.

step 4 of 16
Use distort, perspective and warp (menu-edit-transform=>)
to edit the pieces from the chandelier. Use stamp for the neckpart. For the face darken(adjust brightness/contrast) and resize the chandelier, blur it(I used filter paint doubs) and smudge it into shape.
to edit the pieces from the chandelier. Use stamp for the neckpart. For the face darken(adjust brightness/contrast) and resize the chandelier, blur it(I used filter paint doubs) and smudge it into shape.

step 5 of 16
Transform the bg piece you created earlier and delete unwanted parts with the delete tool.

step 6 of 16
I dodged the leftside of the shape, and multiplied the rightside. Copy the head part, resize it and place it behind the model/shape. This gives an extra dimension/hairline to the model.

step 7 of 16
Transform the bg piece for the shoulder and breast parts. Use perspective and warp.

step 8 of 16
Use a part from the chandelier to make the necklace. Use warp for the transformation, and eraser tool for unwanted parts.

step 9 of 16
Flatten all the layers you have.
Duplicate the model and resize/move.
Duplicate the model and resize/move.

step 10 of 16
With the models in a layer without a bg(the white in this sbs was on a seperate layer) make a new layer, place behind the models and draw a scenery.

step 11 of 16
Draw sand with wind coming from the left onto the models.

step 12 of 16
Use smudge to smoothen and at the same time give more detail to the image.

step 13 of 16
More detail, use every tool you can get your hands on.

step 14 of 16
Rotate the faces a little bit by selecting the face and using the warp tool. Add more detail.

step 15 of 16
Brighten the image, set contrast down, and change the colors.

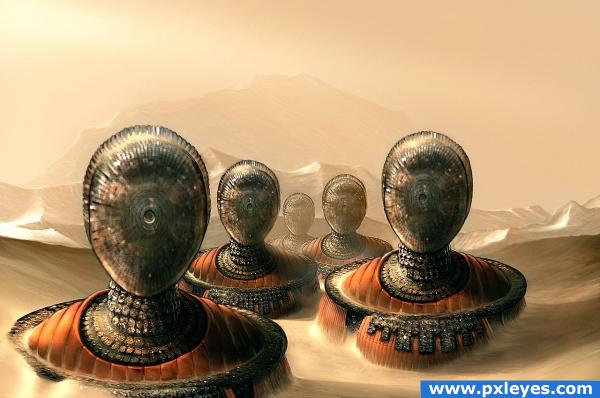
step 16 of 16
Add some detail using the paint daubs filter, brush size 1, sharpness 4. And thats that, finished.

Final result
Comments
Pxleyes
Photography and photoshop contests
We are a community of people with
a passion for photography, graphics and art in general.
Every day new photoshop
and photography contests are posted to compete in. We also have one weekly drawing contest
and one weekly 3D contest!
Participation is 100% free!
Just
register and get
started!
Good luck!
Follow us:


© 2015 Pxleyes.com. All rights reserved.
Exceptional piece, exceptional sbs, exceptional skills. Absolutely LOVE it!!!!!
(5 years and 3981 days ago)You should create a tutorial for this one
(5 years and 3969 days ago)