
Original image
step 1 of 10
Selected the hut using the pen tool.
I also selected small parts where I could see the trees behind and deleted them.
I selected the left side of the roof, which didn't have any vegetation on it, copied it and flipped it horizontal, then matched it to the hut and masked it so that I could get a better right side of the roof.
I also selected small parts where I could see the trees behind and deleted them.
I selected the left side of the roof, which didn't have any vegetation on it, copied it and flipped it horizontal, then matched it to the hut and masked it so that I could get a better right side of the roof.

step 2 of 10
Added the sky and clouds backround and used the clone stamp tool to erase the initial moon.
I also duplicated layer, desaturated it and changed blending mode to hard light to get more shadows.
I also duplicated layer, desaturated it and changed blending mode to hard light to get more shadows.

- : source
step 3 of 10
Selected moon and added it on the image, also added some shadows and a slight outer glow.

- 1: source 1
step 4 of 10
Added hut and colored it by using a gradient layer from the blue and yellow colors that I picked from the sky and clouds image.
I also added the hook that connects the hut to the moon. It comes from an image of my own that I took specially for this project.
You can see the picture in the next step.
I also added the hook that connects the hut to the moon. It comes from an image of my own that I took specially for this project.
You can see the picture in the next step.

step 5 of 10
I used this image to select the hook.

step 6 of 10
Added some extra clouds on the bottom part of image, using a free clouds brush. Colored them slightly, matching them to the whole scenary tones.

- 2: source 2
step 7 of 10
I added trees silhouettes, blending mode hard light.
I selected the top part of the hut and filled it with a light yellow color, in order to get ready for adding up the light beams coming out of the windows.
I added gaussian blur to the yellow random selection.
I selected the top part of the hut and filled it with a light yellow color, in order to get ready for adding up the light beams coming out of the windows.
I added gaussian blur to the yellow random selection.

- 3: source 3
step 8 of 10
Added light beams of different textures. Resized them and distort them to make them match the windows. Also added gaussian blur to them, and lowered opacity down to almost half.

- 4: source 4
step 9 of 10
Added some absolutely fenomenal magic star dust brush around the moon. Also added gaussian blur and changed blending mode to screen to make them glow even more.

- 5: source 5
step 10 of 10
Cropped image, getting rid of a bit right side of the image which was too much in the dark.
And I started to accentuate the colors and shadows.
Added like four gradient adjustment layers of different colors (in tones of blue, pinkish, green and orange), played with the blending modes.
Colored the bottom clouds from underneath the hut a bit more.
Added high pass filter.
Added a big yellow brush right on top of the moon, to make the light look like it's also coming down on the hut. Lowered opacity and changed blending mode to screen.
Added a brightness&contrast adjustment layer.

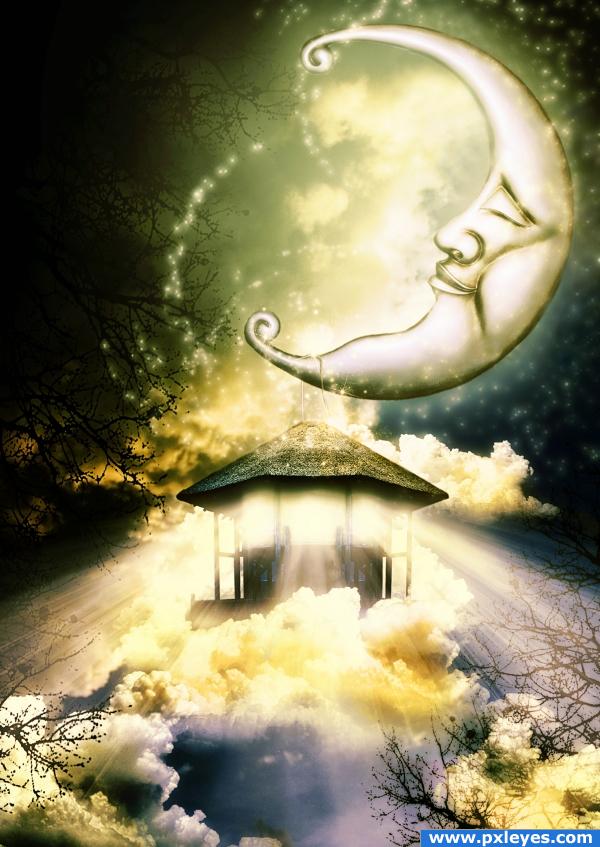
Final result
Pxleyes
Photography and photoshop contests
We are a community of people with
a passion for photography, graphics and art in general.
Every day new photoshop
and photography contests are posted to compete in. We also have one weekly drawing contest
and one weekly 3D contest!
Participation is 100% free!
Just
register and get
started!
Good luck!
Follow us:


© 2015 Pxleyes.com. All rights reserved.