
Original image
step 1 of 13
I made a selection of the stone ball and its pedestal using the pen tool.
I used the warping tool on the pedestal to get a new conical shape.
I merged all three shapes to create new construction. Also resized them bigger.
I used the warping tool on the pedestal to get a new conical shape.
I merged all three shapes to create new construction. Also resized them bigger.

step 2 of 13
I made selections on a great porcelain pumpkin. Selected windows, door, stairs and leaf on top.
I added them on my stone construction and defringed selections along the way.
I added them on my stone construction and defringed selections along the way.

- : source
step 3 of 13
Started to color different elements. This step presents my initial idea to make the construction red. Later on you will see that I've changed my mind and turned it yellowish/greenish.
For colring used hue/saturation.
For colring used hue/saturation.

step 4 of 13
I added two layers of grass, masked and resized them for better blending and perspective.

- 1: source 1
step 5 of 13

step 6 of 13
Added dwarf, casted shadows of all elements by using drop shadow and for the dwarf simply copy/paste him onto a new layer, colored black, distort and warped, added gaussian blur and lowered opacity slightly.
I also added a gradient adjustment layer to give the whole image a greenish look.
I also added a gradient adjustment layer to give the whole image a greenish look.

- 3: source 3
step 7 of 13
Added musical notes, warped them for different shapes. Each of them has two layers, one with blending mode screen, second one added gaussian blur and changed blending mode to color dodge to give them some shinny look.

- 4: source 4
step 8 of 13
Added butterflies.
I found these wonderful PNG files but they were all on the same layer, so I had to roughly select each butterfly using the pen tool.
Then I repositioned them and resized them the way I wanted, mostly to face the dwarf as to give the impression that they were going towards the music.
I also added another gradient adjustment layer, this time from brown to yellow to give more lights and shadows to the whole image.

step 9 of 13
I added a linear gradient from light yellow to transparent coming from the top right part of the image, for lighting purposes.

step 10 of 13
I added a brightness/contrast adjustment layer.

step 11 of 13
I added the galaxies brush and added some gaussian blur to them. Maked some parts as well.

- 7: source 7
step 12 of 13
Added light beams coming from the right side. Lowered opacity for convinience.
Also added some yellow light on the right side of the little house using a soft brush, blending mode soft light and lowered opacity down to almost 50%.
Also added some yellow light on the right side of the little house using a soft brush, blending mode soft light and lowered opacity down to almost 50%.

- 8: source 8
step 13 of 13
Added some pixie dust brush. Masked some parts for better blending.
Corrected some parts of shadows which were not coming naturally, used the clone stamp tool with a big zoom to get clear details.
Finally I added one more brightness/contrast adjustment layer and lowered opacity down to almost 30%.
Corrected some parts of shadows which were not coming naturally, used the clone stamp tool with a big zoom to get clear details.
Finally I added one more brightness/contrast adjustment layer and lowered opacity down to almost 30%.

- 9: source 9
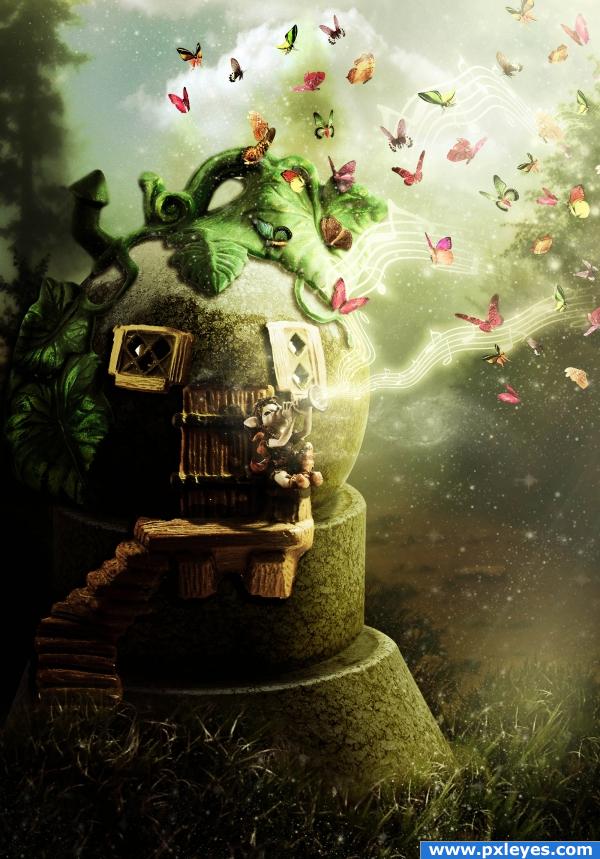
Final result
Pxleyes
Photography and photoshop contests
We are a community of people with
a passion for photography, graphics and art in general.
Every day new photoshop
and photography contests are posted to compete in. We also have one weekly drawing contest
and one weekly 3D contest!
Participation is 100% free!
Just
register and get
started!
Good luck!
Follow us:


© 2015 Pxleyes.com. All rights reserved.