
Original image
step 1 of 13
Different selections from source image (pen tool).

step 2 of 13
Started to recreate elephant.
Hat and ears.
Used warping and resizing selection from step 1.
Hat and ears.
Used warping and resizing selection from step 1.

- : source
step 3 of 13
Added face and revealed initial elephant's eyes using a layers mask.

- 1: source 1
step 4 of 13

step 5 of 13
Added nose.
Used one selection, copy/paste multiple times, resized, warped in position to make each part match into each other.
Used one selection, copy/paste multiple times, resized, warped in position to make each part match into each other.

- 3: source 3
step 6 of 13

step 7 of 13

step 8 of 13
Added shadows and highlights using different grey tones soft brushes and changing layer's blending mode to hard light.
For legs I added a bas relief filter as well to make them look like they've got veins.
For legs I added a bas relief filter as well to make them look like they've got veins.

- 6: source 6
step 9 of 13
Merged all layers to get the whole elephant.
Added a new layer and started paiting on top of it with tones of grey for shadows and highlights.
This is how it looked like before changing the blending mode.
Added a new layer and started paiting on top of it with tones of grey for shadows and highlights.
This is how it looked like before changing the blending mode.

- 7: source 7
step 10 of 13

step 11 of 13
This is how it looked like after changing blending mode of previous grey layers (hard light and screen with different opacities).
I didn't like the white of ears and the trunk so I colored the white into brown and added some texture from the same selection used for legs. I changed texture blending mode to multiply.
I didn't like the white of ears and the trunk so I colored the white into brown and added some texture from the same selection used for legs. I changed texture blending mode to multiply.

- 9: source 9
step 12 of 13
Revealed initial backround from the elephant image. Used the healing brush tool to correct some areas where I could still see the initial elephant.
Added sky backround, blended with first image. Added shadows and highlights to it by desaturating it and changing blending mode to multiply.
Added elephant shadow, using a copy of my elephant and distorting it. Colored it in black, lowered opacity and added gaussian blur.
Added sky backround, blended with first image. Added shadows and highlights to it by desaturating it and changing blending mode to multiply.
Added elephant shadow, using a copy of my elephant and distorting it. Colored it in black, lowered opacity and added gaussian blur.

step 13 of 13
For this last step a series of coloring effects and adding light source:
1. 3 gradient adjustment layers with different tones: primarly orange and blue. Different blending modes: hard light, overlay and luminosity and lowered their opacities as I didn't want the effect to be too striking.
2. High pass filter, soft light, opacity 30% for better definition.
3. Gaussian blur, soft light.
4. Added some light yellow soft brush on the right side to simulate light. Blending mode soft light, opacity 83%.
5. Corrected areas using healing brush tool (specially the bottom of feet where there was some white line from initial selection.
6. Burned overall image specially left side to make elephant shadow better blend into the overall shadow.
7. Softened edges using blur tool.

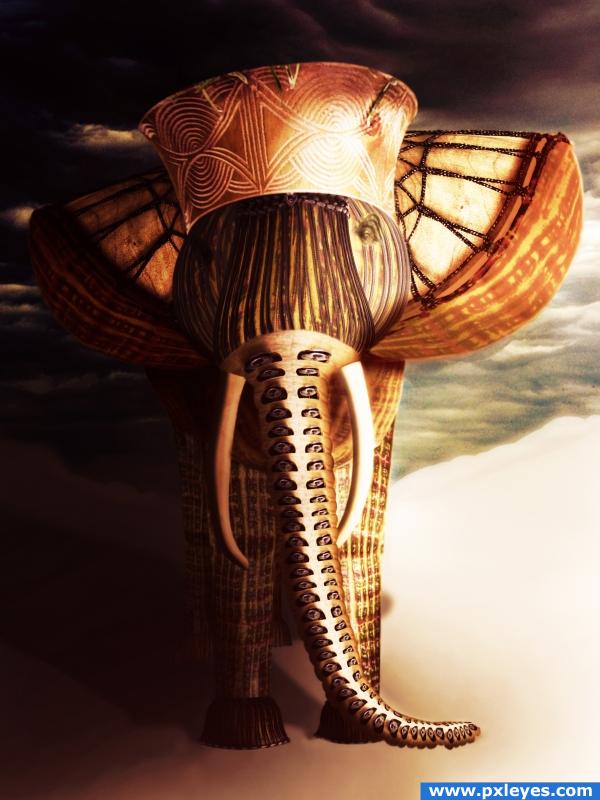
Final result
Pxleyes
Photography and photoshop contests
We are a community of people with
a passion for photography, graphics and art in general.
Every day new photoshop
and photography contests are posted to compete in. We also have one weekly drawing contest
and one weekly 3D contest!
Participation is 100% free!
Just
register and get
started!
Good luck!
Follow us:


© 2015 Pxleyes.com. All rights reserved.