
Original image
step 1 of 33
Initial selections from source image using pen tool.

step 2 of 33
Helmet reconstruction

step 3 of 33

step 4 of 33
Body and neck reconstruction.
You can see a colored final result as well.
You can see a colored final result as well.

step 5 of 33

step 6 of 33
Designing elements.

step 7 of 33
Adding elements in different shapes.
Also removed backround from initial girl image which I didn't need (using a layers mask)
Also removed backround from initial girl image which I didn't need (using a layers mask)

- 2: source 2
step 8 of 33
Nose creation.

step 9 of 33
Other elements and joints.

step 10 of 33

step 11 of 33
Construction of the "see through" mask for eyes and mouth.

step 12 of 33

step 13 of 33
Construction of the "alien" looking hair.

step 14 of 33

step 15 of 33
Added more hair in front of helmet to cover edges which I didn't like very much. Used the first shape that I have created using warp, copy/paste multiple times, resizing, flipping and repositioning.

- 6: source 6
step 16 of 33
Hands construction.

step 17 of 33

step 18 of 33

step 19 of 33
Brain construction.
Used a PNG file, warped and resized it.
Used a PNG file, warped and resized it.

- 10: source 10
step 20 of 33

step 21 of 33

step 22 of 33

step 23 of 33

step 24 of 33

step 25 of 33

step 26 of 33

step 27 of 33

step 28 of 33
A series of effects:
bm - stands for blending mode;
op - stands for opacity;
1. High pass filter (for better definition): bm overlay, 60% op;
2. Vignette: bm overlay, 34% op;
3. Gradient map adjustment layer for coloring (green to yellow): bm luminosity, 78% op;
4. Selective color adjustment layer;
5. Two channel mixer adjustment layers: bm luminosity; one layer with 100% op, second one with 57% op;

step 29 of 33

step 30 of 33

step 31 of 33
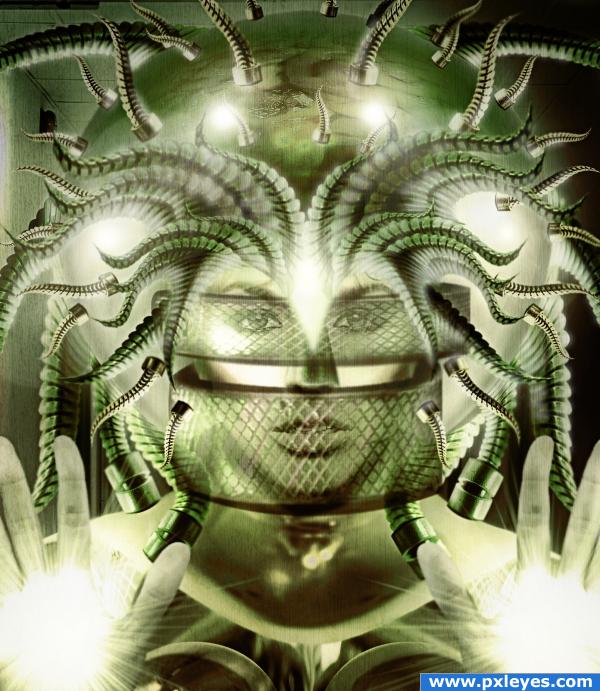
Finally last step:
1. Added more lens flare on the helmet, right underneath the brains.
2. Added some highlights on hair and elements using a soft yellow brush. Added gaussian blur to them and changed bm to soft light.
3. Added a grunge texture: bm overlay, 25% op.
1. Added more lens flare on the helmet, right underneath the brains.
2. Added some highlights on hair and elements using a soft yellow brush. Added gaussian blur to them and changed bm to soft light.
3. Added a grunge texture: bm overlay, 25% op.

step 32 of 33
Note to Katanaz on deviant art for source 1 and 6.

step 33 of 33
Note to Superior Stock on Deviantart for source 2.

Final result
Comments
Pxleyes
Photography and photoshop contests
We are a community of people with
a passion for photography, graphics and art in general.
Every day new photoshop
and photography contests are posted to compete in. We also have one weekly drawing contest
and one weekly 3D contest!
Participation is 100% free!
Just
register and get
started!
Good luck!
Follow us:


© 2015 Pxleyes.com. All rights reserved.
You.. are.. amazing...
(5 years and 4021 days ago)