
Original image
step 1 of 22
First created a document of A4 size...
Now added some guides with the help of rulers... These guides are there to help me set up the panel...
Now added some guides with the help of rulers... These guides are there to help me set up the panel...

step 2 of 22
Now using the rectangular tool with the shape layer option selected and the foreground color set to white... I create the first panel...
You can barely see it, but I have selected it so you can see it...
We will fix that in the next step...
You can barely see it, but I have selected it so you can see it...
We will fix that in the next step...

step 3 of 22
Now I added a layer style of stroke... Made it 5px and position inside...
Now I get a clean border for the panel...
Now I get a clean border for the panel...

step 4 of 22
Now adding panel using the same technique, I get this...
I also use different folder for each panel... Coz that helps a lot...
I also use different folder for each panel... Coz that helps a lot...

step 5 of 22
Now I leave photoshop for a while and open up Illustrator...
Opening the mascot file... Locking the mascot layer and creating a new layer...
Opening the mascot file... Locking the mascot layer and creating a new layer...

step 6 of 22
Now using brush tool 0.5 pt I start tracing... Since I am using pen tablet here, not very precise( I am also new to pen tablet)...
But it's okay... It looks good anyways...
But it's okay... It looks good anyways...

step 7 of 22
Using Illustrator I created 4 more mascot for the remaining 4 panels...
The bottom right mascot is almost as same as the mascot drawn for the first panel...
Only difference is that the lineart is more precise...
And exported them as png file, coz I need the transparency...
The bottom right mascot is almost as same as the mascot drawn for the first panel...
Only difference is that the lineart is more precise...
And exported them as png file, coz I need the transparency...

step 8 of 22
Now placing, resize and masking the mascot as need in their own respective panels...
Also I added a white backing fill of the mascot outline, so when I put background behind the mascot... It won't pass through...
Also I added a white backing fill of the mascot outline, so when I put background behind the mascot... It won't pass through...

step 9 of 22
Now I added the background... Background were made by me thru Illustrator...

step 10 of 22
Now using solid color adjustment layer I color the background( I use adjustment color, so if I want I can change the color easily later on)...

step 11 of 22
Now all background are colored...

step 12 of 22
Now I started adding color to the mascot... Using the same method as I did with the background...

step 13 of 22
Now for adding shade, i made a brightness/contrast adjustment layer of the setting as shown in the screenshot...
I then hide the shading by filling the mask with black fill... Then I painted over the area where I want the shading to appear with a white brush...
I then hide the shading by filling the mask with black fill... Then I painted over the area where I want the shading to appear with a white brush...

step 14 of 22
This is after I shaded the mascot...

step 15 of 22
Now I colored and shaded all the mascot except for the one in the last panel...

step 16 of 22
Coloring using the same process as before...

step 17 of 22
Now for the shading, I took a diff approach here... Made a saturation adjustment layer of the setting as shown in the screenshot...
Filled the mask with black as to hide the shading... Then with a 20% opacity brush did the shading...
Filled the mask with black as to hide the shading... Then with a 20% opacity brush did the shading...

step 18 of 22
Now that all the coloring and shading are done...
Time to put in texts...
Time to put in texts...

step 19 of 22
Using the same method to create the panel, I created the speech and text boxes...

step 20 of 22
Speech and text boxes all done...

step 21 of 22
Now using Anime Ace font and filling up the text boxes...
Using to free transform to make the text fit into the boxes...
Using to free transform to make the text fit into the boxes...

step 22 of 22
Texts are all done...
I also changed the color of the mascot in the 5th panel( it was easy, since I am using adjustment layers)...
And also blurred the background so it won't steal too much focus...
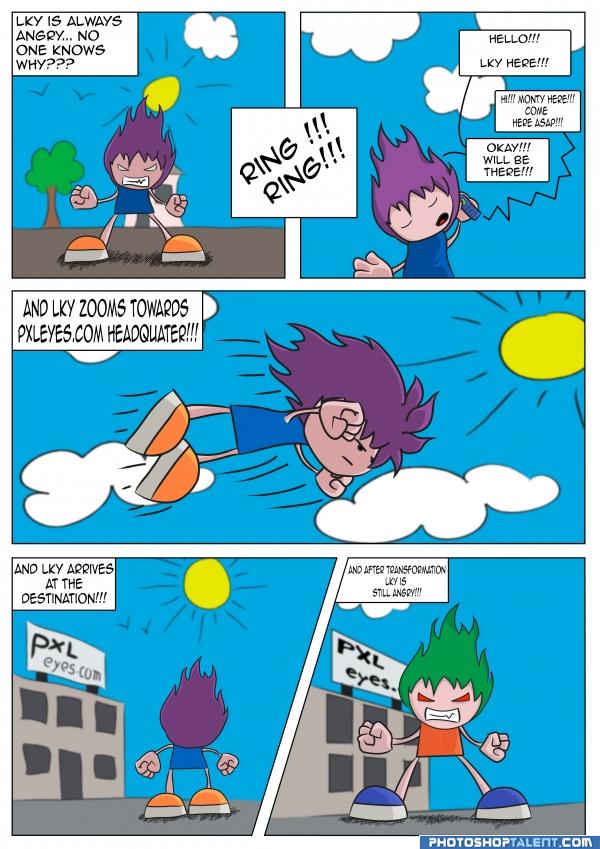
That's it... A mini comic ready... :)
I also changed the color of the mascot in the 5th panel( it was easy, since I am using adjustment layers)...
And also blurred the background so it won't steal too much focus...
That's it... A mini comic ready... :)

Final result
Comments
Pxleyes
Photography and photoshop contests
We are a community of people with
a passion for photography, graphics and art in general.
Every day new photoshop
and photography contests are posted to compete in. We also have one weekly drawing contest
and one weekly 3D contest!
Participation is 100% free!
Just
register and get
started!
Good luck!
Follow us:


© 2015 Pxleyes.com. All rights reserved.
Author, if needed, you can also just import the AI-file straight into PS, so you dont have to export the characters as png
(5 years and 4027 days ago)Yeah, but i didn't need to heavily edit the linearts... So I choose to export them as png...
(5 years and 4025 days ago)Well, I do admit importing directly is better, since it allows to convert it into a smart object... Anyways thanks for the heads up...