
Original image
step 1 of 15
First I took an trace of the front avocado with the pen tool and stoked with a 3 px brush of the color #c8c8c1...

step 2 of 15
Now resizing the path and stroking it about 13 to 15 times...
I get this result...
I get this result...

step 3 of 15
Now making criss cross path as to make it look like an spider web and stroked it...
Also deleting some part from the middle I get this...
Also deleting some part from the middle I get this...

step 4 of 15
Now I did the base of the avocado...

step 5 of 15
Now doing the same procedure for the whole avocado... I get this wireform like look...
Now it's missing is the grid...
Now it's missing is the grid...

step 6 of 15
Now for the grid... I did the following thing... First I made a new doc bigger than my working doc(2000*1500)...
Also I wanted like 100 grids... Made an another doc of size 20*20 px... I stoked the whole image(20*20) using the layer fx with a 2 px size black with the center position... Then I defined a pattern...
Now back to the big document... Went to channel, made a new channel(named it grid) and filled with the pattern...
Now going back to layer and making a new layer... Now selecting load selection and loading the grid channel...
Select inverse and fill with the color used for grid( in this case #c8c8c1)... Now the grid is ready...
Transferring the grid to my avocado doc... Using perspective( via transform) I get this...

step 7 of 15
Now setting the avocado grid and the plane grid... Cleaning up... I get this...

step 8 of 15
Now putting a avocado layer over the grid and setting it at 50% opacity...

step 9 of 15
Now using the grid as guide... I traced along it, cut and pasted the parts...
Also used warp and sometimes coloring behind the parts layers to give it more a wrapping feel...
I get this...
Also used warp and sometimes coloring behind the parts layers to give it more a wrapping feel...
I get this...

step 10 of 15
Now adding shadow to each individual parts separately...

step 11 of 15
Now breaking a few more parts of the avocado and breaking a few floor tiles... Adding shadow I get this...
Actually I wanted to submit it this way... But I thought "instead of looking as if it's breaking, why not making in progress?"
Actually I wanted to submit it this way... But I thought "instead of looking as if it's breaking, why not making in progress?"

step 12 of 15
Now removing the avocado image... I added a panel in the top right hand corner...
Made by the the rounded rectangle tool( set as path), stroking with a light blue color 2 px hard brush...
GAve the layer an layer effect of outer glow...
opacity 76%
spread 5%
size 10 px
Made by the the rounded rectangle tool( set as path), stroking with a light blue color 2 px hard brush...
GAve the layer an layer effect of outer glow...
opacity 76%
spread 5%
size 10 px

step 13 of 15
Now adding a bar inside using a rectangular tool and tweaking it a little... Stroking with a white brush...

step 14 of 15
Now using a green to white linear gradient fill, filled a little part of the bar and shaded with a touch of 20% black brush...

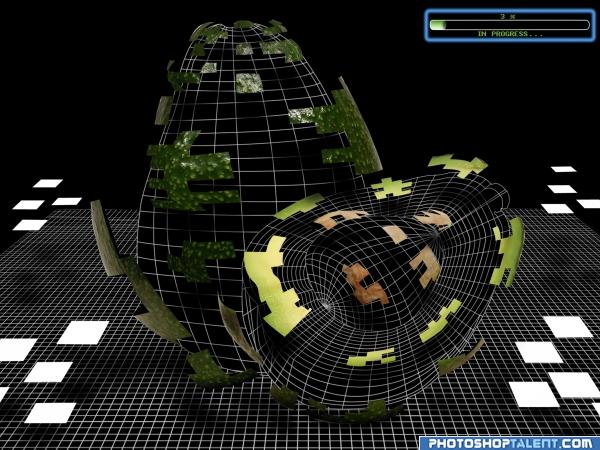
step 15 of 15
Lastly using the "Amiga Forever" font at size 4 pt and a bit darkish green color...
Wrote "3%" and "In Progress..."
Hope this mini sbs helps... :)
Wrote "3%" and "In Progress..."
Hope this mini sbs helps... :)

Final result
Pxleyes
Photography and photoshop contests
We are a community of people with
a passion for photography, graphics and art in general.
Every day new photoshop
and photography contests are posted to compete in. We also have one weekly drawing contest
and one weekly 3D contest!
Participation is 100% free!
Just
register and get
started!
Good luck!
Follow us:


© 2015 Pxleyes.com. All rights reserved.