
Original image
step 1 of 15
First what I did was cut bits of pieces of wings from the contest entry source...
I cut around 4 types of piece... If one is going for this type of composition, you can choose any number of pieces...
I cut around 4 types of piece... If one is going for this type of composition, you can choose any number of pieces...

step 2 of 15
Now lets the face source... Actually for this image, it's more advisable to choose a image where the face is straight and symmetrical...
Of course no face is perfectly symmetrical...
Of course no face is perfectly symmetrical...

step 3 of 15
Now tilting the photo and making it upright...
Now I put a guide in the middle of her face... Now selecting the half side of her face( i choose her right side here)...
Now I put a guide in the middle of her face... Now selecting the half side of her face( i choose her right side here)...

step 4 of 15
Now coping and pasting that selected half... And flipping it horizontally...
Also arranging it, I get this...
Also arranging it, I get this...

step 5 of 15
Now cutting out the unnessecary parts( don't need hair too)...
This is what I get...
This is what I get...

step 6 of 15
Now making some retouching over the face... Made a duplicate layer of it and gave that layer a smart of threshold 23...
Now masking and hiding the top layer... Brushed over the face to reveal the blur avoiding the eyes and lips...
Also added a brightness contrast and hue/sat adj. layer...
Now masking and hiding the top layer... Brushed over the face to reveal the blur avoiding the eyes and lips...
Also added a brightness contrast and hue/sat adj. layer...

step 7 of 15
Now I started adding the cut wings part to the face...
I added a part, rotated it and adjusted bits of it... Then I made a duplicate of it, flipped it horizontally and positioned it...
This is what I got for the side of the eye section...
I added a part, rotated it and adjusted bits of it... Then I made a duplicate of it, flipped it horizontally and positioned it...
This is what I got for the side of the eye section...

step 8 of 15
Now adding bits of the wing all over her face...
I get this...
I get this...

step 9 of 15
Now adding a layer between every wing part...
With an 100% soft and 20% opacity black brush... painted shadow...
With an 100% soft and 20% opacity black brush... painted shadow...

step 10 of 15
Now finishing all the shadow... This is the result...
Actually this was my original entry... But GolemAura pointed out that my mask would be better if spherized a bit... Also neverlander pointed out that it lacked a lil depth...
Actually this was my original entry... But GolemAura pointed out that my mask would be better if spherized a bit... Also neverlander pointed out that it lacked a lil depth...

step 11 of 15
Now merging the wing mask layers and giving it a shpere filter of about 50%...
I get this... But the face became a tad small...
I get this... But the face became a tad small...

step 12 of 15
Now expanding the face a bit and adjusting it to fit the mask( actually should have been the other way lol)

step 13 of 15
Now it felt like some edge of the mask was too empty...
So i made some more wing part of the mask and shadowed it accordingly...
So i made some more wing part of the mask and shadowed it accordingly...

step 14 of 15
Now I added some shadow to the face around the edges of the mask...

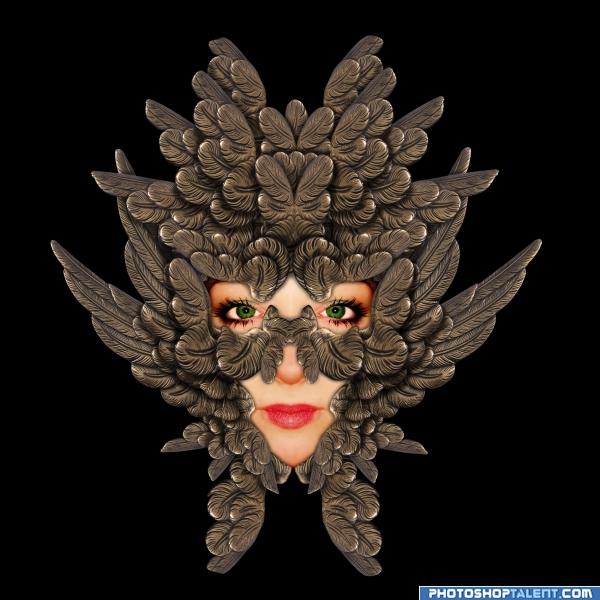
step 15 of 15
And to top it off... Added a photo filter with setting color of #ea1a1a...

Final result
Pxleyes
Photography and photoshop contests
We are a community of people with
a passion for photography, graphics and art in general.
Every day new photoshop
and photography contests are posted to compete in. We also have one weekly drawing contest
and one weekly 3D contest!
Participation is 100% free!
Just
register and get
started!
Good luck!
Follow us:


© 2015 Pxleyes.com. All rights reserved.