
Original image
step 1 of 10
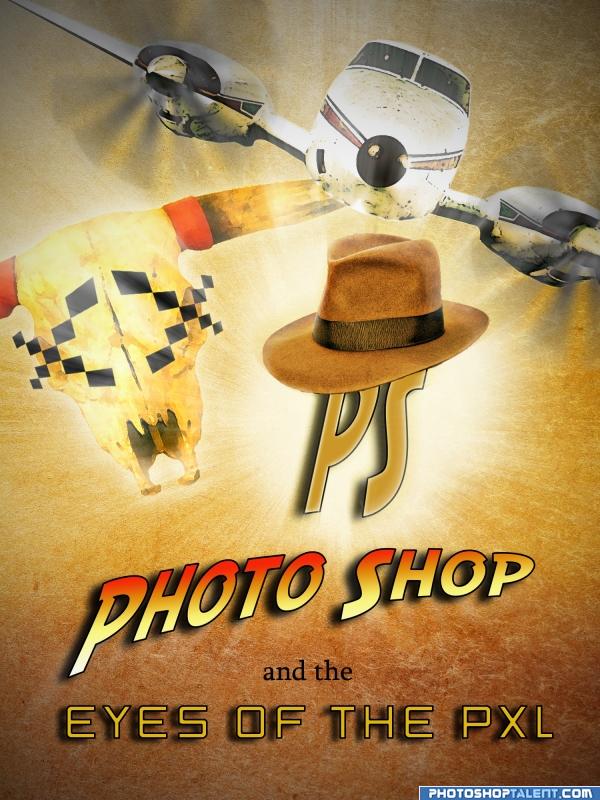
This entry was inspired by the original trilogy of the George Lucas - Indiana Jones))
I highly recommend to listen IJ soundtrack while watching this tutorial)) You can find a link at the bottom of next picture.
Now to the tut - I needed background, so I created gradient from brown to white with following colors:
671702, ff9600, ffc000, f7f4b8.
I highly recommend to listen IJ soundtrack while watching this tutorial)) You can find a link at the bottom of next picture.
Now to the tut - I needed background, so I created gradient from brown to white with following colors:
671702, ff9600, ffc000, f7f4b8.

- : source
step 2 of 10
Created new layer under the gradient one, pasted old paper texture and changed blending of the gradient layer to soft light.

step 3 of 10
Pasted plane into the picture, masked it out, placed it to the top right corner and did some restavration work (copied part of the wing, transformed it (to stretch), cut the blades and used clone stamp, patching tools to rebuild the plane.

step 4 of 10
Propellers were made by copying blades about 10 times around the tip (on the new layer)selecting it with elliptical marquee tool and using radial blur.

step 5 of 10
Copied plane to the new layer, changed blend to luminosity, then applied unsharp mask with 15-18 pxl radius, dry brush filter.

step 6 of 10
Pasted longhorn's skull (actually this is great and terrible PXL 8)), transformed and placed it to the left. Also used dry brush filter to it.

step 7 of 10
Applied layer effects to the skull:
color overlay - fdc608, blend- vivid light, opacity- 55%.
Outer glow - size 70 pxl.
Drew X-eye with black squares and transform-warped it to fit the skull's eyes.
color overlay - fdc608, blend- vivid light, opacity- 55%.
Outer glow - size 70 pxl.
Drew X-eye with black squares and transform-warped it to fit the skull's eyes.

step 8 of 10
Added Indy's hat (masked out) applied layer effect:
color overlay e7a812, blend- overlay, opacity- 65%.
Added PS letters under the hat's layer
Font - SF-Fedora (link included);
color- cc9828, shadow- size 21, displacement- 30, angle- 20, inner glow- 15, stroke- center, 4px, black color.
color overlay e7a812, blend- overlay, opacity- 65%.
Added PS letters under the hat's layer
Font - SF-Fedora (link included);
color- cc9828, shadow- size 21, displacement- 30, angle- 20, inner glow- 15, stroke- center, 4px, black color.

- 1: source 1
step 9 of 10
Drew backlight glow behind PS layer with f6ecc0 color and big soft brush.
Wrote the text:
top line - layer effects gradient (f7f6f1, f8f078, e28308, f62509), black stroke, shadow like PS layer, same Fedora font and text shape distort.
middle line - regular black font.
bottom line - Fedora titles font, shadow- displace 20px, size 15, black stroke and e0b60d color.
Wrote the text:
top line - layer effects gradient (f7f6f1, f8f078, e28308, f62509), black stroke, shadow like PS layer, same Fedora font and text shape distort.
middle line - regular black font.
bottom line - Fedora titles font, shadow- displace 20px, size 15, black stroke and e0b60d color.

step 10 of 10
Merged all layers, duplicated it. On the top layer used threshold 130-150 px, radial linear blur (60-70%), then changed blend mode to screen and opacity to 70%.
In the final picture added filter distort-lens correction vignette effect
In the final picture added filter distort-lens correction vignette effect

Final result
Comments
Pxleyes
Photography and photoshop contests
We are a community of people with
a passion for photography, graphics and art in general.
Every day new photoshop
and photography contests are posted to compete in. We also have one weekly drawing contest
and one weekly 3D contest!
Participation is 100% free!
Just
register and get
started!
Good luck!
Follow us:


© 2015 Pxleyes.com. All rights reserved.
Great to describe how to make the paper background, i love it
(5 years and 4050 days ago)