
Original image
step 1 of 18
In the first four steps I will show how I ended up with different architectural elements for my "protected city" using initial selections from the source image.
The main methods used along the way were: warping, scaling, distorting, flipping, masking.
The main methods used along the way were: warping, scaling, distorting, flipping, masking.

step 2 of 18
Tower construction.

step 3 of 18
Thin towers construction.

step 4 of 18
White tower construction

step 5 of 18
Now, in the next steps I will show how I combined all previous elements to recreate the city.
In this particular step I started adding the blue thin towers. I made them in different shapes to get more diversity and used flip horizontal in order to get simetrical sides (left and right).
In this particular step I started adding the blue thin towers. I made them in different shapes to get more diversity and used flip horizontal in order to get simetrical sides (left and right).

step 6 of 18
Added the main tower

step 7 of 18
Added white towers and blue fences.

step 8 of 18
Added more white towers and the base.

step 9 of 18
Added blue towers in between white towers.

step 10 of 18
Added final elements to complete the structure.

step 11 of 18
Resized it and colored it.
Also added the first shadows using the burn tool.
Also added the first shadows using the burn tool.

step 12 of 18
Using the pen tool I have created a rounded shape and colored it in light yellow with a lower opacity (around 30%).
Added a gradient layer for shadowing the bottom of the circle.
Added a gradient layer for shadowing the bottom of the circle.

step 13 of 18

step 14 of 18
As I didn't like the very front of the water, I cropped the image and gave it a tint of orange using the photo filter.
Added the lightnings and the flares in very light yellow.
Also used the pen tool to create some shapes right where the lightnings are coming down from. Lowered opacity of these yellow shapes, blending mode screen and added gaussian blur.
Also added some fog.
Added the lightnings and the flares in very light yellow.
Also used the pen tool to create some shapes right where the lightnings are coming down from. Lowered opacity of these yellow shapes, blending mode screen and added gaussian blur.
Also added some fog.

step 15 of 18
As I still didnt'like the water, I discovered that in the left hand corner, the wave was making a strange shape that almost looked like a dragon.
Selected that and copied it more times in different places. Also resized it and warped it to get more diversity.
At this point I flattened the image and duplicated it. Changed the blending mode to color dodge and lowered opacity slightly.
Selected that and copied it more times in different places. Also resized it and warped it to get more diversity.
At this point I flattened the image and duplicated it. Changed the blending mode to color dodge and lowered opacity slightly.

step 16 of 18
Finished covering the whole bottom of the image with the dragons made out of water.

step 17 of 18
Used the burn tool for shadowing different areas. Sharpened the water and dragons. Added the high pass filter for high definition.

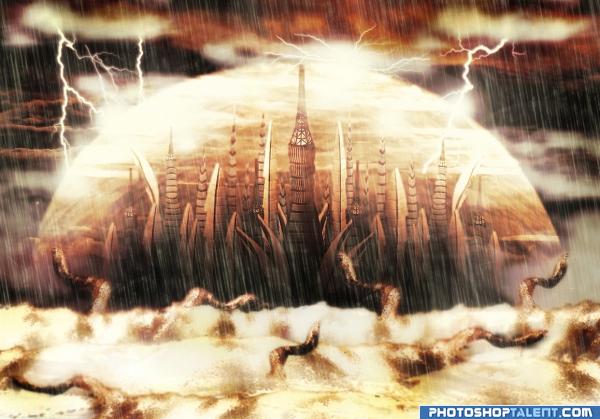
step 18 of 18
Added the rain and blured some areas to make it look like the fog created by the falling rain.

- 4: source 4
Final result
Pxleyes
Photography and photoshop contests
We are a community of people with
a passion for photography, graphics and art in general.
Every day new photoshop
and photography contests are posted to compete in. We also have one weekly drawing contest
and one weekly 3D contest!
Participation is 100% free!
Just
register and get
started!
Good luck!
Follow us:


© 2015 Pxleyes.com. All rights reserved.