
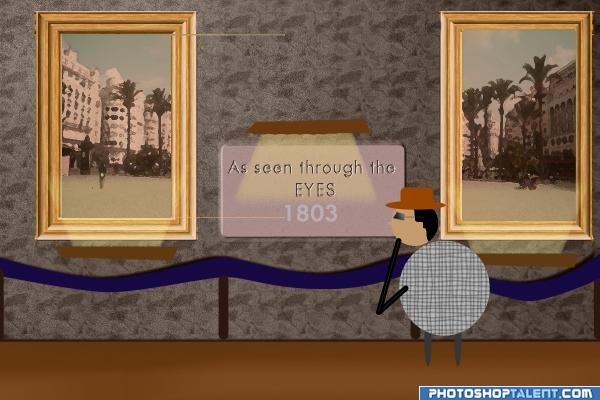
Original image
step 1 of 7
creating the background - fill it with black, give clouds, then render lighting..then simply add a pattern overlay !

step 2 of 7
now, here, added the barricade using pen tool..fill color and drop shadow.
Next, the flooring, similar..rectangle tool. fill color..play around for sometime and blur..shadow
Next, the flooring, similar..rectangle tool. fill color..play around for sometime and blur..shadow

step 3 of 7
now, create the name plaque,
rectangle, bevel emboss
now, for the light, create a rectangle, fill it up wtih some light color...and blur->radial blur and give Zoom and maximum...
rectangle, bevel emboss
now, for the light, create a rectangle, fill it up wtih some light color...and blur->radial blur and give Zoom and maximum...

step 4 of 7
now,creating the frames -
it involved lots of trial and error,
but i will break it down :
1. first,u have to create the color, so simply fill a rectangle with some old orange..then filter fibres..this simply gives that old frame look !
2. next, create smaller rectangles, fill it wtih the same color and add a bevel and emboss and gradient overlay with reduced opacity and place them inside the bigger rectangle..
now, what you have is a big rectangle (filled with orange and fibres) and on it you ahve smaller rectanlges (of the same length) with bevel and emboss and gradient overlay.
3. Once u get this, then its simple, just duplicate thsi rectangle to form the four sides of the frame, play around with flip horizontal..so that u have some difference...
its basically trial and error..however u can find many tutorials available online for making frames...

step 5 of 7
now, insert the given picture, cut it into two, each half into each frame,
the filter ->artistic and fiddle with those effects,
i also added some hue and saturation..
wanted to give a sepia touch, but then thought this was fine
the filter ->artistic and fiddle with those effects,
i also added some hue and saturation..
wanted to give a sepia touch, but then thought this was fine

step 6 of 7
now, duplicate the same light we made for the name plaque and put it for the frames too,
then, i created a big rectangle and filled it with some dark maroon...reduced its opacity..so taht gives the reddish overlay for the pic
then, i created a big rectangle and filled it with some dark maroon...reduced its opacity..so taht gives the reddish overlay for the pic

step 7 of 7
now, the last thing,,...the guy !
a sphere for the head, a sphere for the body, pattern overlay the body sphere..two lines for the hand, rounded rectangle for the legs !
cheers !
a sphere for the head, a sphere for the body, pattern overlay the body sphere..two lines for the hand, rounded rectangle for the legs !
cheers !

Final result
Pxleyes
Photography and photoshop contests
We are a community of people with
a passion for photography, graphics and art in general.
Every day new photoshop
and photography contests are posted to compete in. We also have one weekly drawing contest
and one weekly 3D contest!
Participation is 100% free!
Just
register and get
started!
Good luck!
Follow us:


© 2015 Pxleyes.com. All rights reserved.