
Original image
step 1 of 11
First thing first! with the pen tool i make a box in perspective, the box has compartments as we can see.

step 2 of 11
for the background i simply aplied a gradient, and started on building the floor of the box. the is simple a gradient and a for that pattern i used a brush from www.brusheezy.com im looking for an exclusive silk kind of packaging.

step 3 of 11
Well all the inner planes are blocked now by duplicating our first gradient block with a pattern

step 4 of 11
duplicate our first black frame and add colour, gradient and bevel emboss, the front part is just a plain piece on its own.
Also a bit of shading is applied to give the inner box some depth and volume.
Also a bit of shading is applied to give the inner box some depth and volume.

step 5 of 11
now we bring in the tools and toggle with perspective a bit, a very important step since we have to ensure that we dont over distort our loveley tools.

step 6 of 11
now the tools are at their place. as you can see they're floating and there's too much colour mix match here. so what we do!!!

step 7 of 11
cropped the part of technical drawing and aplied blending mode 'multiply' just to give the box depth and life. the colours are still too much for me

step 8 of 11
decided to have a monochrome kind of a box now which would help to bring the tools up rather than fighting with the tools. so i duplicate the layer with cropped technical drawing and applied a blending mode 'saturation' and ended up here.

step 9 of 11
based on our box shape we make a selection and invert then delete our layer with saturation, which is graying our artwork. and again make a selection of each tool and delete on the graying layer, so the tools colour remain original.

step 10 of 11
here i cleaned the image, added dome shadow to sit the box on the surface and introduced a bit of a reflection.

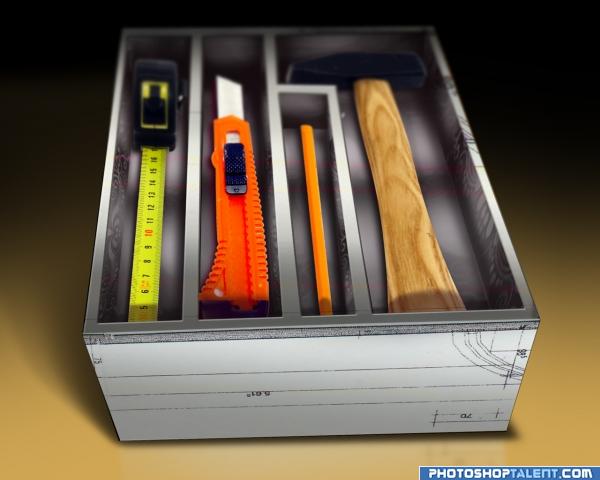
step 11 of 11
well since our box looks sharp i applied blur at the back towards black just to sit it down again and to shift focus towards us.

Final result
Comments
Pxleyes
Photography and photoshop contests
We are a community of people with
a passion for photography, graphics and art in general.
Every day new photoshop
and photography contests are posted to compete in. We also have one weekly drawing contest
and one weekly 3D contest!
Participation is 100% free!
Just
register and get
started!
Good luck!
Follow us:


© 2015 Pxleyes.com. All rights reserved.
guys again im sorry for the poor explanations, my next entry will be properly documented with the screen grabs from photoshop! but thats really how it went down!!!
(5 years and 4056 days ago)