
Original image
step 1 of 8
Ok boys and girls! To make a picture like the one I did you gonna need a fist photo (I took mine real quick), then put it on the container layer and mask it.

step 2 of 8
We need to mask the fist from the inside as well, resize it to fit the image, change blending to overlay and use bevel and emboss in layer effect (size-5, direction-down, black color on both palletes and multiply blending mode, angle 77, height 15).

step 3 of 8
Now take the picture of your foot (like me) or find one via internet and do the same things you did with the fist.

step 4 of 8
Next step - place the fist on the place where you want to see it, then copy, flip it horizontally and place somewhere else on the picture (I put it to the left) foot goes a bit down.
In my case I want the pipe be tore off by HULK's powerful punch - so I remove the bracket (copy and paste nearby pieces and thenuse clone stamp to soften edges). Transform pipe to give it bend style), all free space fill with copy-pasted pieces and clone stamp. Liquify pipes tore edges.
In my case I want the pipe be tore off by HULK's powerful punch - so I remove the bracket (copy and paste nearby pieces and thenuse clone stamp to soften edges). Transform pipe to give it bend style), all free space fill with copy-pasted pieces and clone stamp. Liquify pipes tore edges.

step 5 of 8
Now we need to crop the image (almost to the square size) and apply cracks brushes, You can find alot of them on any ps brushes site... ok, lets be creative and add cracks on and around dent areas.

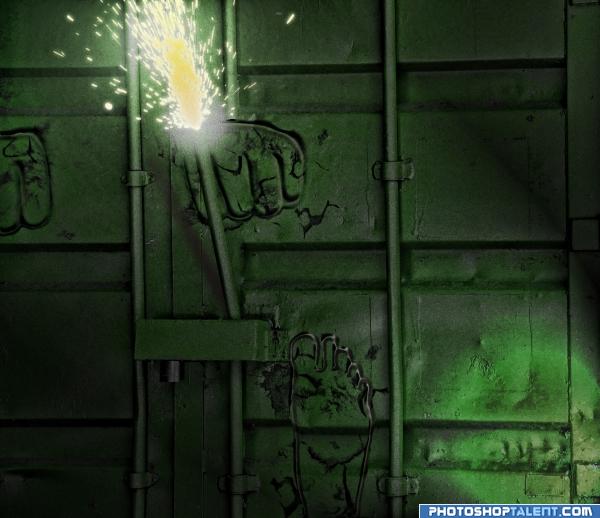
step 6 of 8
Then apply lighting effect from bottom left corner (make it a bit narrow, darken outer space bysliding bottom slider tad to the left). Also I thought I need some action and decided to add sparks to the pipe - used one of my favourite brushes, added gradient white to yellow and layer effect inner and outer glow for more realistic effect))

step 7 of 8
Lets talk about light and shadow! Select dodge tool, take big soft brush and apply on the sparks area to lighten it.
Did I forogt something? Or yeah! Shadow! Copy bent pipe to the new layer, fill it with black color, apply gausian blur 15px, transform it to make it "lay" on the wall and finally add layer mask and gradient (black to transparent) to make shadow tip lighter.
Did I forogt something? Or yeah! Shadow! Copy bent pipe to the new layer, fill it with black color, apply gausian blur 15px, transform it to make it "lay" on the wall and finally add layer mask and gradient (black to transparent) to make shadow tip lighter.

step 8 of 8
Almost done! Now I want to make my picture more greeny (because of Hulk) and added new hue/saturation adjusment layer. Results you can see bellow.
Afterwards I decided to add more details and used topaz adjust plugin (sorry guys if you don't have it, but this step is tottaly optional) and boosted details and slightly used adoptive exposure. At the very end I created new layer, filled it with white to black gradient, added 15% noise, and changed opacity to 50%! Now it's done, enjoy!
Picture bellow without noise filter.

Final result
Pxleyes
Photography and photoshop contests
We are a community of people with
a passion for photography, graphics and art in general.
Every day new photoshop
and photography contests are posted to compete in. We also have one weekly drawing contest
and one weekly 3D contest!
Participation is 100% free!
Just
register and get
started!
Good luck!
Follow us:


© 2015 Pxleyes.com. All rights reserved.