
Original image
step 1 of 8
First of all made a layer "blue" above the locked layer( I always keep the default bg layer as it is for no obvious reason) and filled it with the color #4d98fd( any shade of blue will do)... Then in an another layer "rectangle" made a rectangle using the rectangle tool in paths mode and then stroking it with a white brush of 3px and 100% hardness... Made an another layer "grid" and made some grid in the size 128*128px( this may vary according to the image size)... After that I masked the grid layer as to erase the the grid line that appears around the edges...

step 2 of 8
Now comes the tracing part... Taking a cutout of Lodd, did a pen trace... Here I only did the outline... I made the trace for the inside details and part of his face seprately...

step 3 of 8
Now I stroked the trace with 4px white brush on an another layer... I prefer making different size of strokes on different layer and later choosing the appropriate one...

step 4 of 8
Now the finished line art of Lodd with the main Lodd image hidden( we won't need that anymore)...

step 5 of 8
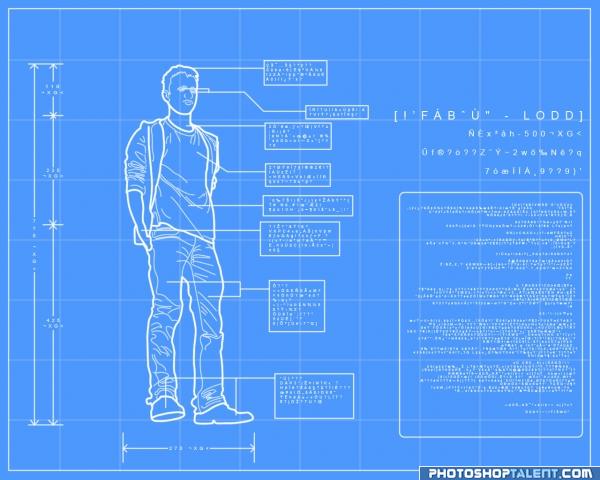
Now I created measurement and description lines in the layer "Markers"... I use pen tool for that( or one can use line tool for it too)

step 6 of 8
Now for the text... Since I was too lazy to rack my brain to write something, I opened an executable file in notepad( any .exe will do, but a small exe will be better since it won't take notepad too long to load it)...
Then I just pasted away... Also I made some rectangular box underneath some of the texts layer so as to make look the blueprint more organized...
And the font I used was arial and font size ranged from 1.5 pt to 6 pt...
Then I just pasted away... Also I made some rectangular box underneath some of the texts layer so as to make look the blueprint more organized...
And the font I used was arial and font size ranged from 1.5 pt to 6 pt...

step 7 of 8
As you can see in the measurement lines, some of the text overlaps with the lines... So I created a mask for the layer "Marker" and erased the lines that overlaps with the text...

step 8 of 8
So there all I did for making a mock blueprint of Lodd... Didn't went too much fancy with it... Blueprints aren't suppose to be fancy, but well detailed... Next time I make a mock blueprint, will try try to implement wire frames in it...
Also I forgot to mention, in step 1 i set the opacity of layer "Grid" to 50%, otherwise later on it interferes withe line art and text...
Also I really didn't quite mention how I made the grid... There are many ways to make grid... Use of pen tool, ruler and guides etc... But if you are interested here is an tut on how to make grids easily... http://www.partdigital.com/tutorials/grid
This is my first entry and my first sbs... Hope it's clear enough for a first time =D

Final result
Pxleyes
Photography and photoshop contests
We are a community of people with
a passion for photography, graphics and art in general.
Every day new photoshop
and photography contests are posted to compete in. We also have one weekly drawing contest
and one weekly 3D contest!
Participation is 100% free!
Just
register and get
started!
Good luck!
Follow us:


© 2015 Pxleyes.com. All rights reserved.