
Original image
step 1 of 18
The first step you have to take in creating this dark face is to gather all the images required for it (sources).
Open the picture of the girl’s face in PS. Open the texture as well. Now we need to prepare the images.
We’ll be working on the texture first by unlocking the layer (double click + ENTER – in the layers palette) and making some changes so it will be perfect for the girls face.
Using the crop tool, remove the lower part of the image to get rid of the green piece of background.

step 2 of 18
Using the dodge tool (highlights, 19% exposure) lighten up the white shiny things in the image.

step 3 of 18
Using the burn tool (shadows, 50% exposure) darken the whole image. You will see now that the shiny white things are not affected, and remain shiny, that is the effect we were looking for.

step 4 of 18
Now we are done with the texture. Switch to the girl’s photo and make the following changes:
Unlock the layer as you did before with the texture (double click + ENTER – in the layers palette)
Using the crop tool, remove the right side of the picture, to center the face
Unlock the layer as you did before with the texture (double click + ENTER – in the layers palette)
Using the crop tool, remove the right side of the picture, to center the face

step 5 of 18
Using the spot healing brush tool, remove the dark spots near the eyes.
Make a new layer and name it “skin color”. Using the paint bucket tool, fill it with #242737 and set the blending mode to screen.
Make another layer and name it “skin color 2”. Using the paint bucket tool, fill it with #9a8b6d and set the blending mode to multiply.
Make a new layer and name it “skin color”. Using the paint bucket tool, fill it with #242737 and set the blending mode to screen.
Make another layer and name it “skin color 2”. Using the paint bucket tool, fill it with #9a8b6d and set the blending mode to multiply.

step 6 of 18
Drag the texture to the girl’s photo, rename it “texture”, CTRL + T (transform), rotate it and put it over the upper right part of the picture.

step 7 of 18
Set the blending mode to multiply and reduce the opacity to about 20%.
Using the clone stamp tool, ALT + click on the image to select a source point, start filling up the rest of the texture.
Create a mask on the texture layer and mask out the eyes, lips, eyebrows, nostrils and the dark background on the sides. Use different opacities for the brush while working on the mask to create shading and to avoid the 2d effect on the face.

step 8 of 18
It is now time for the shiny tuba picture to come in. Load it into PS and unlock the background.
Take the pen tool and draw a path around one of the pieces like shown in the picture. Right click -> make selection and CTRL + J to make a layer from your selection.
Take the pen tool and draw a path around one of the pieces like shown in the picture. Right click -> make selection and CTRL + J to make a layer from your selection.

step 9 of 18
Right click -> make selection and CTRL + J to make a layer from your selection.
With the move tool drag this layer into the main picture and name it “tuba 1”
CTRL + J to duplicate it, and then with the move tool, position both tuba 1 and tuba 1 copy on her upper part of the nose.
Proceed to cutting and dragging more pieces of the tuba to create some sort of mask around the girl’s eyes. Here you should really use your imagination, there are no rules to follow and the mask is not even supposed to be symmetric.

step 10 of 18
After putting together the mask, merge all layers containing bits of it into one single layer called “mask”.

step 11 of 18
Press CTRL + SHIFT + U to desaturate the mask.

step 12 of 18
Load the metal texture and drag it to the main photo. CTRL + click on the mask layer icon to make a selection containing the mask. With the metal texture layer active, click on the add layer mask button in the layers palette. This will create a mask hiding the rest of the texture and applying it only to the girl’s mask.

step 13 of 18
Apply a drop shadow to the mask using the settings in the picture.

step 14 of 18
Copy the skin color 2 layer and place it above the texture of the mask. Using the same procedure as before, put a layer mask so the color will only affect the girl’s mask.

step 15 of 18
It is now time to add a little drama. We’re going to add a vignette.
With the rectangular marquee tool, make a selection inside the picture, to make some sort of frame. Refine the edge by adding a little feather just to round the corners. CTRL + SHIFT + I to invert the selection.
With the rectangular marquee tool, make a selection inside the picture, to make some sort of frame. Refine the edge by adding a little feather just to round the corners. CTRL + SHIFT + I to invert the selection.

step 16 of 18
Set black as your foreground color and with the gradient tool, set to foreground to transparent, trace a gradient on each side of your frame, from the outside in.
Lower the opacity to 50%.
Lower the opacity to 50%.

step 17 of 18
For the shadow on the lips, make a new layer, set your foreground color to #333333 and using the brush tool, paint on the lips.
Go to filter -> blur -> Gaussian blur and set the value to 25 pixels.
Lower the opacity to 50% and set blending mode to multiply.
Go to filter -> blur -> Gaussian blur and set the value to 25 pixels.
Lower the opacity to 50% and set blending mode to multiply.

step 18 of 18
To better blend the mask into the face, make a new layer just above the “skin color 2” layer, take a soft brush, set the foreground color to #6D3916 and paint around the mask to add some sort of shadow. Go to Filter -> Blur -> Gaussian Blur and set the value to 35 pixels, press ok.
Set the blending mode to Multiply and lower the opacity to about 40%. This adds a nice rusty look to the face, just as the mask was there for a long time. And…that’s it!
Set the blending mode to Multiply and lower the opacity to about 40%. This adds a nice rusty look to the face, just as the mask was there for a long time. And…that’s it!

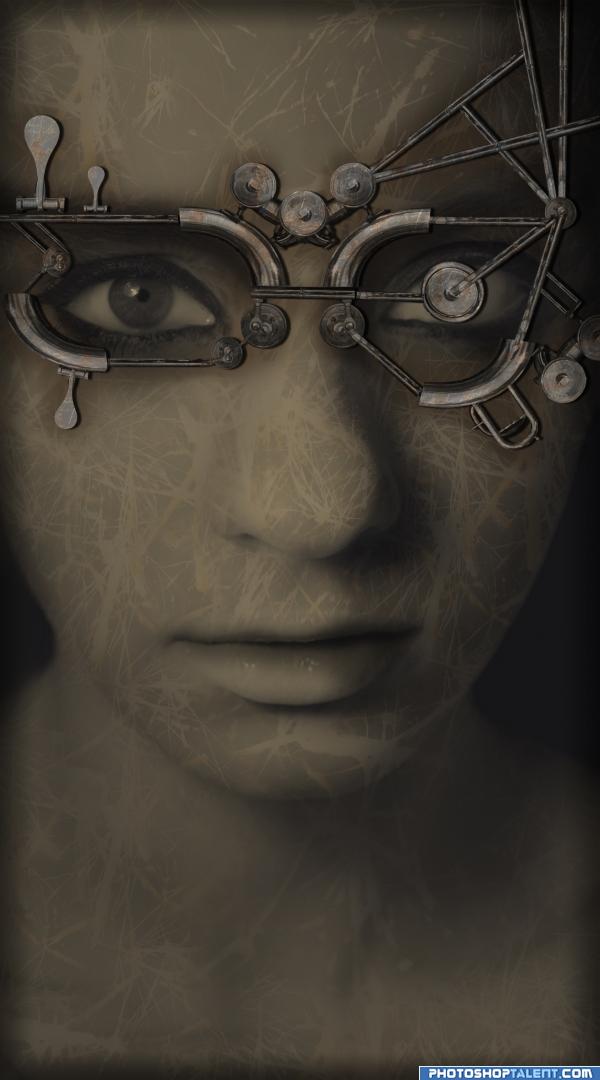
Final result
Pxleyes
Photography and photoshop contests
We are a community of people with
a passion for photography, graphics and art in general.
Every day new photoshop
and photography contests are posted to compete in. We also have one weekly drawing contest
and one weekly 3D contest!
Participation is 100% free!
Just
register and get
started!
Good luck!
Follow us:


© 2015 Pxleyes.com. All rights reserved.