
5 Things You Need to Know About Raytracing
Ray tracing is a widespread technique in computer graphics. You’ve probably seen stills and movies that involved ray tracing, whether in the graphics community or in movie theaters or on TV. The distinguishing feature of ray tracing is that it is one of the most photorealistic ways of rendering computer images. A trade off when using ray tracing is an increase in rendering time, so ray tracing is not used as often in real time situations.
Subsequently, the traditional way of rendering in some 3D programs and most games is not raytracing, but a process called “rasterization” that attempts to do the same thing, but much faster, though slightly less accurately. Ray tracing’s advantage over rasterization is that it’s capable of many more phenomena by default than rasterization, due to its property of being modeled on the real world. It’s this property, and the basic process of raytracing, that will be discussed in this article.
 The reflection of light from a surface defines what we see when we look at the surface. Sometimes the amount of light that comes back from a surface isn’t the same amount that was sent to the surface. The ratio between these two quantities is known as the albedo of a surface, but this term isn’t very often used in computer graphics as there are other variables that produce this effect, particularly the “Diffuse” component of a material in a CG program.
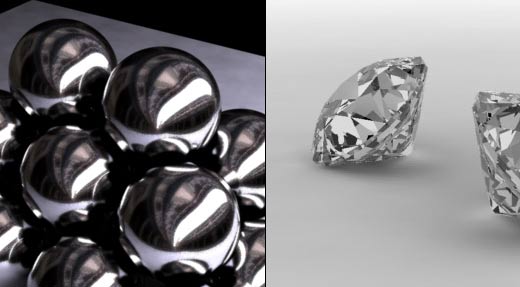 When talking about reflection in regards to surfaces, it helps to make a distinction between specular reflection and diffuse reflection. In short, specular reflection looks more like the reflection of a mirror and diffuse reflection looks more like the reflection of a sheet of paper. Both surfaces reflect light, but they reflect it slightly differently. You can understand why this is so more clearly when you see the differences at a microscopic level between the two surfaces.
 When a somewhat unpolished surface reflects light, what really happens is that the rays bounce off all the nooks and crannies on the surface, distributing the light all over the place. The result is a smoother, less shiny surface. You can observe this effect if you take a soft, reflective metal object, like a spoon, and record the nature of its reflectivity as you add scratches to it. When the entire surface is covered in scratches, the object will lose most of its specular reflection and instead appear to have a dull finish, although the fundamental matter that composes the object hasn’t changed, merely its surface.
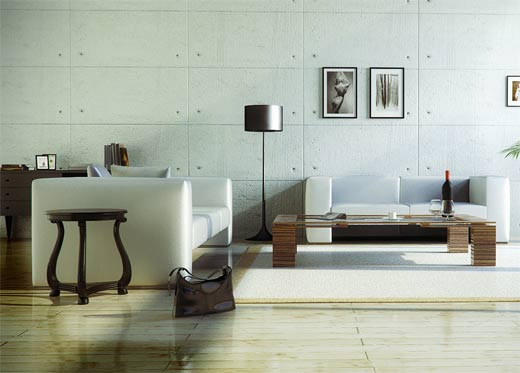
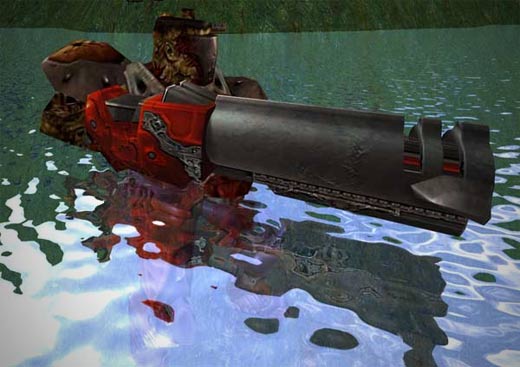
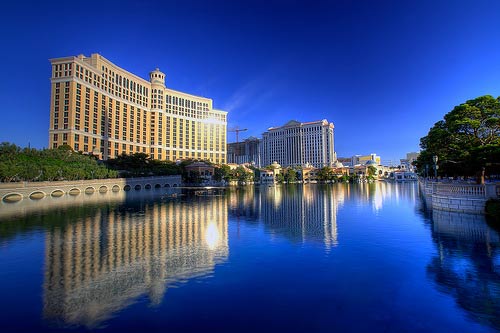 Getting back to the distinction between specular and diffuse reflection, what we colloquially mean when we say “the water reflects the scenery” is really that the water surface’s reflections are specular, rather than diffuse, in nature. Whenever we see other objects reflected on an object’s surface, we see a specular reflection in action. In computer graphics, the term “reflection” almost always refers to specular reflection, but the “specular” component of a material has little to do with the actual specular reflection of the surface.
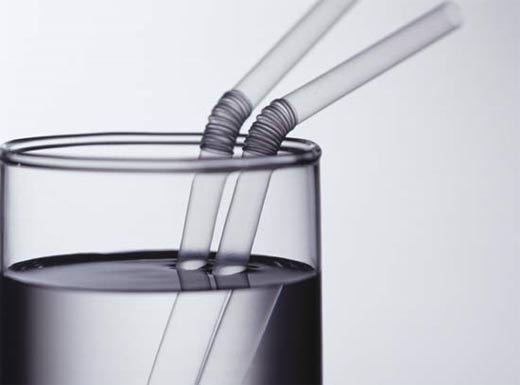 The refraction of light through a surface is the effect we see when we look through a magnifying glass or through frosted glass. Light changes speed (and direction) within the surface and subsequently, we see a different shape of the objects behind the refracting surface. Refraction is useful in simulating glass objects, water, plastics, and physical phenomena like heat waves.
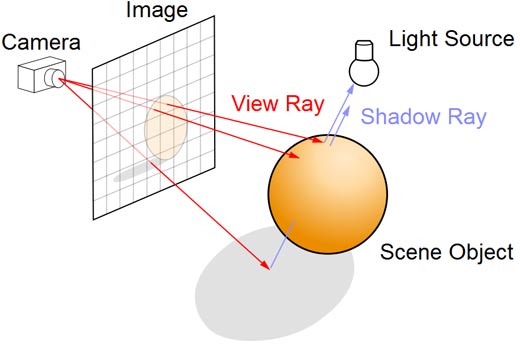 The observer sends out a number of rays, which proceed to either reflect off or refract through the objects in the scene. Once reflected, the rays continue on their path towards the light sources in the scene, at which point other useful parts of the image may be computed, such as shadow rays, which can determine whether or not an object casts a shadow. This is the essence of ray tracing, which happens to be a simple and straightforward process.
 Ray tracing also allows artists to provide additional render detail when necessary, such as global illumination and photon mapping. With other types of renderers, such detail often fundamentally changes how the image is rendered. For example, one can add more rays when rendering an image to get a more precise and accurate output, but an analogous mechanism doesn’t exist for scanline and other renderers. Sampling depth is sometimes used as such a mechanism, but at its lowest levels, it does not provide the basic standard of imaging that ray tracing does. This makes rapid prototyping of a scene much more convenient with ray tracing.
A huge disadvantage of ray tracing is its speed. Ray tracers are to this day rather slow. A great deal of work is being done in this area to parallelize and otherwise separate a render job into smaller chunks, however hardware plays a much larger role in render speed. Some ray tracers, like POV-RAY, are still serial and not parallel, which makes a faster CPU all the more important. It’s for reasons of speed that most 3D applications use a hybrid of scanline and ray tracing render engines.
Ray tracing also allows artists to provide additional render detail when necessary, such as global illumination and photon mapping. With other types of renderers, such detail often fundamentally changes how the image is rendered. For example, one can add more rays when rendering an image to get a more precise and accurate output, but an analogous mechanism doesn’t exist for scanline and other renderers. Sampling depth is sometimes used as such a mechanism, but at its lowest levels, it does not provide the basic standard of imaging that ray tracing does. This makes rapid prototyping of a scene much more convenient with ray tracing.
A huge disadvantage of ray tracing is its speed. Ray tracers are to this day rather slow. A great deal of work is being done in this area to parallelize and otherwise separate a render job into smaller chunks, however hardware plays a much larger role in render speed. Some ray tracers, like POV-RAY, are still serial and not parallel, which makes a faster CPU all the more important. It’s for reasons of speed that most 3D applications use a hybrid of scanline and ray tracing render engines.
 As ray tracing becomes more common, the focus of renderers and GPUs will shift dramatically. Currently, most renderers and GPUs have to sacrifice physical correctness for speed. When the hardware powering most consumer systems becomes powerful enough to ray trace in real time (or at least at 30 frames per second), a lot of these compromises will no longer be required. 3D artists will be able to preview their work immediately and gamers will be treated to an increasingly realistic experience.
The eventual arrival of real time ray tracing means it’s important for artists to understand how the technique works. Though it is quite simple in nature, it’s very powerful and understanding it can allow an artist to predict how their work will look before it’s rendered.
As ray tracing becomes more common, the focus of renderers and GPUs will shift dramatically. Currently, most renderers and GPUs have to sacrifice physical correctness for speed. When the hardware powering most consumer systems becomes powerful enough to ray trace in real time (or at least at 30 frames per second), a lot of these compromises will no longer be required. 3D artists will be able to preview their work immediately and gamers will be treated to an increasingly realistic experience.
The eventual arrival of real time ray tracing means it’s important for artists to understand how the technique works. Though it is quite simple in nature, it’s very powerful and understanding it can allow an artist to predict how their work will look before it’s rendered.

1. Rays and Surfaces
To understand ray tracing, we must first understand what the “ray” in ray tracing stands for. You may recall from geometry that a ray has an origin and a line part that extends infinitely into space towards some direction. An optical ray is very similar in this regard, although the light “carried” by the ray does not remain constantly bright. This property of a ray allows us to model complex phenomena like shadows and surface scattering. So what happens to a ray when it hits a surface, such as the wall of a house? Usually, the ray bounces off of the surface and continues on its path. This phenomena is called reflection. Whenever a ray strikes a surface, several facts can be derived from the event. First, we must establish the normal of the surface. This is an imaginary line we draw that is perpendicular to the surface. You’ll hear about the normals of geometry in 3D a great deal, especially in modeling. Once we’ve established the normal of the surface, we can find the angle of incidence or the incident ray. This is a measure of the distance, in degrees, between the normal and the ray. Knowing this quantity allows us to understand if the ray is hitting the surface dead on or, alternately, at a very extreme angle. The various possibilities affect how the light is reflected. After we’ve figured out the angle of incidence, we can then find the angle of reflection. This is very easy, as the law of reflection states that the angle of reflection is always equal to the angle of incidence.2. Reflection and Refraction
3. Basic Raytracing
Now that we know about rays, reflection, and refraction, we can start constructing a model for ray tracing. First, we must understand that in the real world, light sources emit rays that bounce off surfaces until they reach the observer, such as a person or a camera. This sort of mechanism is computationally intensive, so when renderers use ray tracing to simulate the real world, they send out rays from the observer’s viewpoint instead of passively receiving them. This makes computation much faster, but the underlying mechanism is still the same, just reversed for speed’s sake.
4. Pros/Cons of Raytracing
Ray tracing is quickly taking over as the preferred way of rendering an image with render engines such as mental ray and Yafaray being set by default in popular 3D packages. Notably, 3ds max has continued using its scanline rasterizing renderer by default, which can render a hybrid of raster and ray-traced materials. One advantage of ray tracing is that it is fundamentally a more realistic and desirable mode of rendering. Many physically correct phenomena can be modeled with ease using a ray tracing algorithm, since the algorithm simulates the motion of light in the real world. Rasterizing renderers have to approximate, or outright invent their own solutions to, these phenomena, which can include anything from fluorescence to shadows.5. The Future of Raytracing
Ray tracing is still primarily a technique used in asynchronous computer graphics. Due to the complexity of modern scenes, ray traced images still have to be rendered without anticipating that they’ll be in real time. However, this is changing. Ray tracing is coming to consumer GPUs with the GeForce GF100; real-time raytracing is being offered by CausticRT on a dedicated card; there has been a lot of work done to convert the Quake engine to a ray-traced version. All of these developments point to ray tracing becoming more and more common within the next 10 years.Author: admin
Howdie stranger!
If you want to participate in our photoshop and photography contests, just:
LOGIN HERE or REGISTER FOR FREE
-
says:
-
says:
Great article, I feel suitably educated!
( 2 years and 4868 days ago ) -
says:
Very nice article!
Its really important to learn the concepts attached to a defined knowledge, rather than learning just the way to apply the tools configurations to get to a result.
With such an understanding, working with computer graphics just got a lot easier!
Thanks
( 2 years and 4868 days ago )
Pxleyes
Photography and photoshop contests
We are a community of people with
a passion for photography, graphics and art in general.
Every day new photoshop
and photography contests are posted to compete in. We also have one weekly drawing contest
and one weekly 3D contest!
Participation is 100% free!
Just
register and get
started!
Good luck!
Follow us:


© 2015 Pxleyes.com. All rights reserved.
Woww .. i m not much of a photographer typo .. but this will surely be helpful
( 2 years and 4868 days ago )