
Original image
step 1 of 4
I am using GIMP 2.8 for this, i am very new to image manipulation, so dont expect wonders :P
Ok lets begin with the SBS guide.
I start by adding my background, then i add another image with tall grass.
After that im masking out the grass, roughly.
Ok lets begin with the SBS guide.
I start by adding my background, then i add another image with tall grass.
After that im masking out the grass, roughly.

- : source
step 2 of 4
I then add the girl that is provided by pxleyes.com
I mask her out and duplicate her layer. I use the duplicated layer as a shadow by using the perspective tool to change it so it looks more like a shadow, i also color it all black.
In my image i have two copies of the shadow, one larger and one smaller, the smaller is almost all black, while the bigger is transparent.

step 3 of 4
I add in a few copies of the grass, set to difference, multiply and overlay in that order above the background and above the first grass layer.
I also add in one more copy of the background and set it to overlay above the first background layer but underneath everything else.
I also add in one more copy of the background and set it to overlay above the first background layer but underneath everything else.

step 4 of 4
I blur then merge the girls shadow with the girl so i can move them both at the same time easily.
Now, i use a filter called Van Gogh, i use these settings:
Filter length: 17.8
Noise Magnitude: 3.6
Integration Steps: 18.7
Minimum Value: -15.7
Maximum Value: 75.0
Everything else is default. But play around with these settings for different results, i just did this once or twice before i choose these settings :P
I also add a frame around the picture.
And thats it! Hope someone found it usefull even though i dodnt go into super detail.

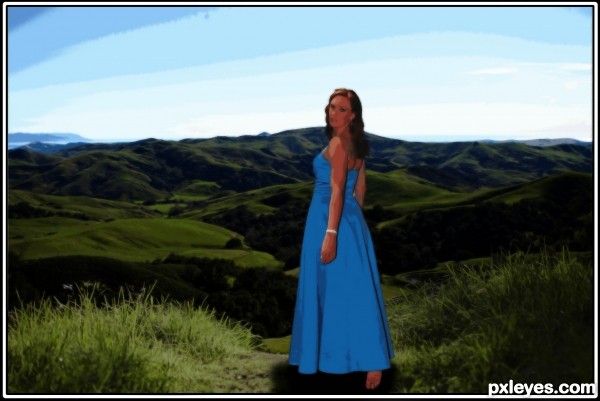
Final result
Pxleyes
Photography and photoshop contests
We are a community of people with
a passion for photography, graphics and art in general.
Every day new photoshop
and photography contests are posted to compete in. We also have one weekly drawing contest
and one weekly 3D contest!
Participation is 100% free!
Just
register and get
started!
Good luck!
Follow us:


© 2015 Pxleyes.com. All rights reserved.