
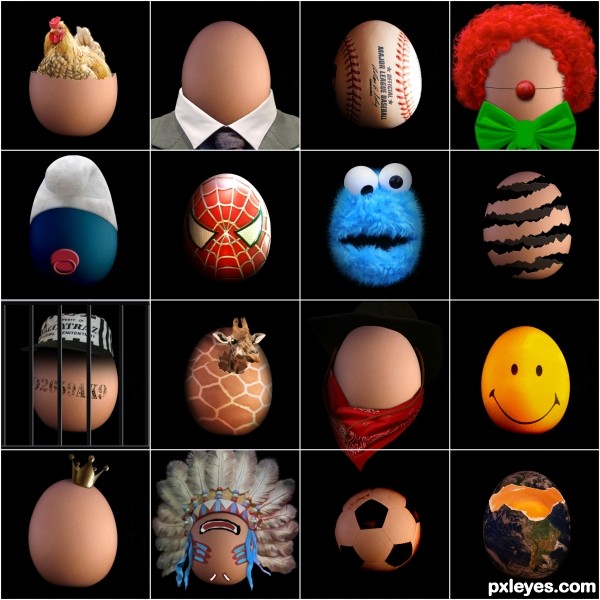
Original image
step 1 of 25
I started out with a frame and 25 spaces to make eggs. I ended up with less because I didnt like all the eggs I made and I ran out of time to make even more. Yes I made more then I am showing but I didnt feel they fit with the image so i left them out.

step 2 of 25
ON the step by step pictures you will see a golden egg appear that I created from scratch however I didnt think it fit with the rest so I didnt added it to this collection and you can ignore it. THe creation of this one speaks for itself. created shadows near the edges of the collar and resized it. in simple description. There was a lot more little things to it as you probably will understand without me telling every detail.

- : source
step 3 of 25
Cutout my sources and used free transform and a lot of warp to fit each ellement the way i wanted it.

- 1: source 1
step 4 of 25
After I placed all the objects the way i wanted them I got this result. The leather strap I recreated partly using smudge.
last of the work was adding shadows and some burn n dodge.
last of the work was adding shadows and some burn n dodge.

step 5 of 25
Basic stuff to begin with, cut out source and shape them so it fit on the egg. The nose is oval in some steps but i didnt liked that after all so I changed it back to round. The hair was done using smudge technique.

- 2: source 2
step 6 of 25
Its hard to see but theres a shadow below the thread that holds the nose. I thought the pic was a lil empty without the bow so i found a bow source, changed the color to green and smudged it and shaped it till I was happy.

- 3: source 3
step 7 of 25
King egg was rather simple to make but still needed precise work to get the requierd result.
cut out the cown, smoothened the edges using a soft blur, and smoothened some shines on the crown as well with smudge. Created a shadow and voila there we have King egg
cut out the cown, smoothened the edges using a soft blur, and smoothened some shines on the crown as well with smudge. Created a shadow and voila there we have King egg

- 4: source 4
step 8 of 25
used the hat from the source listed here and used reform, resize, warp smudge and eraser to make it fit on the egg.
I made the egg blue using a color overlay with linear burn setting.
I made the egg blue using a color overlay with linear burn setting.

- 5: source 5
step 9 of 25
Since I thoguht the smurf was a little boring I added the sucker to make baby smurf. I created the sucker from scratch and unfortunately I was so wrapped up in making the imag that I forgot to make more steps inbetween. Used many layers to create it, used bevel an emboss, warp and smudge mainly. Draw shadows to finish it all off.

- 6: source 6
step 10 of 25
cut the source and put it on the egg. reshaped it using warp mainly and put the source of spiderman on overlay in blending modes. smudged some parts to make them look nicer. In the last step you can see i added shading and I adjusted the colors to make it more the red I wanted.

- 7: source 7
step 11 of 25
I colored the egg yellow using color overlay in blendmodes and then I used warp and transform to make the smiley head fit the egg. I put the smiley layer after it fit on the egg aswell in a blendmode overlay i think and used a blur on the edges to smoothen it some more.

- 8: source 8
step 12 of 25
cut out the source cookiemonster and placed it on top of the egg. resized it till it would be big enough to cover the egg. Cut out each eye serperately too and placed them on the head again. using the smudge to erase all unwanted hair that got on the eye from where it used to be. redraw all the hairs using smudge for hours and hours :P

- 9: source 9
step 13 of 25
I created this egg using only the given source egg. I made a background egg that i changed the levels on o make it lighter then i added a color overlay on it using the color black to make it shaded. Then I used the lasso tool to cutout the peels of the top layer egg. Then I did the same on the lighter/bottom layer. It took me a lot of trial to get it right but I was very satisfied with the result. I used bevel and emboss to give the crack egg effect on the edge and used a large brush to create a shadow inside the egg.

step 14 of 25
and the finished peeled egg with the shading inside.

step 15 of 25
created the eggshell abou the same way as i created the peeled egg and cut out the chickenroughly. I put the chicken between the both layers of the shell and started to make the cutout nice n pretty using eraser and some smudge. The feathers of the chicken I smudged back till it looked realistic again. added some shading just using a brush and voila a chicken egg was born :P

- 10: source 10
step 16 of 25
Baseball egg was created using the baseball source listed here. I cut it out, used the transform and warp on it to make it the same size as the egg and then put it on overlay. adjusted some color settings and added shading. it all sounds really simple fast n easy and i have to admitt this wasnt the most complicated one but it was a lot of tweaking to get it right and to find the right source took time too.

- 11: source 11
step 17 of 25
cut out the source hat and used transform and warp o make it fit. Then I created the text on the egg using standard fonts that come in adobe (stencil or something :P) and made in an bending shape.
Then I made the hat a little nicer using smudge on the edges and blur.
Made the text look a little worn by using eraser with a standard grunge brush that comes in photoshop. Also I lowered the pacity of the layer.
Then I made the hat a little nicer using smudge on the edges and blur.
Made the text look a little worn by using eraser with a standard grunge brush that comes in photoshop. Also I lowered the pacity of the layer.

- 12: source 12
step 18 of 25
I spend hours and hours cutting out a cage that I never ended up using and created these simple bars instead using bevel and emboss on simple bars created with the shape tools.

- 13: source 13
step 19 of 25
I dont have many step by step shots for the indian since most of it ame down to smudging. Almost done i decided to flip the headwear and remove the red shading on the feathers, again using smudge. the image is a statue but i tried to make the feathers look as real as possible using smudge allover them. drawing more and more edges of the feathers. Draw the face paint using brushes in several colors then I brushed some shading on the egg where the edges of the headwear is. The side thnigies (those blue ones) that are hanging down gave me some real trouble and im still not 100% happy but the clock keept ticking and I had to make more eggs. so i moved on.

- 14: source 14
step 20 of 25
Cut out the source and copy pasted on the egg. made the opacity lower so i could see the egg thoguh and used transform and warp to make it match the eggshape without deforming it too much. Then I played some with the blending modes and moved on to the next source.

step 21 of 25
only used the eggyolk top part of the egg source and cut it nicely at the edge of the crack.
placed it on top of my source egg and used transform to put it the right place and size put the earth source on top of it with overlay blend mode. first the bottom then the top of the egg, leaving the yolk vissible like a sun inside.
placed it on top of my source egg and used transform to put it the right place and size put the earth source on top of it with overlay blend mode. first the bottom then the top of the egg, leaving the yolk vissible like a sun inside.

step 22 of 25
changed the exposure to make the egg look darker and the yolk pop a bit more. and added some shading.

step 23 of 25
cutout the giraffe and put on top of the egg resizing it first.
then I created the opening like I have done before with the peeled egg and the chicken egg for example. created a shadow and used warp and transform to place it. took me a while to get it right.
then I created the opening like I have done before with the peeled egg and the chicken egg for example. created a shadow and used warp and transform to place it. took me a while to get it right.

- 17: source 17
step 24 of 25
chose a source for the skin of the egg and cut ut out. shaped it and smudged out the things that i found disturbing.
changed the colors a little and put it on overlay. added some shading and voila.
changed the colors a little and put it on overlay. added some shading and voila.

- 18: source 18
step 25 of 25
The football egg eas really the most simplest one of all, I ran out of time and ideas so here goes. I changed the shape of the egg not knowing yet what i was gonna do with it. I found a soccerball source by chance and decided to use it. cut it out and put it on overlay. played with the blending modes and added some shading. And thats that!

- 19: source 19
Final result
Pxleyes
Photography and photoshop contests
We are a community of people with
a passion for photography, graphics and art in general.
Every day new photoshop
and photography contests are posted to compete in. We also have one weekly drawing contest
and one weekly 3D contest!
Participation is 100% free!
Just
register and get
started!
Good luck!
Follow us:


© 2015 Pxleyes.com. All rights reserved.