
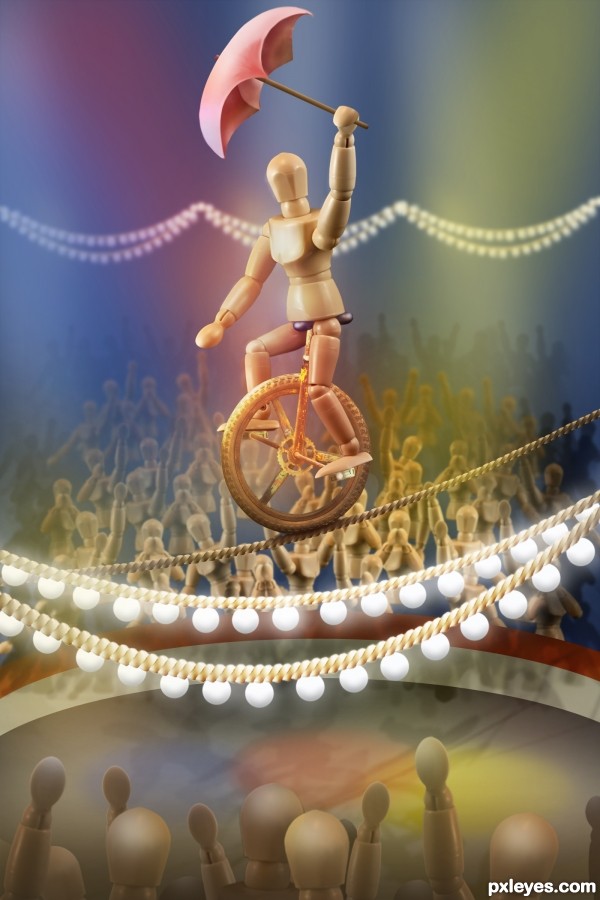
Original image
step 1 of 23
After masking the figure, front wheel of the bike and the pedal pieces, place in general positions on canvas.

step 2 of 23
Used puppet warp to align leg, foot and pedal

step 3 of 23
Chose segment of joint for rope.

step 4 of 23
Warp the piece into shape. Duplicate a thousand times (ok, it only felt like a thousand times) to create the full rope.

step 5 of 23
Apply a little warp to create the bend in the rope.

step 6 of 23
Created the bike seat using the same segment of joint, warped to shape. Levels changed to create natural shadow and light. Hue/Saturation adjustment layer to change the color, with blending mode set to Color.

step 7 of 23
Umbrella created from section of head. Warped and stretched to create the right shape.

step 8 of 23
To simulate closed hand around the handle, selected a half-shape piece of top of hand and moved it into place.

step 9 of 23

step 10 of 23

step 11 of 23
Select leg section to create handle. Narrowed and stretched tall.

step 12 of 23
To create the crowd, isolated arm sections and torso, then mixed and matched to create various expressions.

step 13 of 23
Crowd "template." These segments were duplicated to make three tiers, spacing adjustments made between figures. Center tier was flipped horizontally to vary the crowd. Second tier and top tier were each made smaller than the previous layer. Gaussian blue applied at 1.5 on fist layer, 2.5 on second layer, and 3.5 for top or back layer.

step 14 of 23
Foreground crowd was made from the crowd "template" with a second torso applied to cover the arm fronts (to simulate the figures' backs). Levels adjusted to darken.

step 15 of 23
"Spotlights" added by using soft brush at low opacity. With starting point off the canvas, held Shift key to draw straight lines.

step 16 of 23
Floor was created with two ellipses of varying shades. Dark red Stroke applied to top oval to create upper edge of circus "ring." Inner shadow applied to lower oval

step 17 of 23

step 18 of 23

step 19 of 23
Duplicate and reduce the rope to create strings of lights.

step 20 of 23
Using the ellipse tool with shift key pressed, created round lights

step 21 of 23
On a separate layer, painted white glow on each bulb with a soft brush with low opacity. Because I feared not enough glow, or too much, I repeated the process on another layer with brush set to different opacity. One layer was set to screen, the other normal, but opacity lowered.

step 22 of 23
Gaussian blue was applied to the background strands. For the foreground lights, layers were duplicated and stretched.
Smallest layer of crowd was highlighted (Control, click on layer) and dark Levels adjustment layer created. Levels layer only was moved to the very back to create the illusion of a fourth row.
To finish, several more layers were inserted in front of and behind the main figure, and painted with splashes of soft colors to create lights and shadows. The same technique used in creating the last row (dark Level adjustment layer) was used to create the shadows on the "ring" wall and floor: crowd template was flipped vertically (upside down), selected, and then shadows painted from the silhouette. Crowd layer was then discarded and Levels layer duplicated, rearranged and overlapped, and opacity turned down.

step 23 of 23
Slight bevel and emboss added to the foreground light bulbs (Thanks, Alan 2641!)

Final result
Votes
| user | voted |
| nanaris | |
| steed | |
| ramesan | |
| Drivenslush | |
| arca | |
| arca | |
| nacho124 | |
| spaceranger | |
| Androla | |
| chandershekhar | |
| Missy | |
| kushpatel | |
| Score: 10 | |
Comments
Pxleyes
Photography and photoshop contests
We are a community of people with
a passion for photography, graphics and art in general.
Every day new photoshop
and photography contests are posted to compete in. We also have one weekly drawing contest
and one weekly 3D contest!
Participation is 100% free!
Just
register and get
started!
Good luck!
Follow us:


© 2015 Pxleyes.com. All rights reserved.
Great work on the SBS!
(5 years and 2865 days ago)GREAT SBS!!
(5 years and 2863 days ago)