
Original image
step 1 of 8
Take the original source, make your first 'tower' and take the source for skyscrapers to find a nice scale and perspective.

step 2 of 8
Create horizontal pipe building from the original source.

step 3 of 8
Put some tower layers together to make a bit more heavy tower for the back and add your horizontal pipe too.

step 4 of 8
Create an opaque glass layer with light pencils and use burn and smudge tools to add some highlights. Make a big glass, so you can take several different looking windows. Make some frames from the original source.
Try different blend modes for your window layer to achieve a bit transparent glow effect.
Try different blend modes for your window layer to achieve a bit transparent glow effect.

step 5 of 8
Make a wavy building texture from the original source. Add a colour layer with blend mode to add the stripes.

step 6 of 8
Make a duplicate of your background skyscraper layer, mirror it horizontally and create new scene with the "Suntrust" -building on the center with a new shape and design. Arrows show some spots to take care.
Clean the bushes and electric wires and stuff, fix the perspective for the skyscrapers and remember to turn the mirrored Suntrust -logo on the right side.
Use your sunset layer to achieve a new sky. Change the colour to little bit blue and grayish with hue/saturation tool and find a nice blend mode (multiply or something) to achieve night time look.
A lot of masking and clone tool work here to make a clean background.

step 7 of 8
Make those small towers from your horizontal pipe source by duplicating, rotating to vertical position and making a mirrorto create a round looking tower. Adjust colours and use layer style outer glow to achieve green and orange glow.
Note some missing cleaning work still seen on the BG.
Note some missing cleaning work still seen on the BG.

step 8 of 8
Adjust overal lightning of the image to make it a little bit darker. Take duplicate of your whole flattened image, adjust levels with levels -tool and use multiply mode with a slight gaussian blur to soften and darken the image colours. Use hue/saturation tool on the topmost layer to get rid of excess colours and saturation.
Clean your window frames, take copy of your window shapes and use layer styles of outer glow with black 'light' to create some depth. Also use layer mode of bevel and emboss for the windows to achieve look where they blend into the buildings.
Flatten your whole image and redefine all edges with selection tools and clean them with pattern tool to make clean edges for everything. Also fix small spots which looks odd and complete the background cleaning.

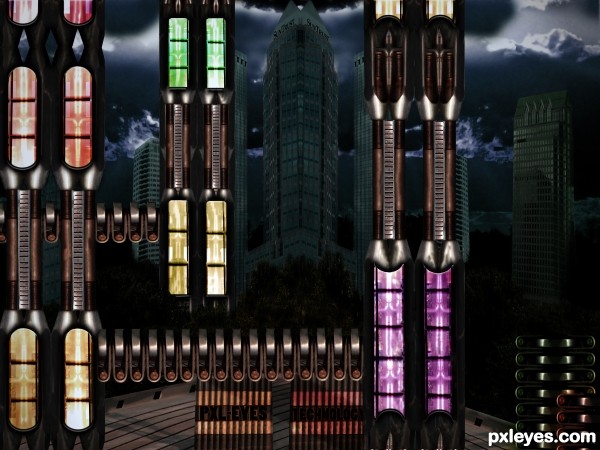
Final result
Pxleyes
Photography and photoshop contests
We are a community of people with
a passion for photography, graphics and art in general.
Every day new photoshop
and photography contests are posted to compete in. We also have one weekly drawing contest
and one weekly 3D contest!
Participation is 100% free!
Just
register and get
started!
Good luck!
Follow us:


© 2015 Pxleyes.com. All rights reserved.