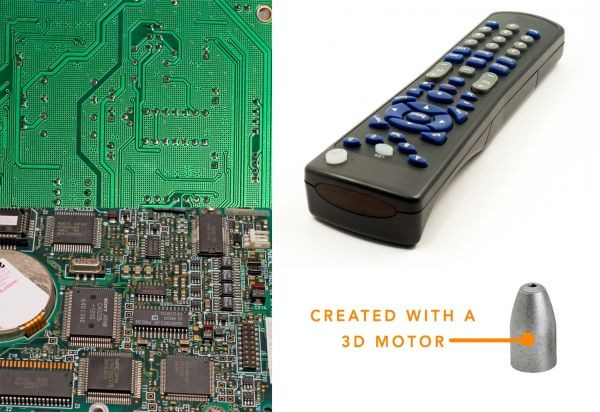
In this tutorial I'm going to show you how to make a nice bullet shot effect. I decided to use a technological object such as a remote control to show a lot of tiny parts flying off after the impact: the circuit board, the buttons, a few chips...
For this tutorial I used Photoshop CS3 and I think is pretty necessary. It also recommended that you still know how to:
- Select an area with the pen tool
- How the liquify filter works (we're not going to use it much but it can be useful for some threatments).
I used these sources:
http://www.adigitaldreamer.com/gallery/displayimage.php?album=6&pos=15http://www.adigitaldreamer.com/gallery/displayimage.php?album=6&pos=9http://www.adigitaldreamer.com/gallery/displayimage.php?album=6&pos=10The bullet used in this tutorial is designed by me with Solidworks 3D Pro but you can find easily a free stock photo of a bullet. And if you don't find it you can use mine, there's no problem.
Ok let's begin!!
Step 1
Ok, here are the sources.
Step 2
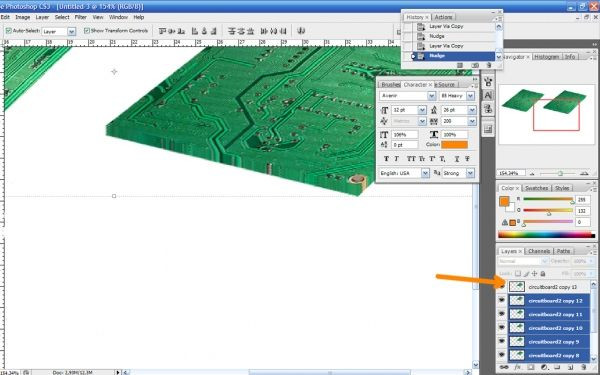
Before beginning to work on our sources let's see this process which is going to be fundamental for our work. The process is: how to make a 3D effect. Let's suppose that we have this layer with a circuitboard and we want to make it tridimensional to get rid of this "flat" effect. Follow the instructions and keep them clear in your mind.
- Duplicate the motherboard layer (Ctrl+J)
- press the "up" key on the keyboard
- Do this a few times (depends on the situaztion may be 2-3 mauy be 8-9 or more...)
- merge all the layers preserving th one on top (view the image below)
- blur the merged layers with a Gaussian blur ->amount=1
- Burn a little th merged layers
- Blur a little the edges of the layer on top
- merge all the layers
- Done! It's not 2D anymore
Step 3
Now let's begin to select some buttons: to make a clean rounded selection use the pen tool and design your path, then right click and "make selection" (feather to zero).
After that, copy your selection in a new layer (so Ctrl+C and Ctrl+V )then work with "liquify" (filter->liquify) to make them rounded and to extend the missing parts (1). If you want to jump this part (1) well be clever and select directly a button which is still ready to be used! As I did in (2). Some cleaning is anyway necessary in both situations, so use carefully the eraser tool.

Step 4
Let's hide those buttons they can be useful later, but we still don't know it.
Now create the first two parts: select with the pen tool the buttons' surface (1) (I hope you get what I mean) and then copy and paste.
Do the same with the part of the box below (2). Now to create the 3D effect on the first part is really easy (look at step 2 of this tutorial) but on part (2) is not so easy. Let's see it in next step

Step 5
Ok we have our selection just made (A) in the previous step, so let's draw the 3D part on a new layer below the (A). Use a brush and if you want a pen tool can be useful (is up to you and your skills) I drawed these "wings" because it's supposed that the surface with buttons is linked to something...well I really don't know I never opened a remote control =)

Step 6
I decided to fill these lttle wings with a pattern. Create a new layer below this shape, select with the magic wand tool (W) the two blanck parts, then go to edit-> fill (choose a 50% grey). Go to blending options and set pattern overlay. Choose the pattern in the image and set his blending option to multiply. Click ok, select the three layers and link them (or merge them if you're really really sure)

Step 7
Ok well done. Now take the circuitboard source and let's make it realistic...as it really fits in the remote control. To do it in perspective you can use the "vanishing point" (filter -> vanishing point) or do it manually with the Edit->Transform->free transform. I recommend you the last one because it's easier for this work and you have an istant feedback of what you're doing. For example here I show how you can distort it: just pressing the Ctrl + click and drag on one of the litle squares around the image you're able to distort and....free transform!!

Step 8
Ok after the previous little lesson about the free transfom let's work seriously on our circuitboard. Duplicate it with Ctrl+J, make the two layers aligned each other, then make the desired perspective using the other layer with the buttons as a reference.

Step 9
Ok now our motherboard is in theright perspective but it doesn't have the right shape: to make it match with the "buttons' layer" move it on top then Ctrl+click on the layer's thumbnail (the layer with the buttons) then Ctrl+Shift+I to select inverse and finally click on the motherboard layer's and press Canc. Give it a volume then.

Step 10
Ok now let's create from zero a chip that will be inserted in our circuitboard. Create a shape layer: use a "rounded rectangle tool" and fill it with a random colour. then go to blnding options and apply these settings.

Step 11
Now place the chips on the circuitboard using the free transform. Then take the original source of the remote control and: select the red light with a pen tool. and clean the edges with the eraser tool
Finally duplicate the layer two times and scale them, changing the opacity to 90% and 80%.

Step 12
Always starting from the main source, select with the pen tool the inferior part of the box.

Step 13
Now let's work with this layer:
- [[5128]] x 5 times = tridimensional effect In the orange circle we've a very nice border, but in the yellow circle you can see that there's some more effort to do
- Preserving the layer on top (in blue), merge the other layers, blur and burn them
- erase carefully the part that you don’t want (look at the short orange arrow)
- copy with the pen tool the grey border we've created in (1) and the entire other part of the box wich lies just below the border...then flip them orizontally (Ctrl+T and then rotate 180°)

Step 14
Align the grey border with the box with the warp tool

Step 15
For comfort I hide the part that is not of our interest now. So: 1 Draw the border on a new layer with a black brush (extract the colour trough the picker tool so it will be the same) 2 Smudge with a soft brush with "hardness" set to 50 3 erase carefully the hard edge and make it more rounded

Step 16
- Create a new layer under the box and paint with grey
- erase the exedent parts on the grey layer and the box layer
- Burn (midtones-exposure to 50) and dodge (highlights-exposure 30) A) I also draw with a brown soft brush those lines just to give more the idea of a box B) For this box I used a different technique: instead of painting with a grey brush, I obtained the part from liquifying very much the layer (after duplicating it of course)
The result is almost the same and is more a reference for our work I don't think these parts will be completely visible at the end.

Step 17
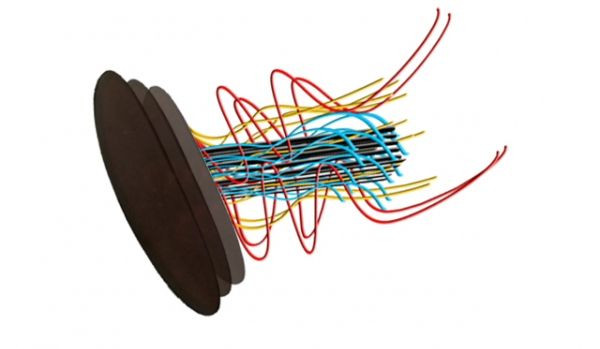
Let's create some electric wires:
- create a new layer
- first we set the brush: press B, choose a 10 px black brush with hardness 90%
- draw some curves and/or straight lines with pen tool
- right click with mouse -> stroke path -> brush (deselect the "simulate pressure" option)
- go to blending options and click "bevel e emboss" and "color overlay" (here you can choose a colour for your wire/s)
- I created some black, yellow, red and cyan wires. Let's link now these wires to the red lights with the help of the eraser tool.
Step 18
Now let's take the other circuitboard image. Our task is to make the perspective of the source matching with the perspective of the remote control. The procedure is the same as for th other circuitboard.

Step 19
So just following the istructions in step 7 and 8 of this tutorial, we match the perspective. And then as we did before:
- superimpose the layer to the reference
- Ctrl+click on the reference's thumbnail
- Ctrl+Shift+I to select inverse, then click on the circuitboard layer and press Canc.
- Done!!

Step 20
A) Of course also for this layer we must create some 3D B) Take again the previous source...let's save a chip it can be useful later. So: -select with the pen tool -rotate -Ctrl+J and right arrow for 5/6 times -Merge and burn the edges

Step 21
A little riepilogue. Now we must think about the bullet shot effect...specially the direction of the bullet and the direction of the smashing pieces.

Step 22
I think that this is the best: the bullet comes from the down-left corner of the image and smash in the middle our remote control making a lot of flying off tiny parts. So let's do that!

Step 23
Herafter some steps can be up to you and your style. Take the first surface with the buttons and split it in two parts: to do so duplicate the layer, apply a layer mask on both of them, and begin to erase some parts with a black brush. Remove carefully the grey buttons. Finally rotate a bit the layers and, when you're sure of your masking, right click on the layer mask's thumbnail and click "apply layer mask".

Step 24
Select with the lasso tool the area near the crash,right click -> feather and type 7 (it depends on your resolution).

Step 25
Then warp: warp carefully the area to distort more the edges. This method allows you to distort only the selected area and give you much more control. Click ok. Look carefully, because even if you have done a clean work, exactly where there was the selection line there should be a weird 1pixel line that shows your (white) background.
Remove it with a history brush, but also the blur tool with a 2-3 pixels brush can be enough. If we don't use the feather during this process..the result is horrible. This is my warp threatment. Move carefully the edges of the grip always taking care of what you're moving also at the base of your selection.

Step 26
- Use also some liquify and find a waved effect on this plastic "shreds".
- Create a 3D effect. The orange "bracket" indicates the area we should erase.
- erase the parts we don't need (look at the two arrows starting from down)
- Now we've a 3D effect also for our part wich is smashed (or better smashing) by the bullet.

Step 27
1 On the last edges, nearer to the impact, work with the smudge tool with hardness 70%. More moving effect!! 2 Another very very cool threatment you can do on your layers is to work with smudge tool ON the layer mask!! Using a grunge brush for example you can create these crashed tiny edges.

Step 28
Your task is to work with this process on every one of the layers created since now (exept lights and wires). I'm not going to show you again for every layer just because there's nothing new to see,the process is always the same. Follow the steps from 23 to 27 you've all the informations you need. It's also up to you and your style how to crash the parts, but the process is quite easy. I made a riepilogue again. Now that we broke the layers, let's put them in a correct logical order. So the box wich contains the technical parts as first and last layers, while the circuitboards, the lights, the wires...in the middle.

Step 29
- Now apply a drop shadow to every layer with these settings
- Apply also a red "color overlay" to the lights (always from the blending options)
- Don't apply any shadow to the last layer

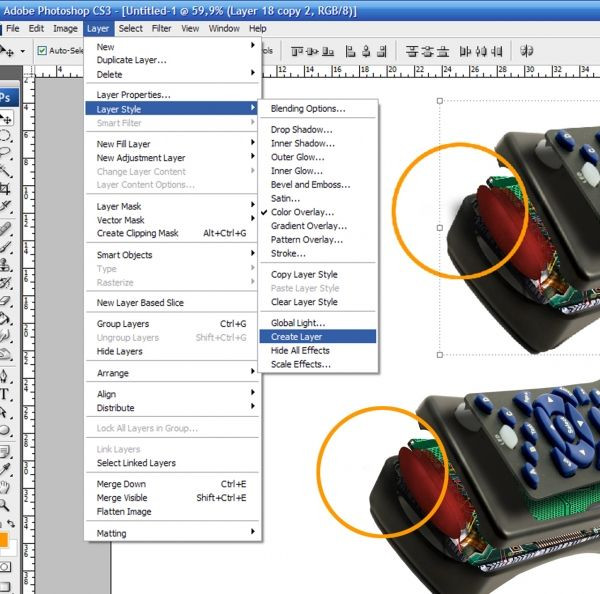
Step 30
We have a shadow that goes out from the main shape. It's the shadow of the lights; so click on the lights, go to Layer style -> create layer. Now we have the lights and the shadow as two splitted layers. Erase the excess shadow with the eraser tool (or a layer mask is better if you're not still sure of the position of the red lights)
Step 31
Now DUPLICATE all the layers and merge them. This way we can create the crash effect faster and better. select with the lasso tool some parts as in the image below. Lasso tool -> Ctrl+C -> Ctrl+V

Step 32
We have this layer now. So.
- duplicate and rotate (to obtain more pieces)
- merge the two layers
- Go to filter-> blur -> radial blur. Set to "zoom" , amount "37", quality "best".
- Create some variants and combine them. Use some warp and/or liquify to manipulate your effect.
- FInally merge them

Step 33
We can delete the "merged remote control" we don't need it anymore. Then
- Place the layer we've created in the previous step in the middle of the remote control.
- Now the tedious part of the work: create dozens of little parts flying off.
So the process is the same: lasso tool -> Ctrl+C -> Ctrl+V -> make it 3D -> smudge tool. from every component some tiny parts flying off.

Step 34
Place these tiny pieces into the "smashing point". Then take the bullet, convert it into a smart object, then go to filter->blur->motion blur and apply.

Step 35
Is a smart object...so it's smart! The filter applied is not destructive: it means that we've a layer mask available for the filter and we can change the setings of the filter when we want just double clicking on the filter thumbnail...cool! So let's erase with a blach brush the filter where we don't want it.

Step 36
The bullet is ready, and looks like is moving. Now take one of the blue buttons and smash it. So erase some parts and smudge the edges as you want: remember to give an "exploding" effect.
Create (be clever dupicate the ones you've previously done) some flying off tiny parts, which follow the bullet after the impact. Smudge them in the correct direction not randomly

Step 37
You are at this point now. (I desatured the image just to show you better but don't do it!!) The flying pieces should follow the orange directions, so create some new or move, rotate, transform the ones you've previously created.

Step 38
Place correctly also the blue button just near the impact point. Remeber to add the shadow manually. Take a soft black brush, draw the shadow, set the layer to multiply and opacity to 65%.

Step 39
1 Let's suppose that the bullet hit a chip and smash into two pieces. In step 20 we saved a chip from our source. Well broke it (as in steps 23-27) and smudge it in the correct direction.
2 Well add a shadow also here so: new layer->soft black brush->multiply mode and opacity to 65%

Step 40
Open a new document. Drag the remote control with the bullet and all the tiny parts and merge them. Call this layer "remote control" Then new layer-> foreground colour white, background colour a dark green. Filter -> render -> clouds

Step 41
Apply blur, levels, Hue/saturation threatment as showed (in order!) Dodge with a big soft brush the too dark areas (in the orange circles). Set the range of the dodge to "shadows" and the exposure to 20

Step 42
Create a new layer and make a black to transparent gradient. Set the mode to multiply (so also black to white can be ok because the multiply hides the whites).

Step 43
New layer, fill it with black, go to filter -> render -> lens flare. Set the blending mode to overlay

Step 44
This the scheme with the opacity and mode settings

Step 45
our image is a little too dark now et's adjust it. So: merge all the layers but NOT the clouds. Go to image-> adjustments -> shadow/highlight and use these settings to reveal some informations...

Step 46
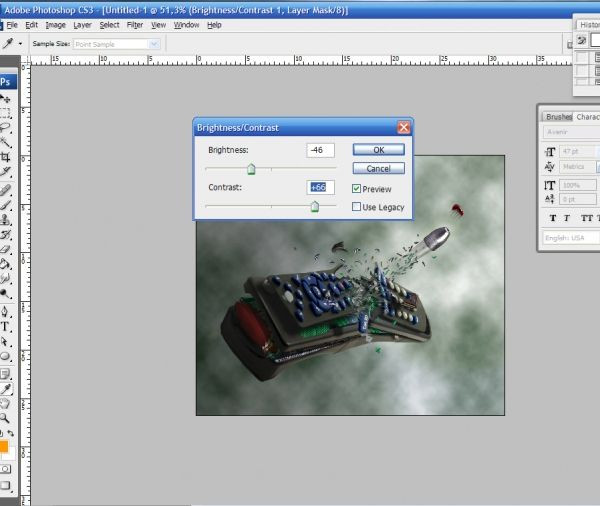
Flatten the image on a new document. Play with the brightness-contrast until the image looks good. I suggest you to use the adjustment layer and not to go to Image .-> adjustments. To create a new layer click on the half black half white circle at the bottom of the palette menu.
Step 47
Here it is my result!! Pretty cool =D I hope you enjoyed this (puff pant very long) tutorial and sorry for my "italianish" english. Thanks!
